**Is it possible to use Miniconda for ARM and Intel processors on an ARM-based Mac? Yes, it is possible, and we will show you how!**
Generated with Grok
As an ML Engineer or Data Scientist, you want to use both flavors (x86\_64 & Apple Silicon) of Miniconda or Anaconda if you are working on product development for both architectures. In this tutorial, we will show you how to install Miniconda for both processor architectures on an ARM-based Mac.
We've no time to waste. Let's start with the installation process!
## Prerequisites
Before installing Miniconda, make sure your setup meets the following requirements:
- Mac with ARM chip (M Series), We use a MacBook Pro 16-inch (2024) with an Apple M4 Max chip.
- Installed [Homebrew](https://brew.sh){:target="_blank" rel="noopener"}
Homebrew is a package manager for macOS and Linux. We use [Homebrew](/software-engineering/homebrew-package-manager/) for all apps that we install on our MacBook. The advantage is that we can update all apps with a single command. That saves us a lot of time and makes us much more productive.
Next, you need to install the package wget. It is a free command line program for downloading files from the Internet.
You can use the following command:
```bash
brew install wget
```
Great! Now, we are ready to start with the conda installation.
## Installation of Miniconda for x86\_64
First, you have to open the terminal app. Then, you need to check whether your terminal is in rosetta mode. For this, you can use the following command in your terminal:
```bash
uname -m
# Desired Output: x86_64
```
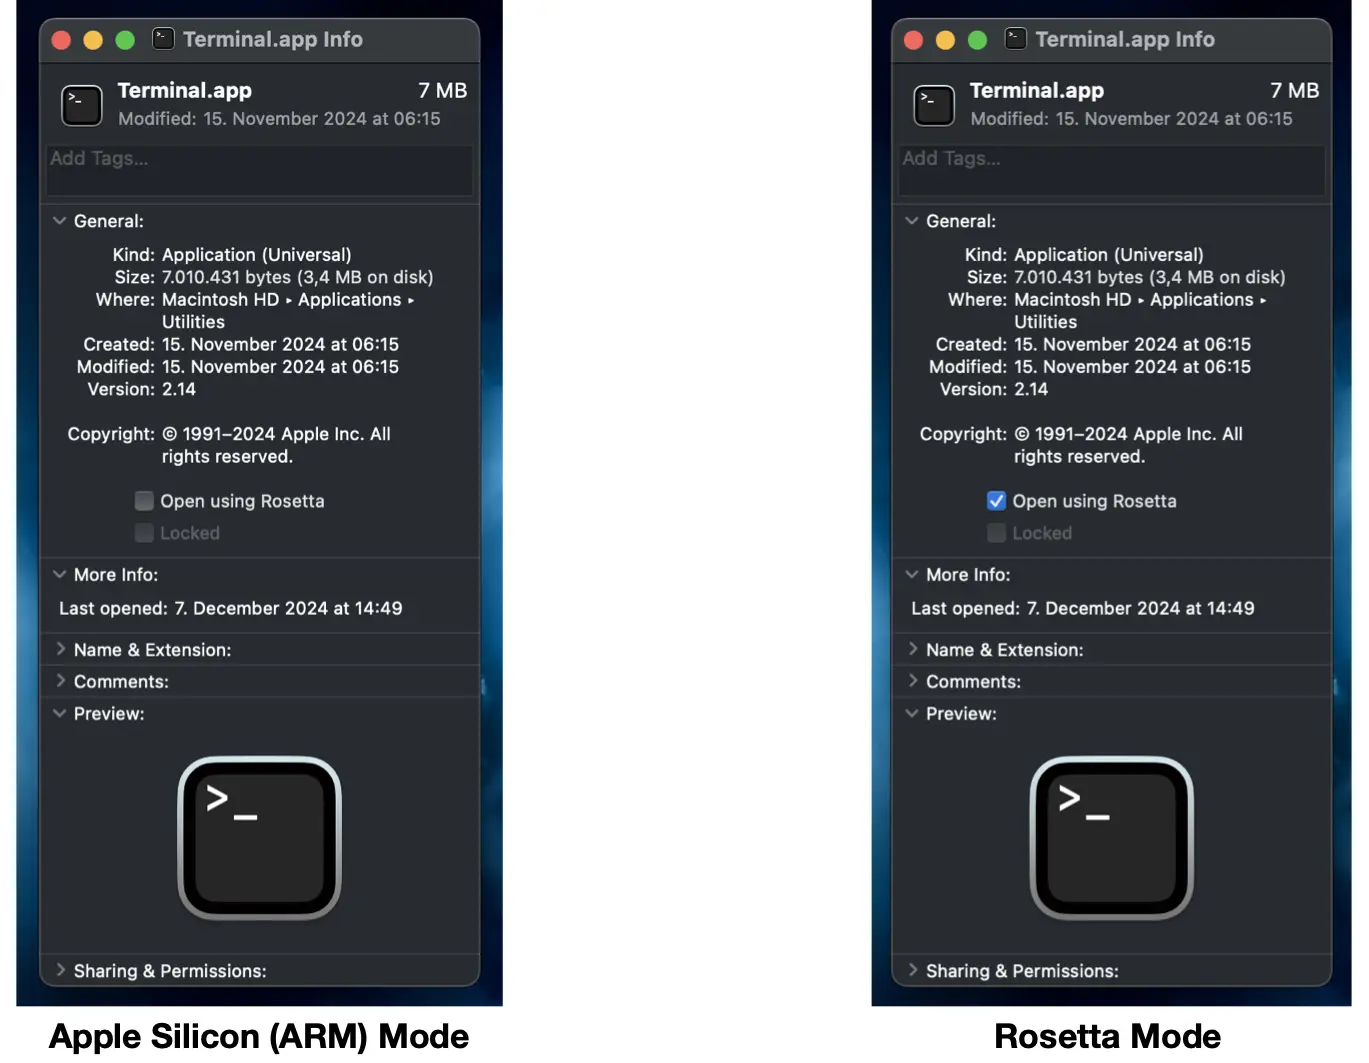
You can also check in the Finder whether the rosetta mode is activated. To do this, right-click on the terminal app and select "Get Info". Then, you can see whether the check mark is set for rosetta mode. If not, set the check mark.
Apple Terminal App
Next, we download the Miniconda x86\_64 bash installer. You can use the following command:
```bash
wget https://repo.anaconda.com/miniconda/Miniconda3-latest-MacOSX-x86_64.sh
```
Then, you have to run the installer:
```bash
sh ./Miniconda3-latest-MacOSX-x86_64.sh
```
Click enter until you can agree to the license with yes.
Next, you have to enter the installation path (e.g., `/Users/[your user name]/miniconda3-x86_64`). The main idea is to preserve the default installation path for the Apple Silicon Miniconda installation.
Then, enter no for conda init. We don't want to add the conda initializers to our terminal startup scripts. We create a custom startup script later.
## Installation of Miniconda for Apple Silicon
First, you have to switch your terminal into silicon mode! For this, open the "Get info" menu of your terminal app and uncheck the box "Open using Rosetta".
Next, you have to check whether your terminal is in silicon mode:
```bash
uname -m
# Desired Output: arm64
```
Your terminal is in the right mode when you see the output `arm64`!
Next, you need to download the Miniconda silicon bash installer. You can use the following command:
```bash
wget https://repo.anaconda.com/miniconda/Miniconda3-latest-MacOSX-arm64.sh
```
Run the installer with the following command:
```bash
sh ./Miniconda3-latest-MacOSX-arm64.sh
```
Click enter until you can agree to the license with yes. Then, you have to install it at the default path `/Users/[your user name]/miniconda3/` .
Enter no for conda init! We don't want to add the conda initializers to our terminal startup scripts.
## Configuration for both installations
In this section, we create a custom startup script for the conda init process. The script activates based on the terminal mode (rosetta or Apple silicon) x86\_64 or the Apple silicon installation of Miniconda.
You can configure this in four easy steps:
1\. Create a custom startup script for conda init:
```bash
mkdir ~/.custrc/ && touch ~/.custrc/.condarc
```
2\. Open and add the conda init functions to the script:
```bash
# open the conda startup script
nano ~/.custrc/.condarc
```
Paste the following [code](https://towardsdatascience.com/how-to-install-miniconda-x86-64-apple-m1-side-by-side-on-mac-book-m1-a476936bfaf0){:target="_blank" rel="noopener"} in the startup script (change it to your user name).
```bash
init_conda() {
# >>> conda initialize >>>
conda_path_silicon="/Users/[your user name]/miniconda3"
__conda_setup="$('${conda_path_silicon}/bin/conda' 'shell.zsh' 'hook' 2> /dev/null)"
if [ $? -eq 0 ]; then
eval "$__conda_setup"
else
if [ -f "${conda_path_silicon}/etc/profile.d/conda.sh" ]; then
. "${conda_path_silicon}/etc/profile.d/conda.sh"
else
export PATH="${conda_path_silicon}/bin:$PATH"
fi
fi
unset __conda_setup
# <<< conda initialize <<<
}
init_conda_x86_64() {
# >>> conda initialize >>>
conda_path_x86_64="/Users/[your user name]/miniconda3-x86_64"
__conda_setup="$('${conda_path_x86_64}/bin/conda' 'shell.zsh' 'hook' 2> /dev/null)"
if [ $? -eq 0 ]; then
eval "$__conda_setup"
else
if [ -f "${conda_path_x86_64}/etc/profile.d/conda.sh" ]; then
. "${conda_path_x86_64}/etc/profile.d/conda.sh"
else
export PATH="${conda_path_x86_64}/bin:$PATH"
fi
fi
unset __conda_setup
# <<< conda initialize <<<
}
```
3\. Open the file .zshrc:
```bash
nano ~/.zshrc
```
If the file does not exists, create the file (`touch ~/.zshrc`).
Add the following code to the file:
```bash
# init conda based on architecture
source ~/.custrc/.condarc
if [[ $(uname -m) == 'x86_64' ]]; then
init_conda_x86_64
echo "conda x86_64 is activated"
else
init_conda
echo "conda silicon is activated"
fi
```
4\. Finally, open your rosetta enabled terminal. You will get the output “conda x86\_64 is activated”. Then open the silicon enabled terminal (default terminal). You will get the output “conda silicon is activated”.
Great! Now, you can use the x86_64 and ARM-based Miniconda side-by-side on your Mac.
Happy coding!
💡 Do you enjoy our content and want to read super-detailed guides about AI Engineering? If so, be sure to check out our premium offer!