**Do you want to know how to get your OpenAI API Key? Yes, then this article is for you.**

<figure class="">
  <img src="/assets/img/blog/2023-08-10-obtain-your-openai-api-key-with-these-3-simple-steps/header_img.webp"
       alt="Getting Your OpenAI API Key in Three Easy Steps"><figcaption>
      Photo by <a href="https://unsplash.com/@maria_shalabaieva">Mariia Shalabaieva</a> on <a href="https://unsplash.com/" target="_blank" rel="noopener">Unsplash</a>

    </figcaption></figure>


Many developers want to start developing GPT-powered apps. But first, they need an API Key to get access to OpenAI’s advanced language models, such as GPT-3 or GPT-4. With this key, you can integrate LLM functionalities (code writing, translation and much more) into your apps, and that makes your apps smarter.

<div class="ad-banner" style="margin-bottom: 0.7rem;">
    <hr class="hr-text" data-content="Advertisement*">
    <a href="/out/elevenlabs/" target="_blank" rel="sponsored nofollow noopener"><img src="../../assets/img/ads/elevenlabs.webp" alt="ElevenLabs Partner*" nopin="nopin"></a>
    <small style="display: block; margin-bottom: 0.5rem; margin-top: 0.5rem;"><strong>✨ Read without banner ads? </strong><a href="https://steady.page/en/tinztwins-hub/about" target="_blank" rel="noopener">Become a member</a> or <a href="https://steady.page/en/log_in?publication=tinztwins-hub" target="_blank" rel="noopener">log in</a></small>
</div>

In this tutorial, we’ll guide you through three steps to get and manage your OpenAI API key. In addition, we’ll show you how to use this key in your apps.

We’ve no time to waste. Let’s start!

## Benefits of an OpenAI API Key
You’re probably asking yourself what are the advantages of an API key. Here’s a list of four benefits:

1. **Up-to-date and advanced models:** You have access to OpenAI’s latest and most advanced models. With these models, you can perform complex natural language tasks.
2. **Easy Integration:** You can easily integrate the OpenAI API into your existing applications. For that, you can use frameworks like [LangChain](https://www.langchain.com/){:target="_blank" rel="noopener"} or [LlamaIndex](https://www.llamaindex.ai/){:target="_blank" rel="noopener"}. The integration of the API makes your apps more intelligent and interactive.
3. **High Scalability:** The API can handle large amounts of data, which makes it interesting for many companies.
4. **High Efficiency:** You don’t have to train the models from scratch, which is costly and time-consuming. You can use the models directly via the API. That makes them cost, resource and time efficient in usage.
    
OpenAI’s API speeds up the development of new AI applications enormously, as you don’t have to worry about creating and deploying the models.

<div class="ad-banner" style="margin-bottom: 0.7rem;">
    <hr class="hr-text" data-content="Explore our premium blog articles">
    <a href="https://tinztwinshub.com/membership"><img src="../../assets/img/ads/premium_2.webp" alt="Explore our premium blog articles" nopin="nopin"></a>
    <small style="display: block; margin-bottom: 0.5rem; margin-top: 0.5rem;"><strong>✨ Read without banner ads? </strong><a href="https://steady.page/en/tinztwins-hub/about" target="_blank" rel="noopener">Become a member</a> or <a href="https://steady.page/en/log_in?publication=tinztwins-hub" target="_blank" rel="noopener">log in</a></small>
</div>

## Obtaining and using your OpenAI API Key
### 1. Create an OpenAI Account
First, you need to create an OpenAI account, if you don’t already have an account. Visit the [OpenAI website](https://openai.com/){:target="_blank" rel="noopener"} and click the “Sign Up” button. Enter your details and create your account.

Next, you have to check your emails for a verification link. Click on it and confirm your OpenAI account. Then log in to the OpenAI website with your login details. After that, you see a page where you have to click on “API”.

Great, now you can see the OpenAI welcome page! You have successfully set up your OpenAI account.

<div class="ad-banner" style="margin-bottom: 0.7rem;">
    <hr class="hr-text" data-content="Advertisement*">
    <a href="/out/elevenlabs/" target="_blank" rel="sponsored nofollow noopener"><img src="../../assets/img/ads/elevenlabs.webp" alt="ElevenLabs Partner*" nopin="nopin"></a>
    <small style="display: block; margin-bottom: 0.5rem; margin-top: 0.5rem;"><strong>✨ Read without banner ads? </strong><a href="https://steady.page/en/tinztwins-hub/about" target="_blank" rel="noopener">Become a member</a> or <a href="https://steady.page/en/log_in?publication=tinztwins-hub" target="_blank" rel="noopener">log in</a></small>
</div>

### 2. Setting up your API Key
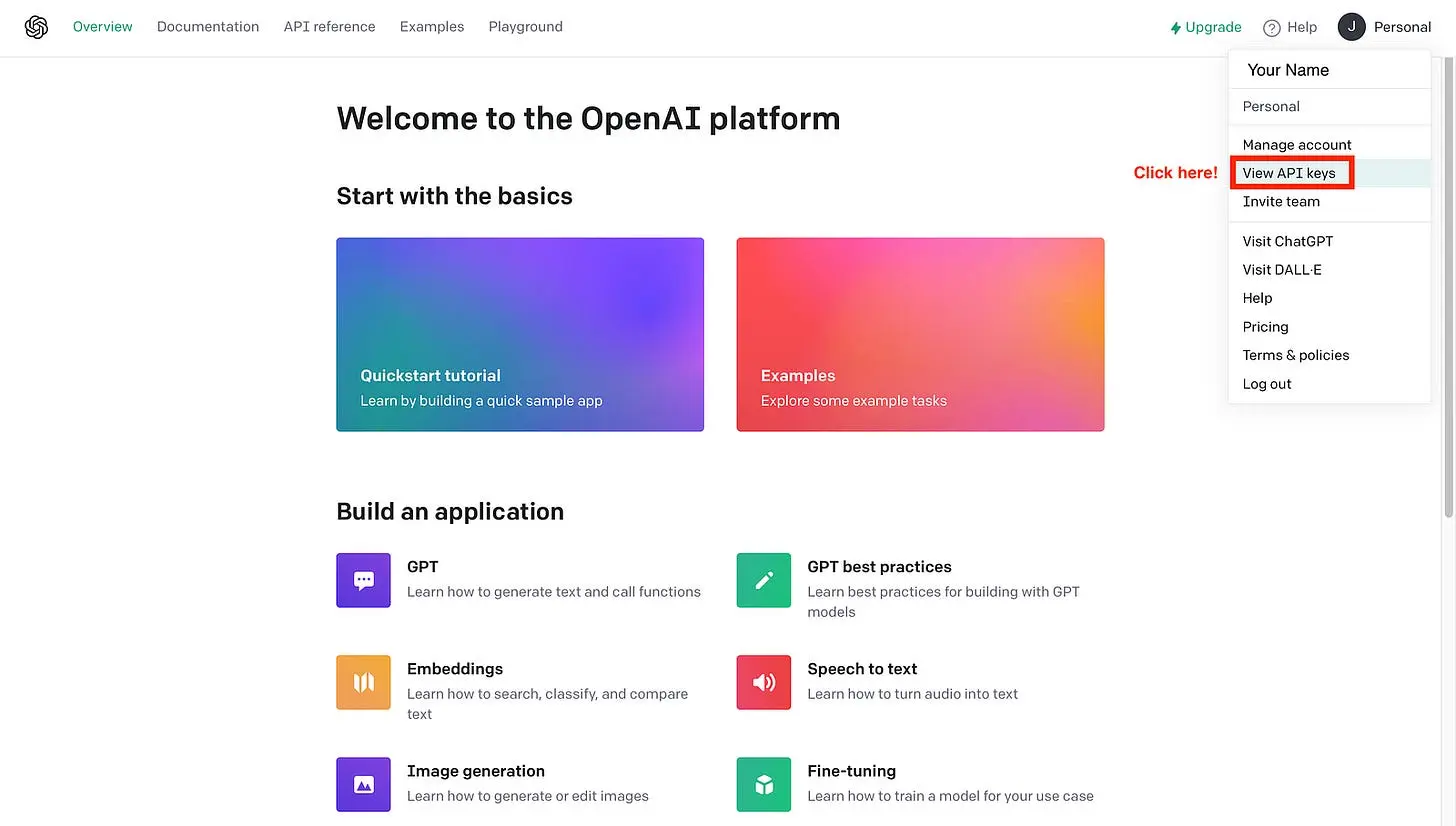
Once you are on the main OpenAI website, you have to click on your account logo. Then, click on “View API keys”.

<figure class="">
  <img src="/assets/img/blog/2023-08-10-obtain-your-openai-api-key-with-these-3-simple-steps/openai_api_website.webp"
       alt="OpenAI API website (Image by authors)"><figcaption>
      OpenAI API website (Image by authors)

    </figcaption></figure>


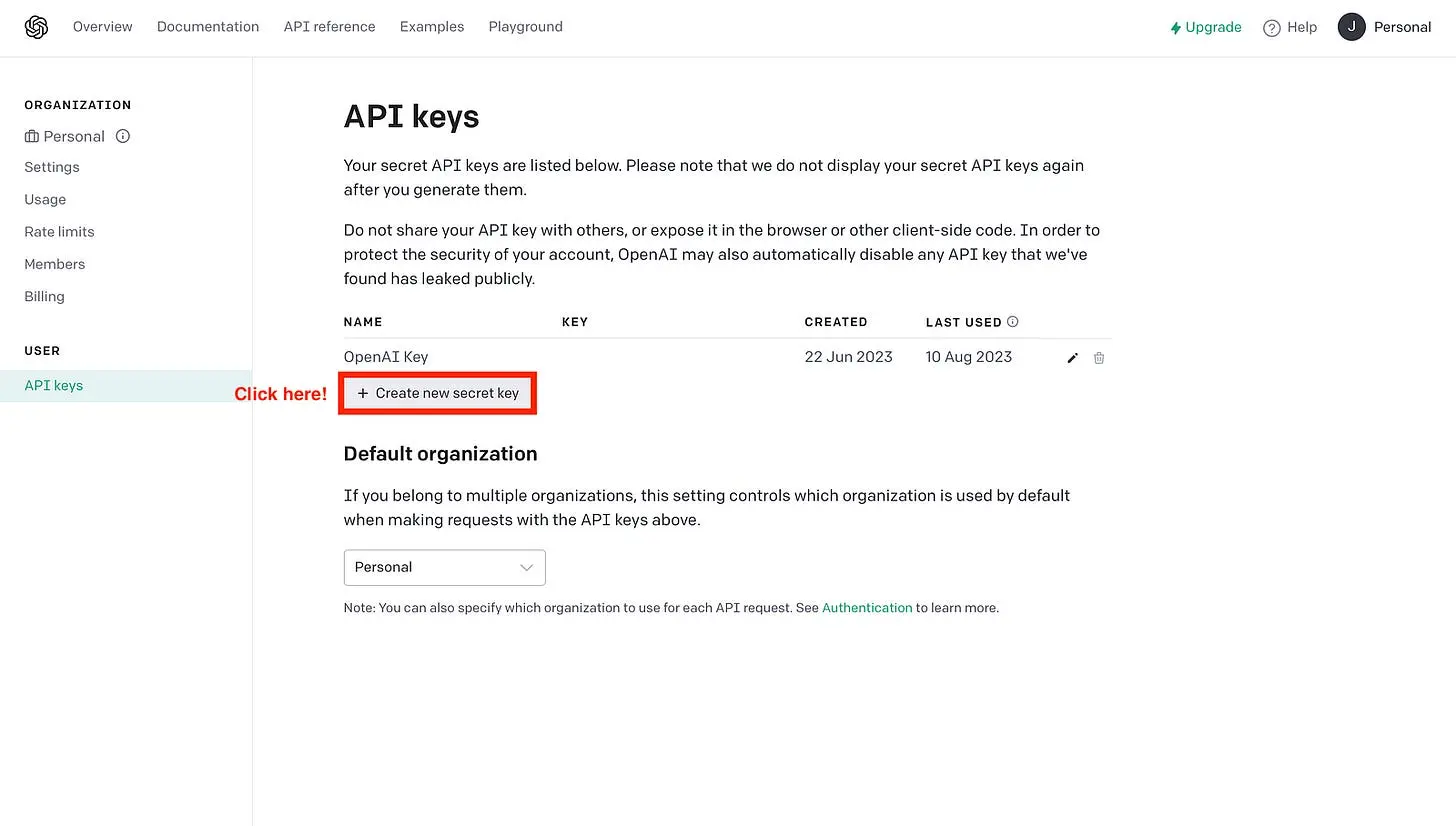
Now, you should see the API keys page. On this page, you click on “Create new secret key”.

<figure class="">
  <img src="/assets/img/blog/2023-08-10-obtain-your-openai-api-key-with-these-3-simple-steps/openai_api_website_api_keys.webp"
       alt="OpenAI API website — API keys (Image by authors)"><figcaption>
      OpenAI API website — API keys (Image by authors)

    </figcaption></figure>


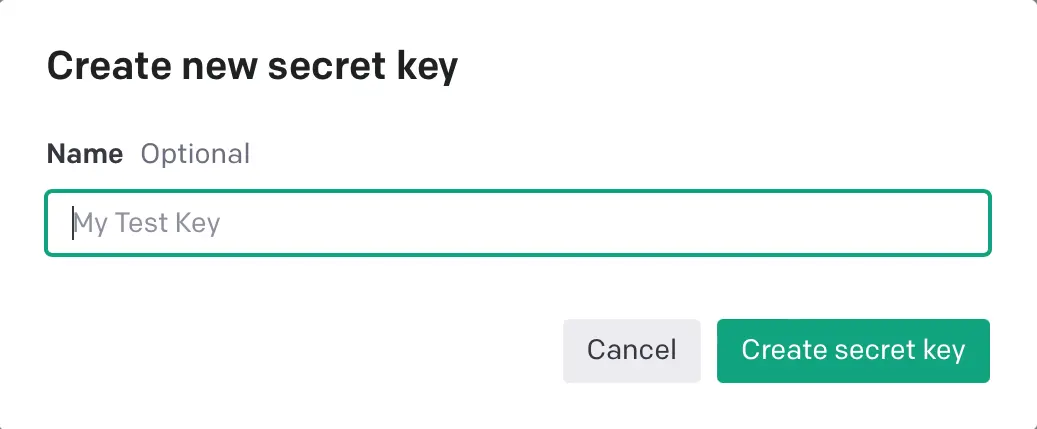
Give the API key a name of your choice and click “Create secret key”.

<figure class="">
  <img src="/assets/img/blog/2023-08-10-obtain-your-openai-api-key-with-these-3-simple-steps/openai_api_website_naming_of_the_api_key.webp"
       alt="OpenAI API website — Naming of the API key (Image by authors)"><figcaption>
      OpenAI API website — Naming of the API key (Image by authors)

    </figcaption></figure>


The API name doesn’t matter. The name is only for you so that you know what you are using the key for.

<div class="ad-banner" style="margin-bottom: 0.7rem;">
    <hr class="hr-text" data-content="Advertisement*">
    <a href="/out/castmagic/" target="_blank" rel="sponsored nofollow noopener"><img src="../../assets/img/ads/castmagic.webp" alt="CastMagic Partner*" nopin="nopin"></a>
    <small style="display: block; margin-bottom: 0.5rem; margin-top: 0.5rem;"><strong>✨ Read without banner ads? </strong><a href="https://steady.page/en/tinztwins-hub/about" target="_blank" rel="noopener">Become a member</a> or <a href="https://steady.page/en/log_in?publication=tinztwins-hub" target="_blank" rel="noopener">log in</a></small>
</div>

Next, copy the key! You get free credit for API access. Save your key in a safe place because it will not display again. Later, you will need the API key to authenticate your applications with OpenAI.

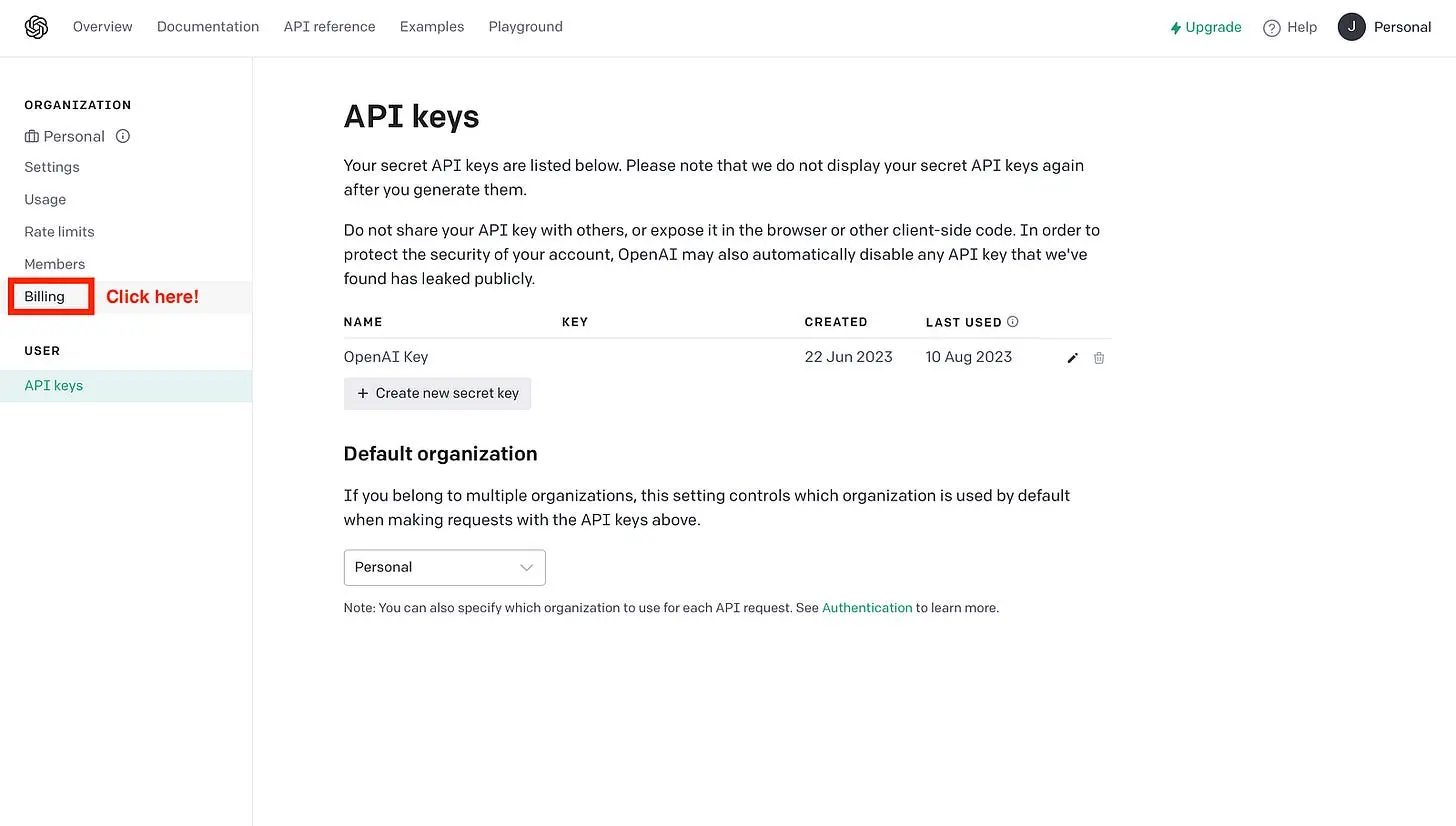
You don’t necessarily have to enter a payment method. First, you can use your free credit. However, there may be rate limits. To avoid this, it is best to deposit a payment method. For that, navigate to the “Billing” page.

<figure class="">
  <img src="/assets/img/blog/2023-08-10-obtain-your-openai-api-key-with-these-3-simple-steps/openai_api_website_go_to_billing.webp"
       alt="OpenAI API website — Go to Billing. (Image by authors)"><figcaption>
      OpenAI API website — Go to Billing. (Image by authors)

    </figcaption></figure>


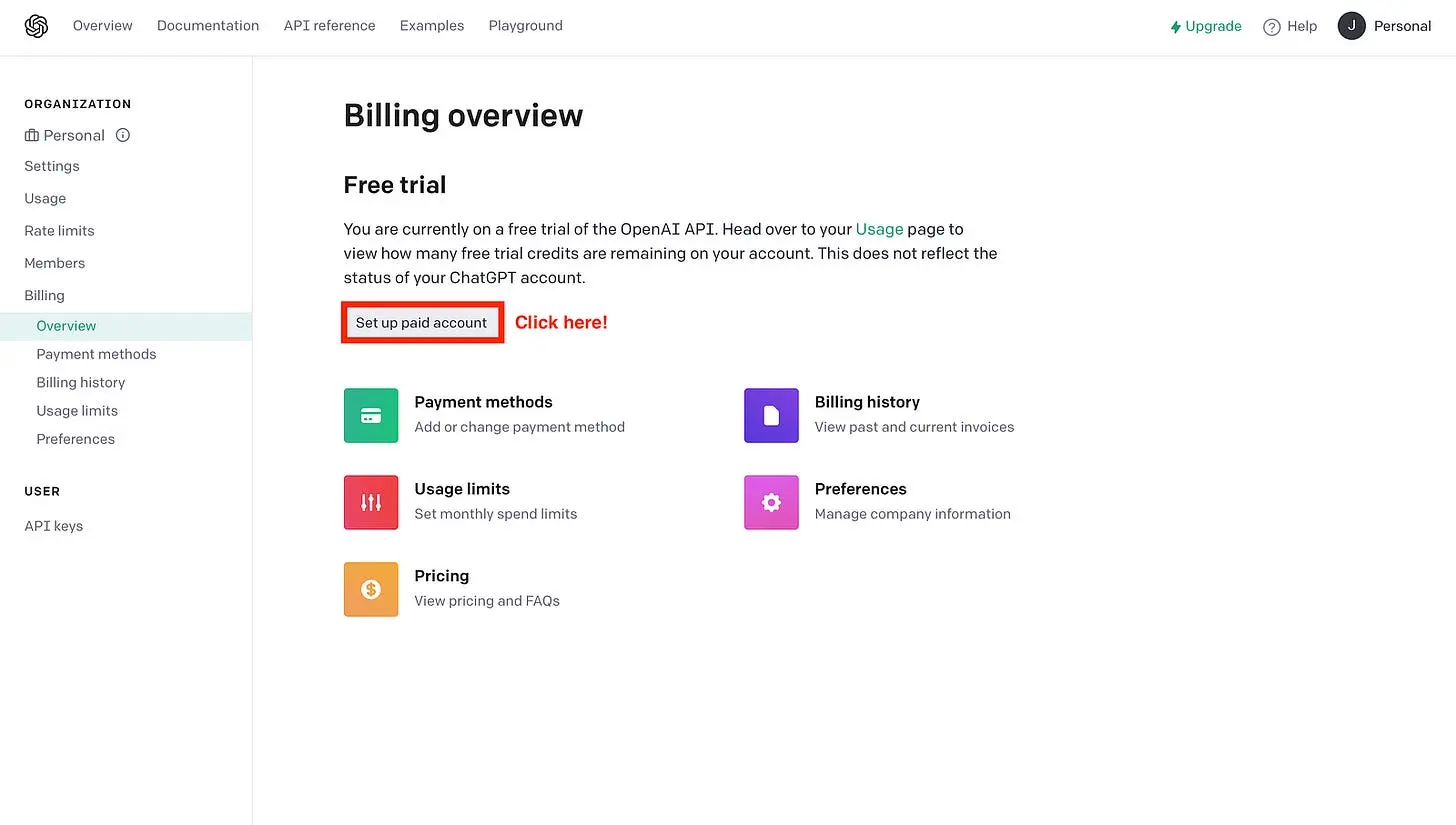
Then, you should see the option “Set up paid account”. Click on it!

<figure class="">
  <img src="/assets/img/blog/2023-08-10-obtain-your-openai-api-key-with-these-3-simple-steps/openai_api_website_billing_overview.webp"
       alt="OpenAI API website — Billing Overview (Image by authors)"><figcaption>
      OpenAI API website — Billing Overview (Image by authors)

    </figcaption></figure>


Then, select whether you are an individual or an organization. Next, enter your credit card and billing details, then click “Set up payment method”.

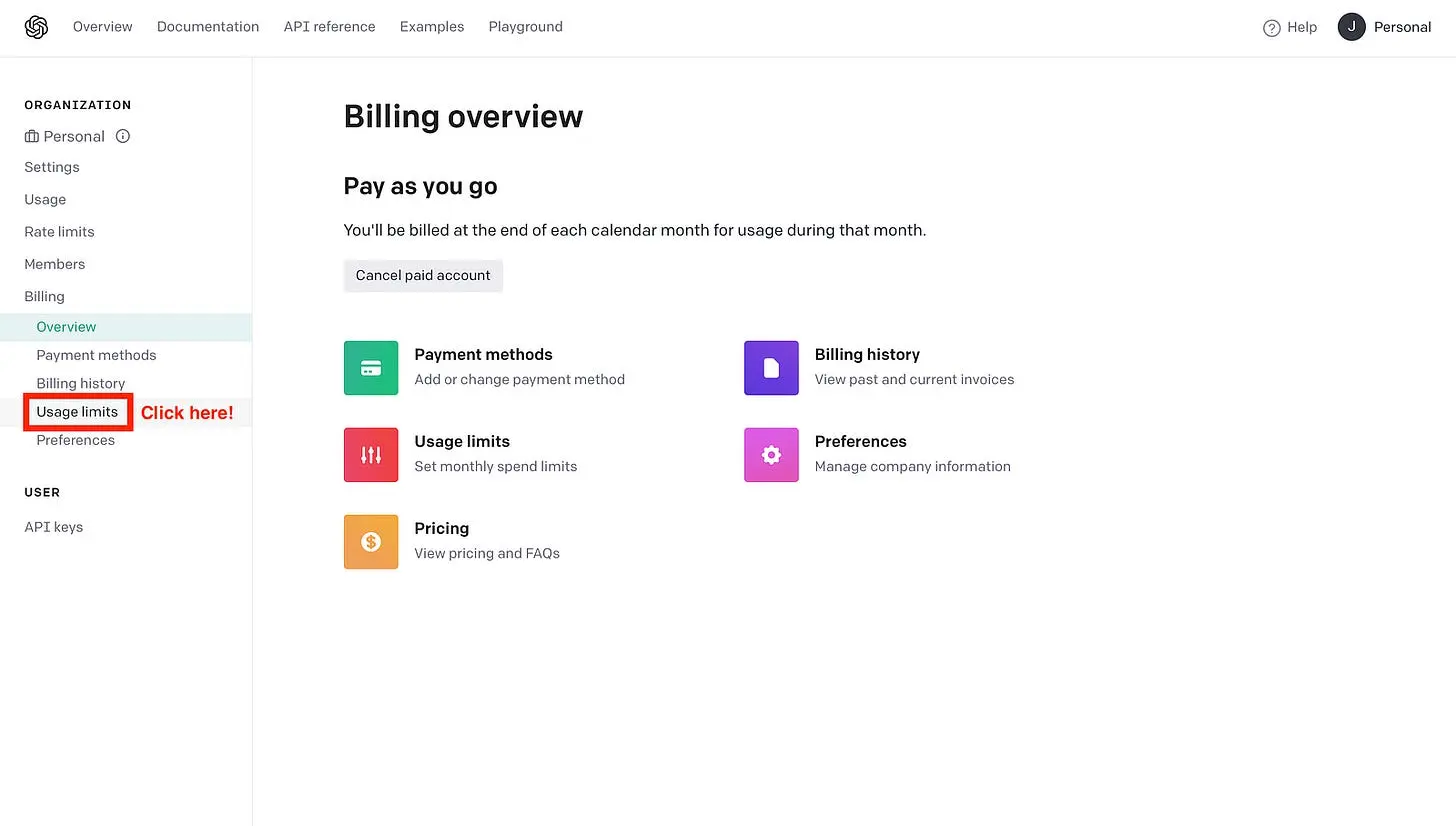
You probably ask yourself how you can manage your usage. No worries, we show you these steps here as well.

The first thing you should do is limit the usage of the OpenAI API so that you don’t have any problems with expenses. To do this, go to the “Usage limits” section.

<figure class="">
  <img src="/assets/img/blog/2023-08-10-obtain-your-openai-api-key-with-these-3-simple-steps/openai_api_website_go_to_usage_limits.webp"
       alt="OpenAI API website — Go to Usage limits (Image by authors)"><figcaption>
      OpenAI API website — Go to Usage limits (Image by authors)

    </figcaption></figure>


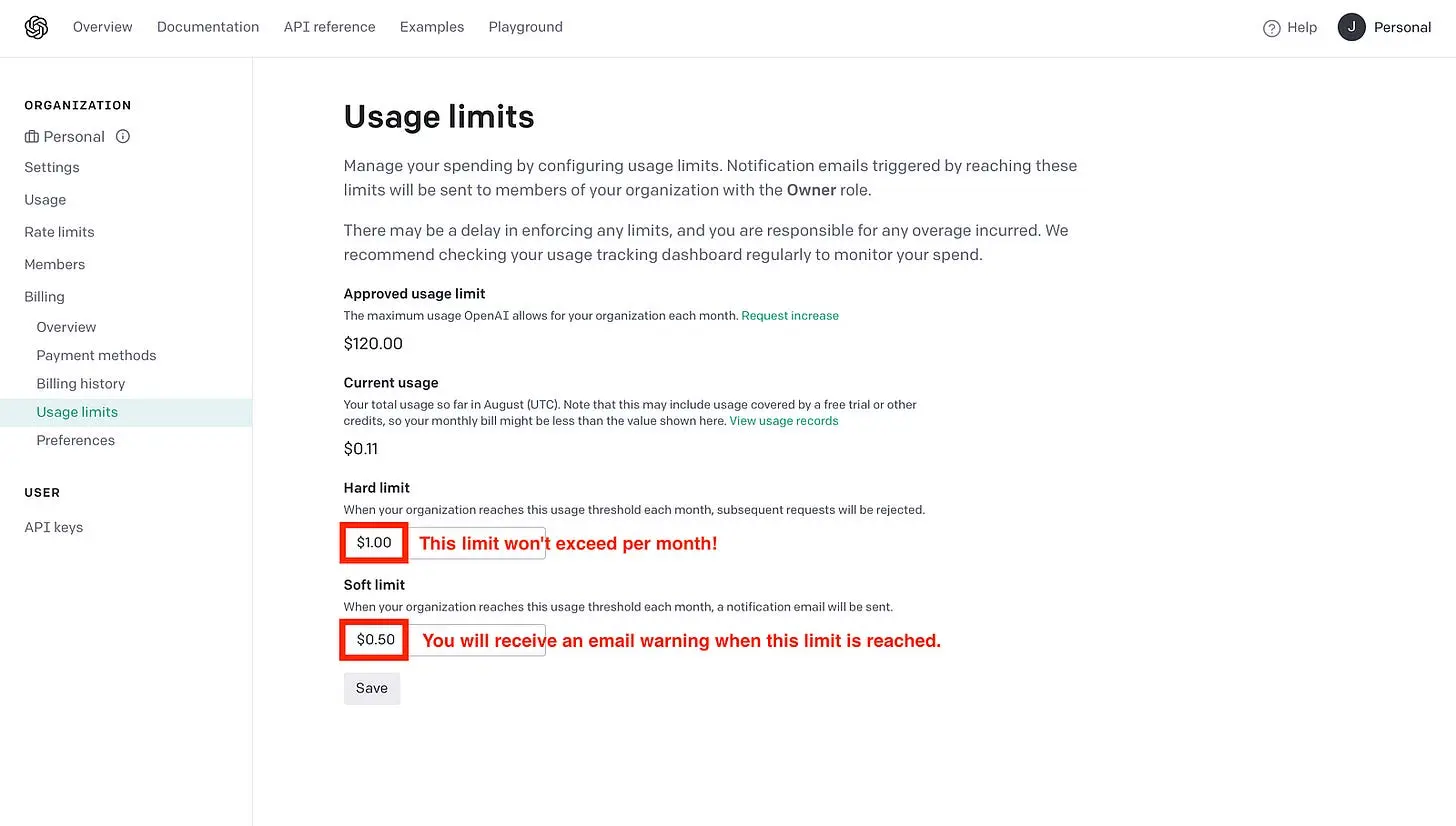
And then choose the limits you prefer.

<figure class="">
  <img src="/assets/img/blog/2023-08-10-obtain-your-openai-api-key-with-these-3-simple-steps/openai_api_website_usage_limits.webp"
       alt="OpenAI API website — Usage limits (Image by authors)"><figcaption>
      OpenAI API website — Usage limits (Image by authors)

    </figcaption></figure>


The API is blocked when you reach the hard limit. You, therefore, pay at most the price that you enter in the hard limit item. So there are no nasty surprises!

Next, we’ll look at how you can use the API key in your apps and track your API usage.

### 3. Use of the API Key
Now we have everything set up for the API. Let’s look at how to use the API key in your apps.

**Set the API Key as an environment:**

You can set your API key as an environment variable. In the following, you can see how you can do this:

```bash
# macOS and linux
$ export OPENAI_API_KEY=[Insert your API Key here.]

# windows
$ set OPENAI_API_KEY=[Insert your API Key here.]
```

Insert your API key at the marked point and delete the square brackets as well. Next, you can use frameworks like LangChain or LlamaIndex to build your own GPT-powered apps.

Great, but you probably want to know how to track the API usage of your apps.

**Tracking API Usage:**

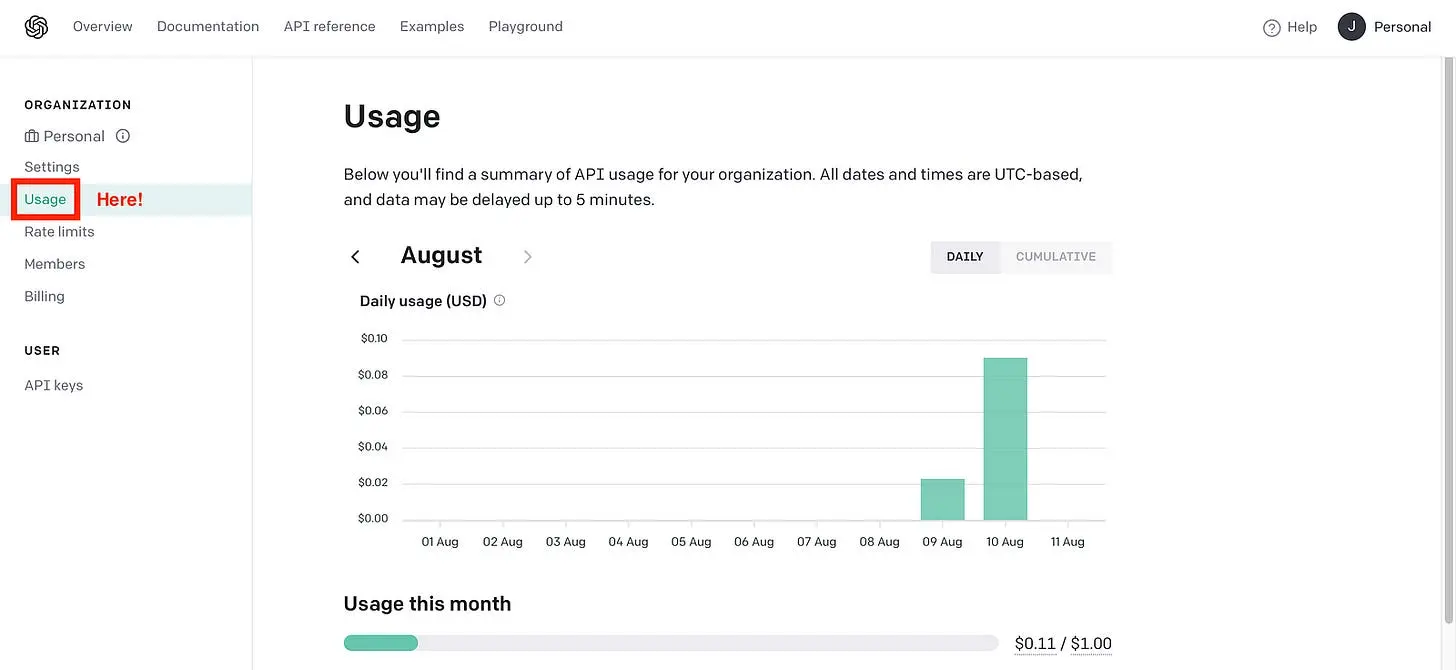
As a final step, we show you how to track the API usage. For this, you need to go to the “Usage” section. There you can see your costs for every day.

<figure class="">
  <img src="/assets/img/blog/2023-08-10-obtain-your-openai-api-key-with-these-3-simple-steps/openai_api_website_usage.webp"
       alt="OpenAI API website — Usage (Image by authors)"><figcaption>
      OpenAI API website — Usage (Image by authors)

    </figcaption></figure>


Great, that’s it! Now, it’s your turn. Use the API and create amazing apps.

Thanks so much for reading. **Have a great day!**

<div class="ad-banner">
  <hr>
  💡 Do you enjoy our content and want to read super-detailed guides about AI Engineering? If so, be sure to check out our premium offer!

  <div style="text-align: center; margin-top: 0.7rem;">
    <a href="https://steady.page/en/tinztwins-hub/about" class="btn btn--primary">Unlock Premium</a>      
  </div>
</div>

<div class="ad-banner">
    <hr class="hr-text" data-content="Our Merch Shop">
    <a href="https://shop.tinztwinshub.com/merch/"><img src="../../assets/img/ads/ai_and_coding_merch.webp" alt="AI and Coding Merch" nopin="nopin"></a>
    <small style="display: block; margin-bottom: 0.5rem; margin-top: 0.5rem;"><strong>✨ Read without banner ads? </strong><a href="https://steady.page/en/tinztwins-hub/about" target="_blank" rel="noopener">Become a member</a> or <a href="https://steady.page/en/log_in?publication=tinztwins-hub" target="_blank" rel="noopener">log in</a></small>
</div>