**[MQTT](https://mqtt.org/){:target="_blank" rel="noopener"} stands for Message Queuing Telemetry Transport. It is a messaging protocol for IoT devices with resource constraints. It is specialized for low bandwidth and high latency environments, making it an ideal protocol for machine-to-machine (M2M) communication.**
Photo by Zan on Unsplash
MQTT works according to the publisher/ subscriber principle with a central broker. This principle means that the sender and receiver have no direct connection. The senders publish the data on a topic, and all recipients who have subscribed to this topic receive the data.
In this post, we will introduce the basic functionalities of MQTT. We also show how to set up a secure MQTT broker with Docker. In a second article, we will create an MQTT Publisher and Subscriber in Python using this MQTT Broker. So be curious about the second article. But now we start with the first article. 😉
The steps are the following:
1. **MQTT basics**
2. **Technical requirements**
3. **Set up an MQTT Broker with Docker**
4. **MQTT Explorer**
5. **Conclusion**
6. **Useful links**
## MQTT basics
The MQTT protocol connects IoT devices. We can use it for various purposes, such as Smart Homes or the Industrial Internet of Things (IIoT). There are sensors (publishers), actuators (subscribers) and a broker (topics). An example is below.
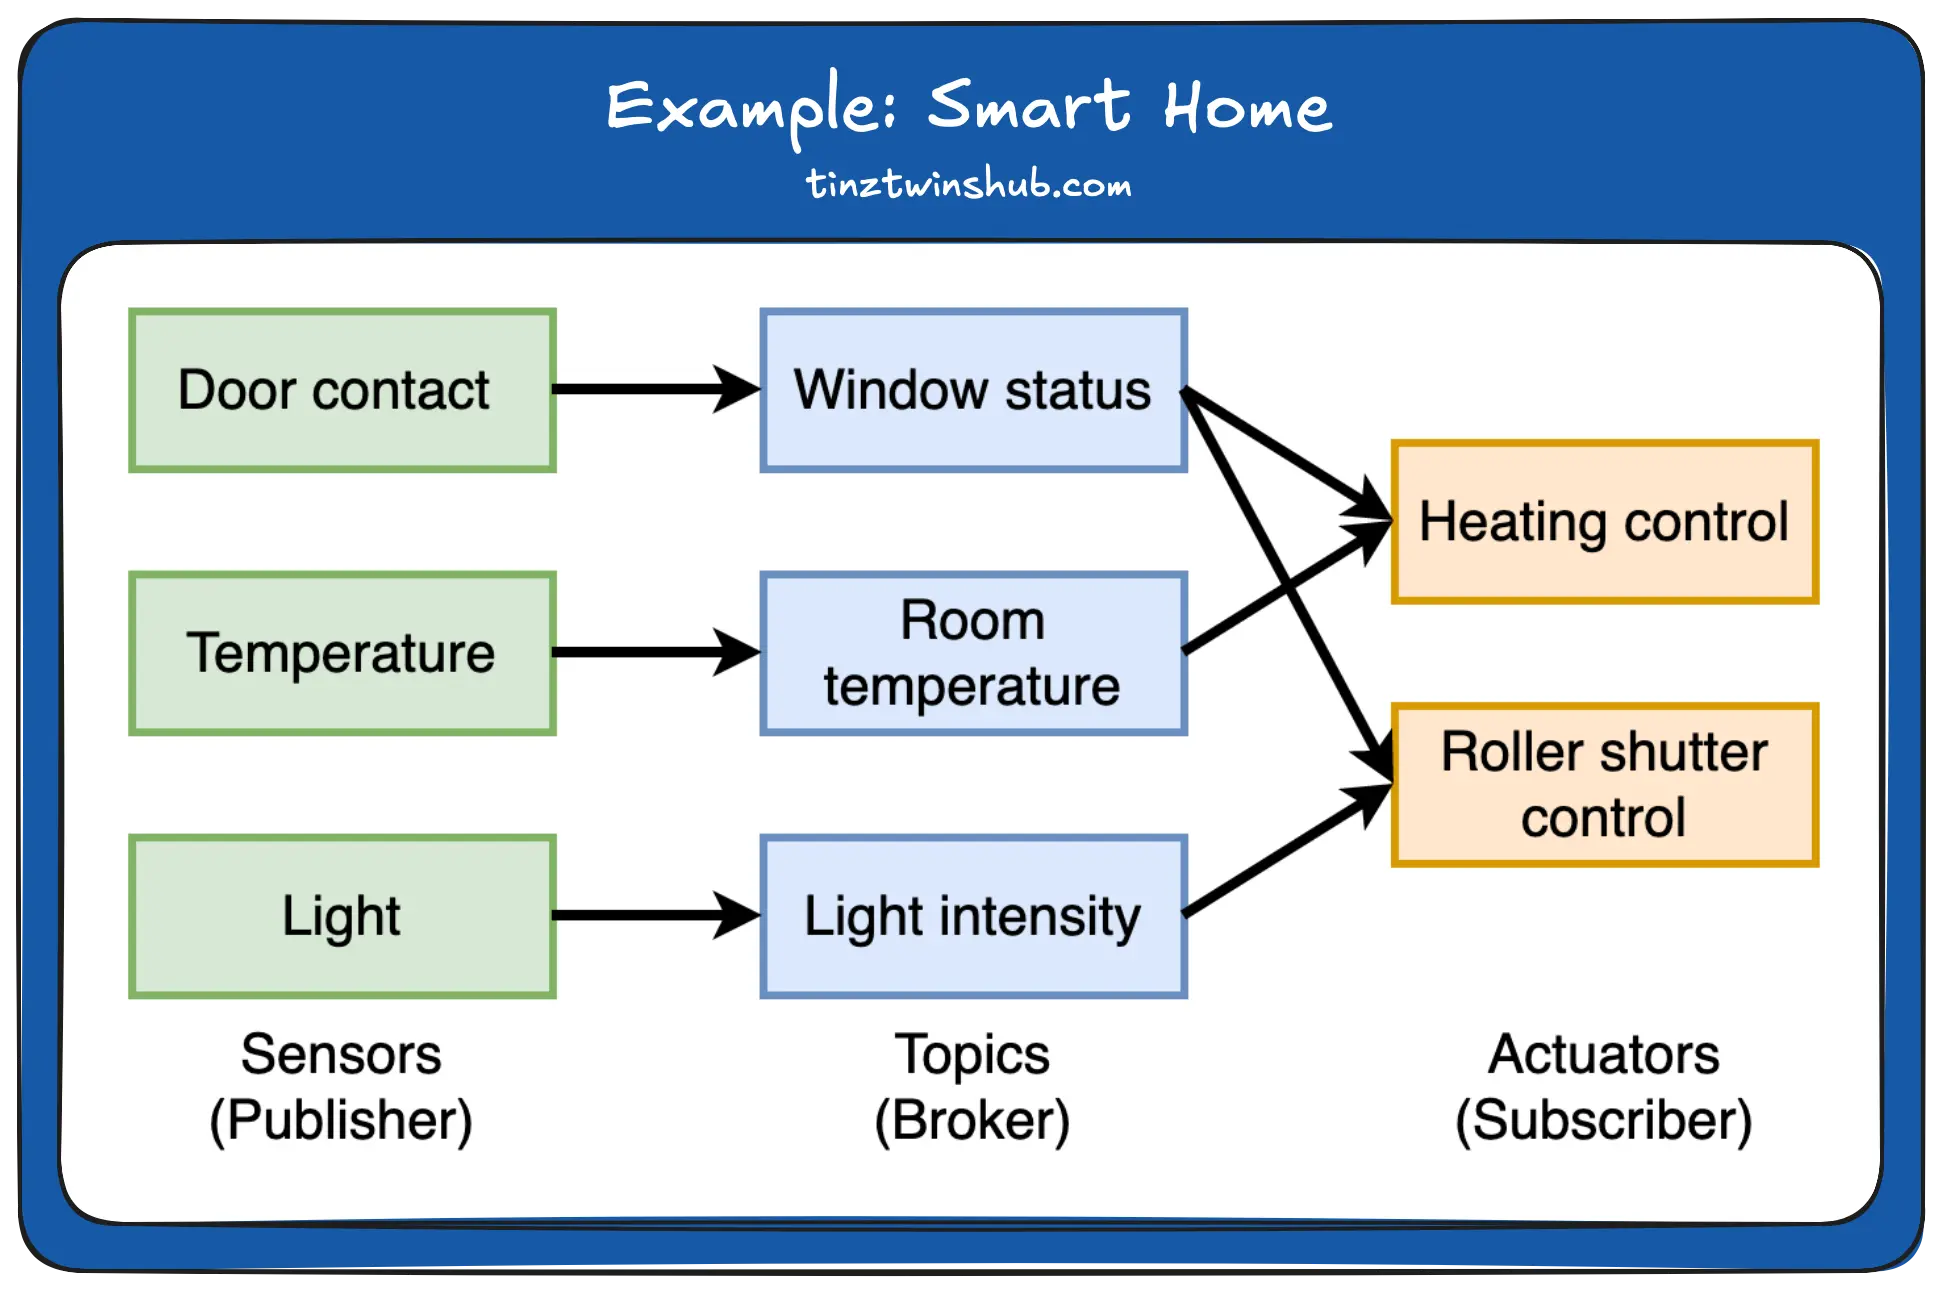
On the left side, we see the sensors: door contact, temperature and light. These sensors publish their values on an MQTT broker. An MQTT broker is a server that manages the topics. The topics are window status, room temperature and light intensity. On the right side, we have the actuators: heating control and roller shutter control. The actuators react to sensor values.
**Example 1:** Heating only starts when the temperature is too low and there is no open window.
**Example 2:** The shutters only go down when the light intensity is low and there is no open window.
With MQTT, you can automate your home or industrial processes with less effort. Furthermore, MQTT offers different quality of service levels (QoS).
**QoS levels:**
* once at most (0): Message sent once at most.
* at least once (1): Message transfer at least once.
* exactly once (2): Message transmit exactly once.
A broker usually supports all QoS levels. In the publisher and subscriber, you can set the QoS levels. That was enough theory! Let’s continue with the practical part. 😀
## Technical requirements
You will need the following prerequisites:
* The latest version of Docker must be installed on your machine. If you do not have it installed yet, please follow the [instructions](https://docs.docker.com/get-docker/){:target="_blank" rel="noopener"}.
* The latest version of Docker Compose must be installed on your machine. Please follow the [instructions](https://docs.docker.com/compose/install/){:target="_blank" rel="noopener"}.
* Access to a bash (macOS, Linux or Windows).
## Set up an MQTT Broker with Docker
First, you should check that you have Docker installed correctly. Enter the following command in a terminal of your choice:
```bash
$ docker --version
# Example output: $ Docker version 20.10.22
```
If the installation is correct, you can see the Docker version (Maybe you already have a newer Docker version). You can check the same for the Docker Compose installation.
```bash
$ docker-compose --version
# Example output: $ Docker Compose version v2.15.1
```
Yeah. 😀 Everything is okay. The Docker installation was successful.
Next, we set up a secure MQTT broker with Docker. Create a folder to store all the files from this tutorial. For example, call the folder `broker`. In this folder, you create a file with the name `docker-compose.yml`. Please add the following content to the file.
```yaml
version: '3.8'
services:
mosquitto:
container_name: mosquitto-mqtt
image: eclipse-mosquitto:latest
volumes:
- ./config:/mosquitto/config/
- mosquitto_data:/mosquitto/data
- mosquitto_log:/mosquitto/log
ports:
- '1883:1883'
- '8883:8883'
environment:
TZ: 'Europe/Berlin'
networks:
- mqtt
restart: always
networks:
mqtt:
volumes:
mosquitto_data:
mosquitto_log:
```
Let’s take a look at the service in detail. First, we define the Docker Compose file format version, here `3.8`. Then we define the service with the name `mosquitto`. After that, we set the name of the Docker Container, here `mosquitto-mqtt`. We use the Docker Image [`eclipse-mosquitto:latest`](https://hub.docker.com/_/eclipse-mosquitto){:target="_blank" rel="noopener"} from [DockerHub](https://hub.docker.com/){:target="_blank" rel="noopener"}.
Next, we come to the definition of the volumes. Please create a folder called `config` and a folder called `keys` in the directory `/broker/`. In the following, we discuss which files you need in the two folder `keys` und `config`.
**Folder** `keys`**:**
This folder contains the certificates and a script for generating the certificates. Let’s have a look at the script for generating the certificates (This is an example script.).
```bash
#!/bin/bash
# Relative Distinguished Names (RDNs).
# - CN: Common Name
# - OU: Organizational Unit
# - O: Organization
# - L: Locality
# - S: State Or Province Name
# - C: Country Name
# check which operating system (only macOS or linux)
if [[ "$OSTYPE" =~ ^darwin ]]; then
COMMON_NAME=$(scutil --get ComputerName)
fi
if [[ "$OSTYPE" =~ ^linux ]]; then
COMMON_NAME=$(hostname)
fi
echo ${COMMON_NAME}
SUBJECT_CA="/C=DE/ST=Berlin/L=Berlin/O=my-organisation/OU=CA/CN=$COMMON_NAME"
SUBJECT_SERVER="/C=DE/ST=Berlin/L=Berlin/O=my-organisation/OU=Server/CN=$COMMON_NAME"
SUBJECT_CLIENT="/C=DE/ST=Berlin/L=Berlin/O=my-organisation/OU=Client/CN=$COMMON_NAME"
function generate_CA ()
{
echo "$SUBJECT_CA"
openssl req -x509 -nodes -sha256 -newkey rsa:2048 -subj "$SUBJECT_CA" -days 365 -keyout ca.key -out ca.crt
}
function generate_server ()
{
echo "$SUBJECT_SERVER"
openssl req -nodes -sha256 -new -subj "$SUBJECT_SERVER" -keyout server.key -out server.csr
openssl x509 -req -sha256 -in server.csr -CA ca.crt -CAkey ca.key -CAcreateserial -out server.crt -days 365
}
function generate_client ()
{
echo "$SUBJECT_CLIENT"
openssl req -new -nodes -sha256 -subj "$SUBJECT_CLIENT" -out client.csr -keyout client.key
openssl x509 -req -sha256 -in client.csr -CA ca.crt -CAkey ca.key -CAcreateserial -out client.crt -days 365
}
function copy_keys_to_certs ()
{
cp ca.crt ../config/certs/
cp server.crt ../config/certs/
cp server.key ../config/certs/
}
generate_CA
generate_server
generate_client
copy_keys_to_certs
```
In the script, we generate the certificates with OpenSSL. OpenSSL is an open-source implementation of the (SSL and) TLS protocol. First, we read out the computer name for Linux or Mac. We use this name later for the common name (CN). The CN is the fully qualified name for the system. For static DNS, use the hostname or IP address.
Then, we define the subject for the Certificate Authority (CA), the client and the server certificate. You can replace the entries in the subject individually. If you would like to take a closer look at the topic of encryption, you can read the following [OpenSSL tutorial](https://www.cs.toronto.edu/~arnold/427/19s/427_19S/tool/ssl/notes.pdf){:target="_blank" rel="noopener"}. The tutorial shows very clearly how encryption and signatures work.
In the next step, we define four functions. The explanation is below:
* `generate_CA()`: In this function, we generate the files for the CA (`ca.crt` (public certificate) and `ca.key` (private key)). The CA certificate is valid for 365 days. You are welcome to choose a different number.
* `generate_server()`: This function creates a certificate request (CSR)(`server.csr`) containing the public key and some other information (name, address, organization, etc.). The CSR is then signed by a trusted third party (CA) using the CA’s private key `ca.key` and converted into a certificate (`server.crt`). `-CAcreateserial` creates a file `ca.srl` containing a counter of how many certificates have been signed by this CA. The server certificate is valid for 365 days. We get the two files: `server.crt` and `server.key`.
* `generate_client()`: We do the same for the client certificate as for the server certificate. The only difference is the name of the certificate. We get the two files: `client.crt` and `client.key`.
* `copy_keys_to_certs()`: Then we copy the relevant certificates for the MQTT broker into the `config/certs`folder so that the broker can find the certificates.
Create a script with the name `make_keys.sh` in the folder `/keys`. Paste the code discussed above into the script and save it. Then execute the following command in the folder `/keys` in your terminal:
```bash
$ bash make_keys.sh
```
The script generates the certificates for the CA, the server and the client. In addition, we copy all relevant certificates for the server to the `config` folder. Next, we look at which files still need to be in the `config` folder.
**Folder**`config`**:**
This folder contains the MQTT broker configuration stuff. First, create a file called `mosquitto.conf` in the `/config`folder. For more information on the `mosquitto.conf` file, see the [mosquitto.org](https://mqtt.org/){:target="_blank" rel="noopener"} website. Add the following content to the file `mosquitto.conf`.
```plaintext
listener 1883
listener 8883
persistence true
persistence_location /mosquitto/data/
log_dest file /mosquitto/log/mosquitto.log
allow_anonymous false
password_file /mosquitto/config/mosquitto.passwd
cafile /mosquitto/config/certs/ca.crt
certfile /mosquitto/config/certs/server.crt
keyfile /mosquitto/config/certs/server.key
require_certificate true # true: client needs certificates, false: client needs no certificates
use_identity_as_username false # false: client authenticates as normal (user, password), for more see https://mosquitto.org/man/mosquitto-conf-5.html
```
First, we define that our broker will access ports 1883 (unencrypted) and 8883 (encrypted). The broker can operate in an unencrypted and an encrypted mode. We also set the `persistence` variable to true. If we set the variable to true, connection, subscription and message data are written to disk in mosquitto.db at the location specified by the Docker Compose file (volume `mosquitto_data`). We store the logs of the broker in the volume `mosquitto_log`. The variable `allow_anonymous` describes whether we allow anonymous login. We set the variable to false because we do not allow anonymous login to our MQTT broker. Next, we set the path to our password file. Please create a file with the name `mosquitto.passwd` in the `/config` folder. Open the file and add the following content.
```plaintext
mosquitto:$6$oF7jfj7Ex178nHBT$uGjmdm2GTQ9yKHPTSGJZnuJVUOmOTqlCD9R1hLWGfITv5Z/YdZDWbzZea5EECadwPlRuxO56wjeQbFj5Kp/UEg==
```
The file `mosquitto.passwd` sets the username to “mosquitto” and the password to “mosquitto”. You see the encrypted password.
Next, we add the path to the required certificates (`ca.crt`, `server.crt` and `server.key`). We set the variable `require_certificate` to true so that clients have to use certificates. We also activate the user/ password authentication.
In the next step, we specify the ports in the Docker Compose file. We also set the time zone. In our case, for example, Berlin. Furthermore, define a Docker network for the broker and specify that the container should always restart.
Your final file structure should look like this:
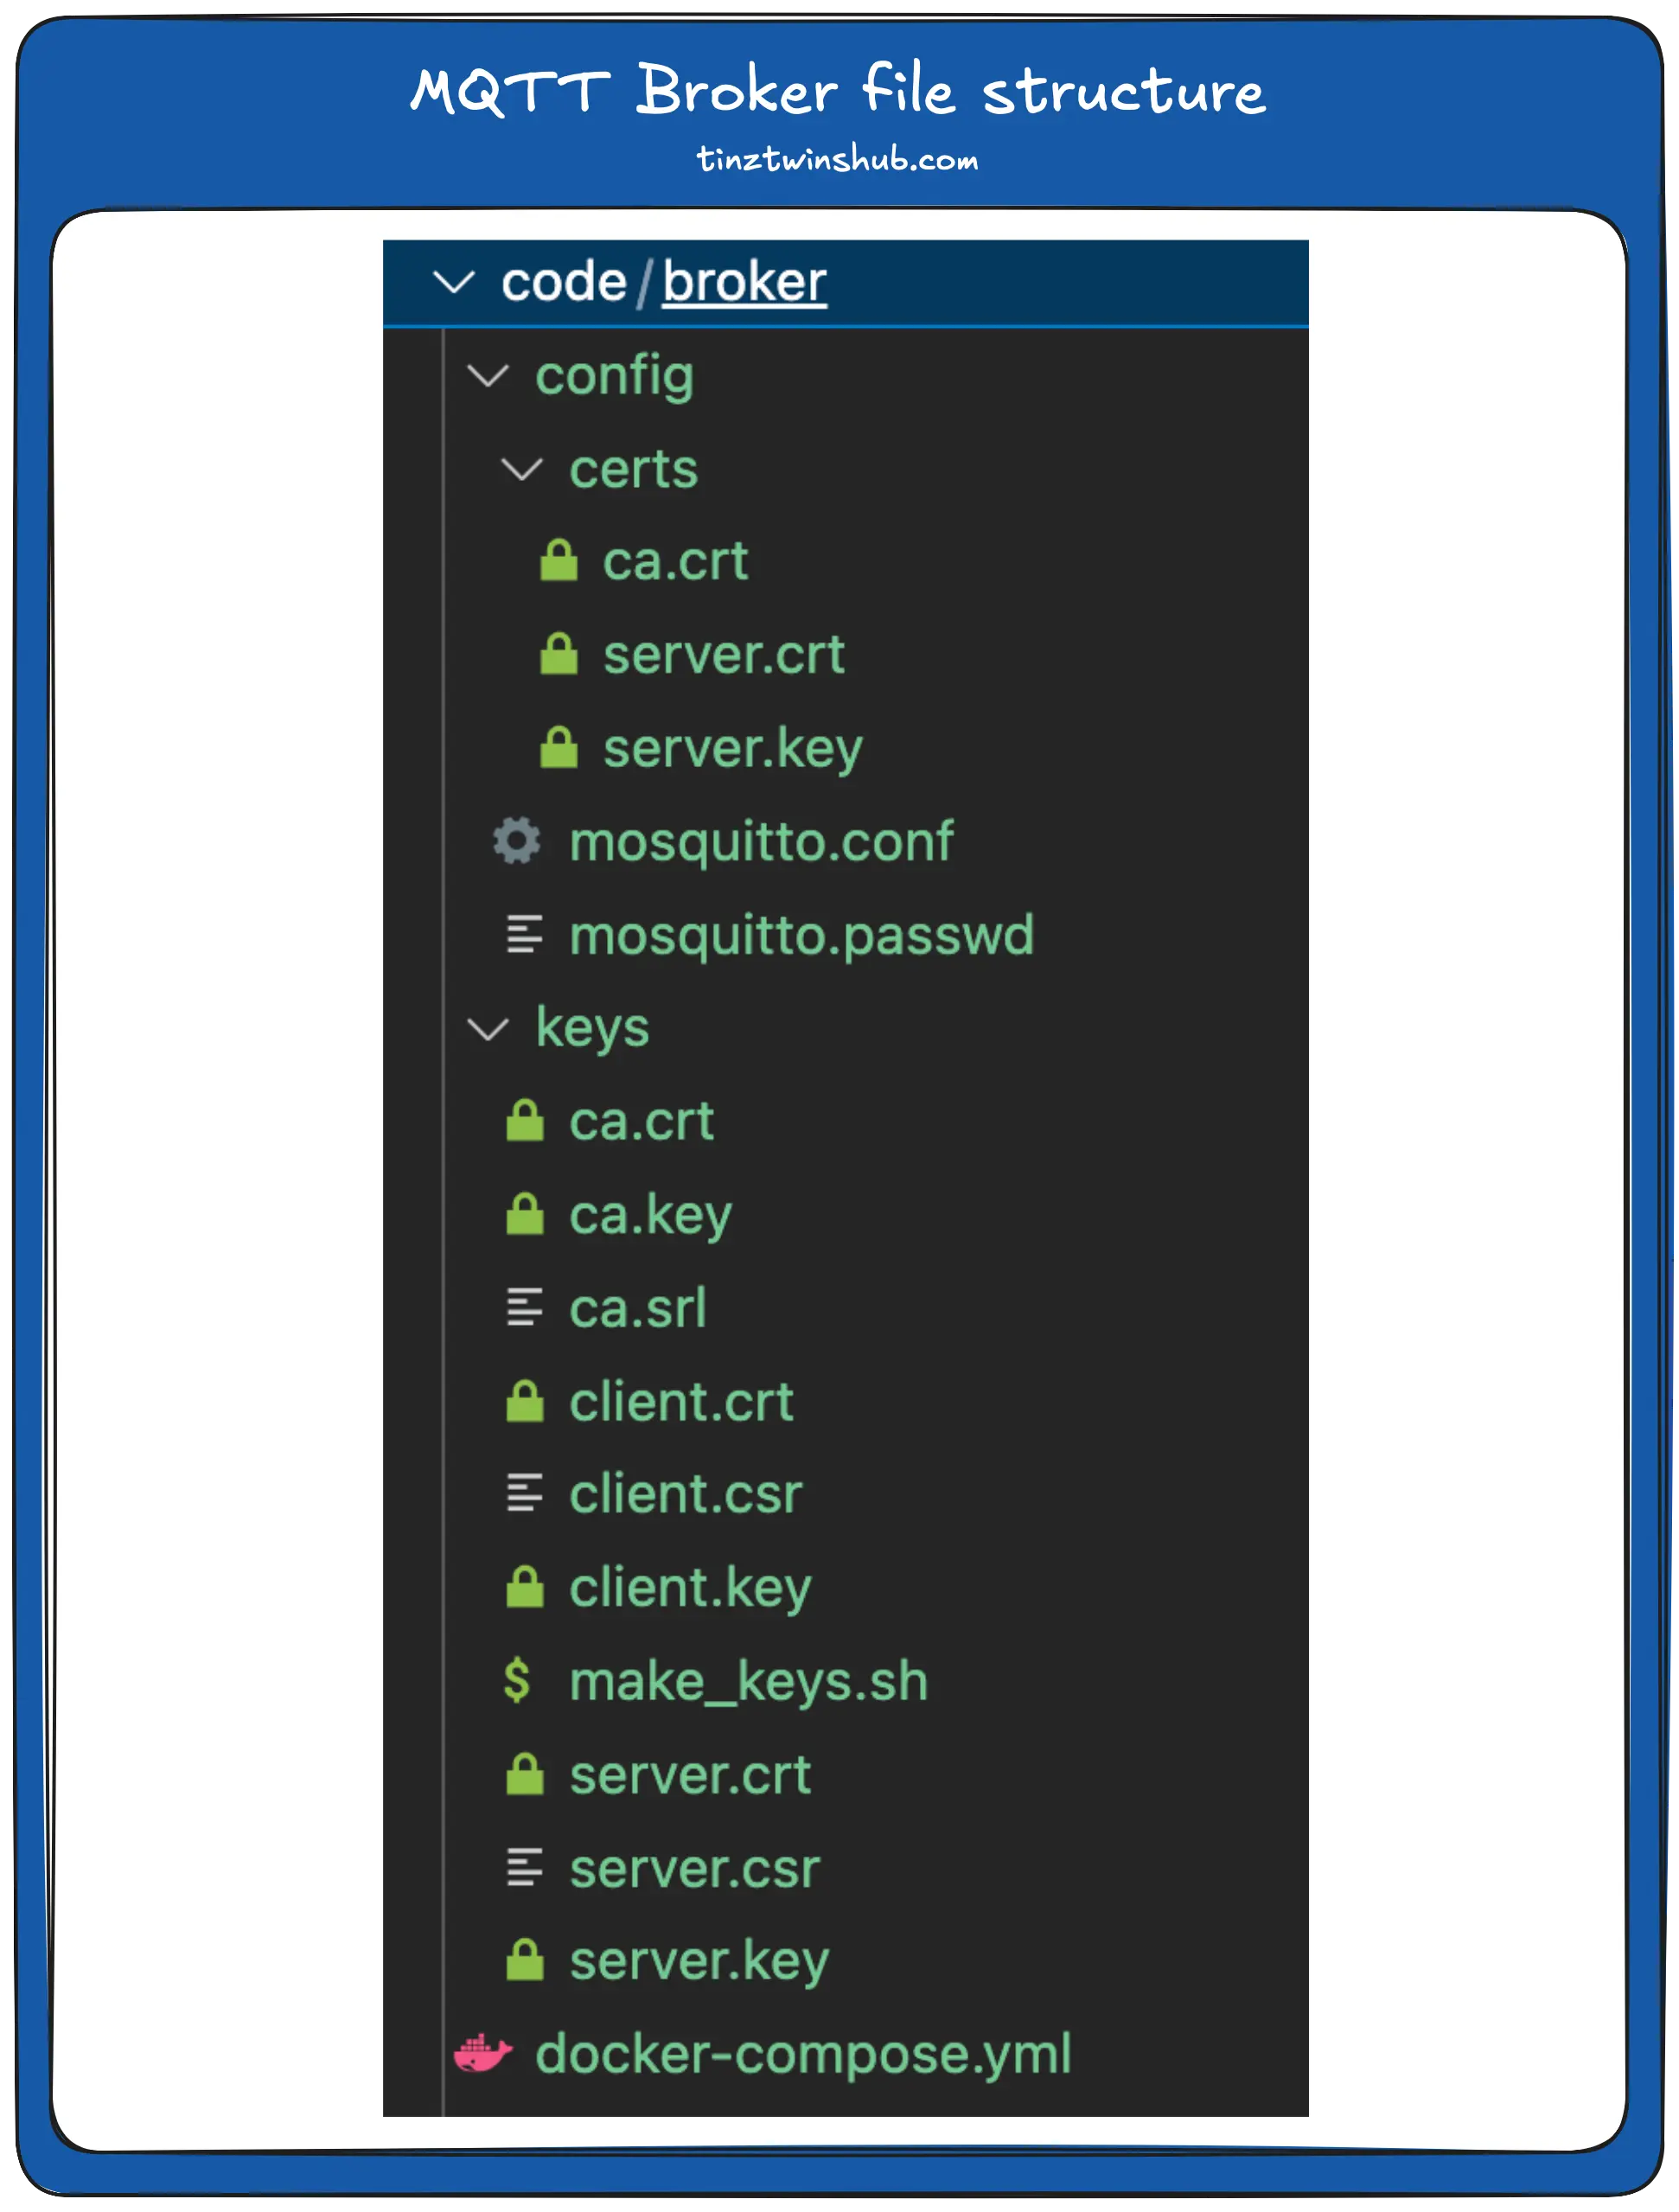
Now, you can start the MQTT broker with the following command in a terminal of your choice:
```bash
$ docker compose up -d
```
The flag `-d` means that the container is running as a daemon. In this mode, the terminal does not output any logs. Now the MQTT broker is started, and you can use it.
## MQTT Explorer
In this tutorial, we use the tool MQTT Explorer to test the functionality of the MQTT broker (You can also use another application of your choice.). You can download the application from the [MQTT Explorer website](https://mqtt-explorer.com/){:target="_blank" rel="noopener"}.
First, we establish an unencrypted connection via port 1883. The following screenshot shows the login data.
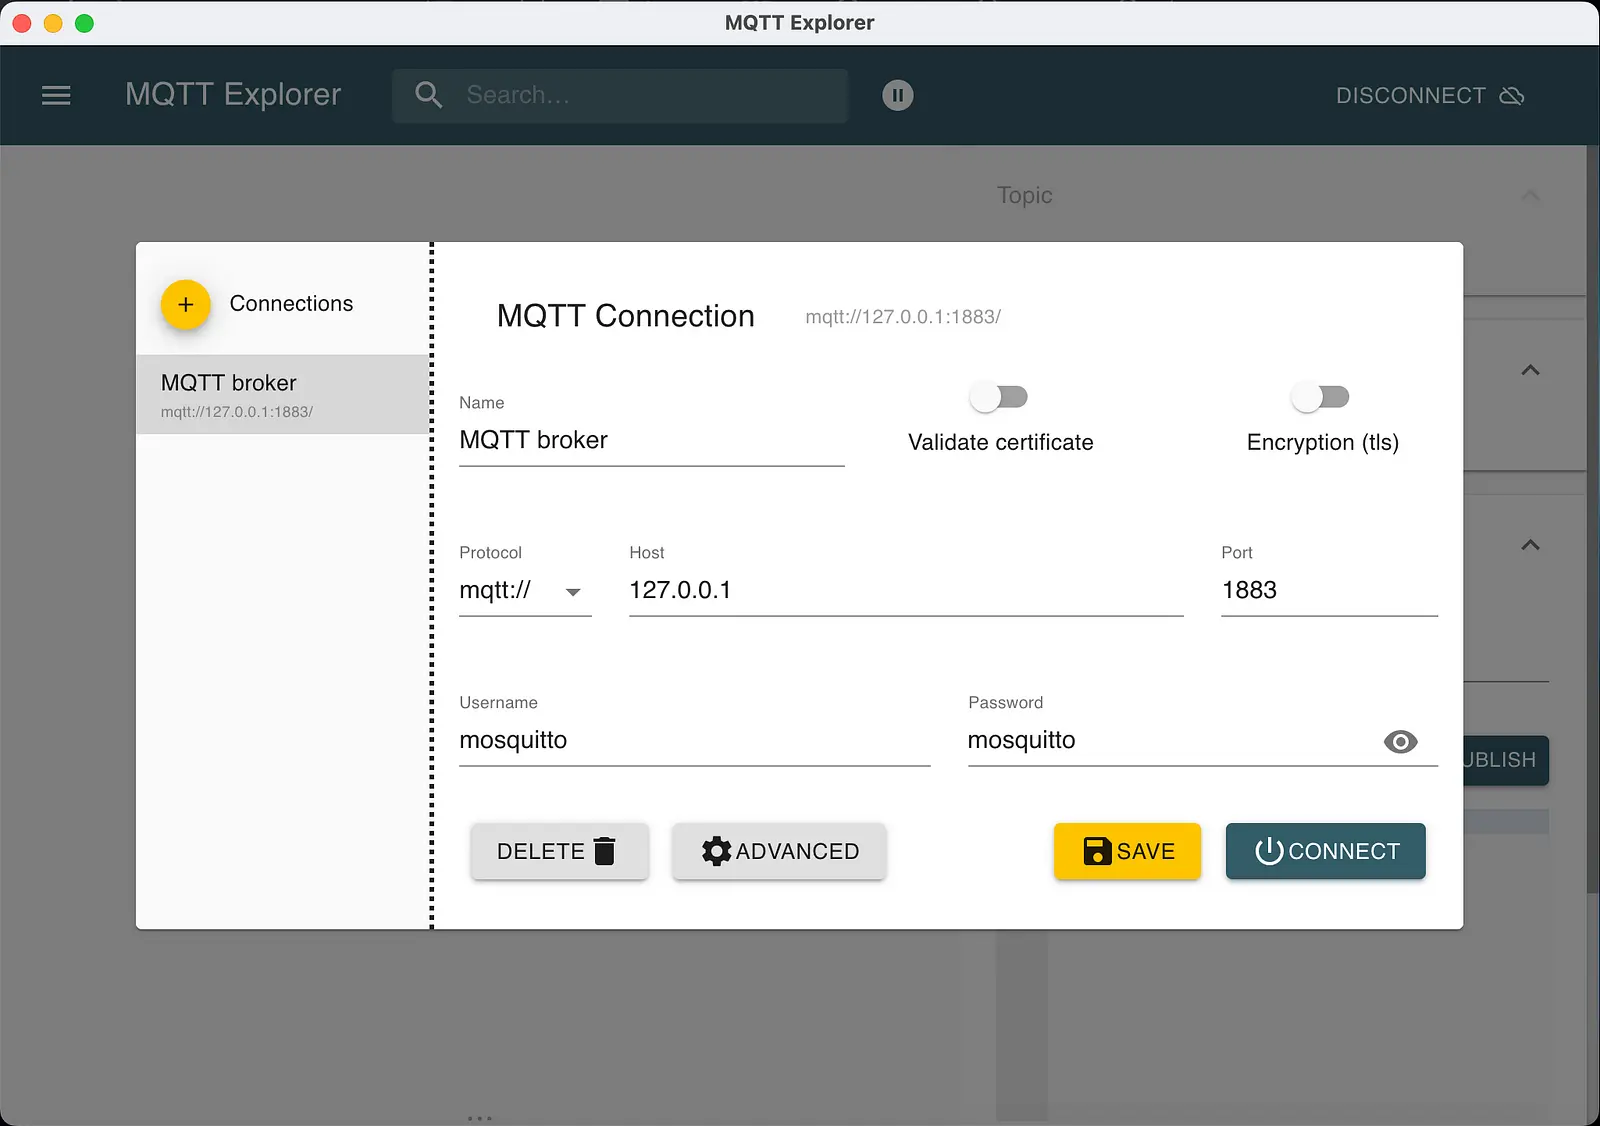
The following login data are default:
* **Username:** mosquitto
* **Password:** mosquitto
**We strongly recommend changing the password!**
You can change the password and the username with the following command (Please note that you must be in the folder with the Docker Compose file.):
```bash
$ docker-compose exec mosquitto mosquitto_passwd -c /mosquitto/config/mosquitto.passwd
```
Please replace the variable `` with a new username. Then enter the password twice. After that, you have to restart the MQTT broker. Enter the following commands in the terminal:
**Stopping the MQTT broker:**
```bash
$ docker-compose down
```
**Starting the MQTT broker:**
```bash
$ docker-compose up -d
```
Now, you can click Connect to access the broker.
Next, we connect to the encrypted broker. We enter the login data again, and the options “Validate certificate” and “Encryption (tls)” must be activated. See the following screenshot.
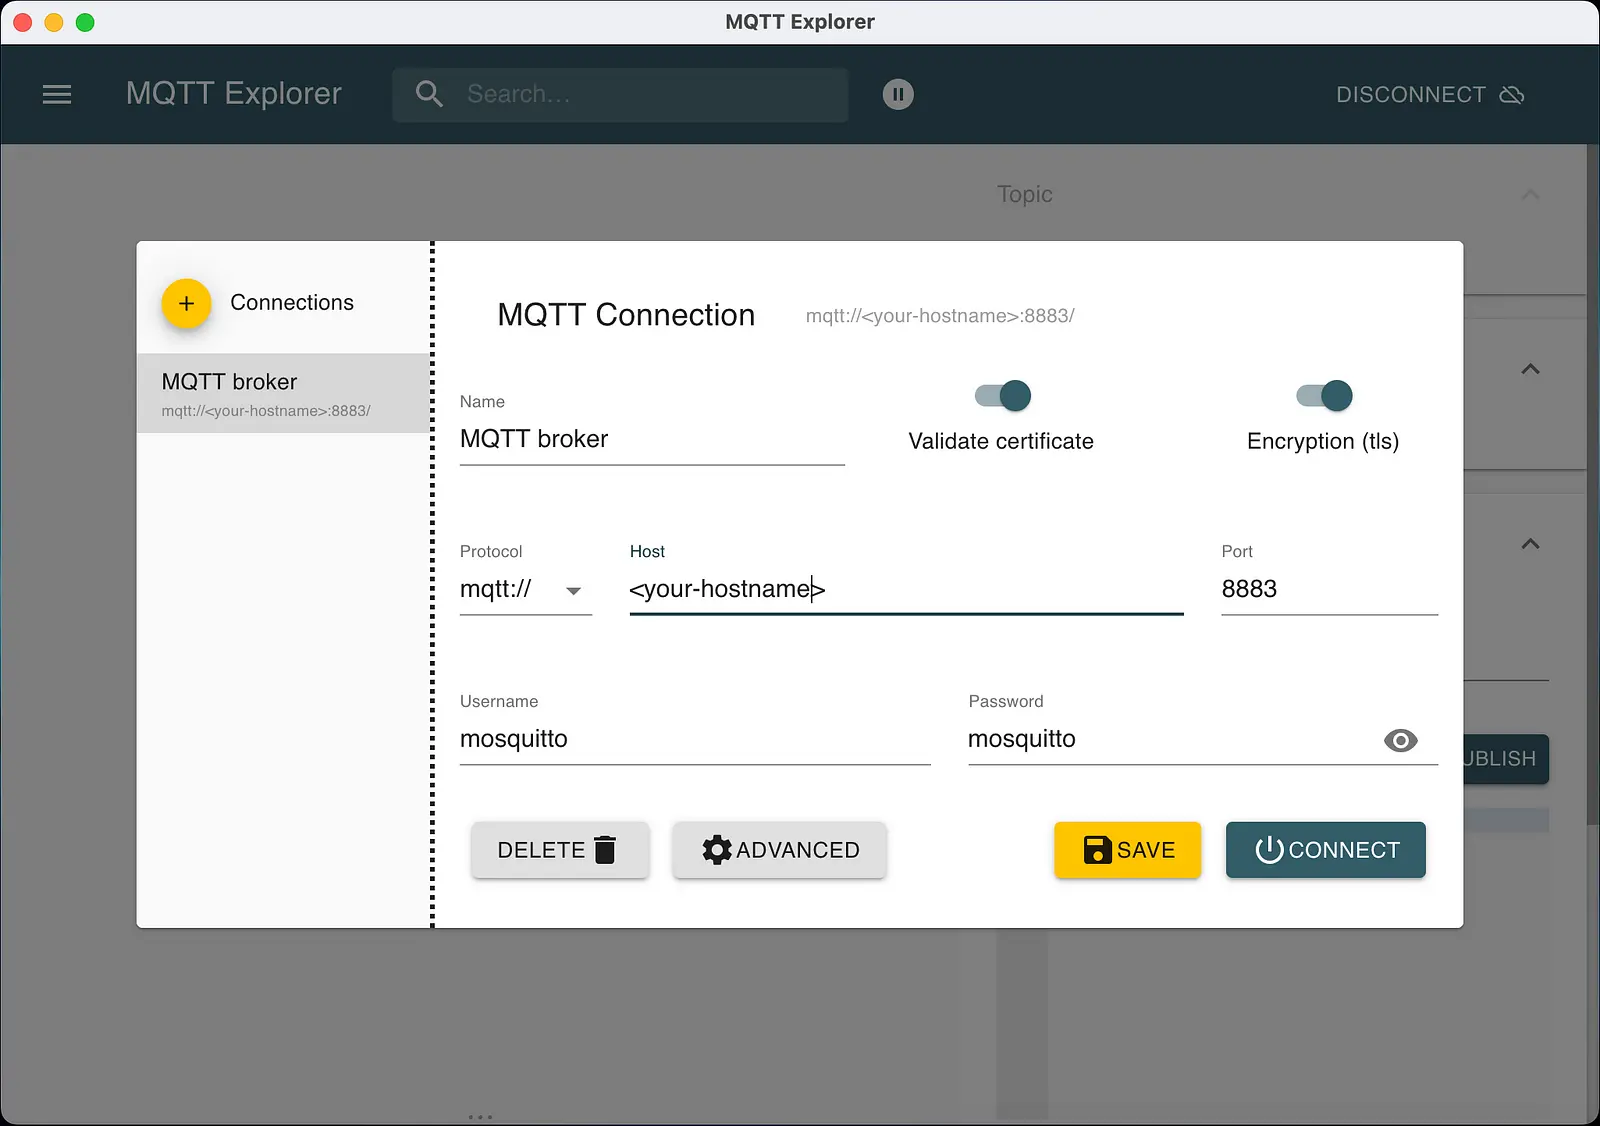
In addition, we have to set the certificates in the MQTT Explorer. Use the certificates from the folder `/keys`. The following screenshot shows the settings in the MQTT Explorer.
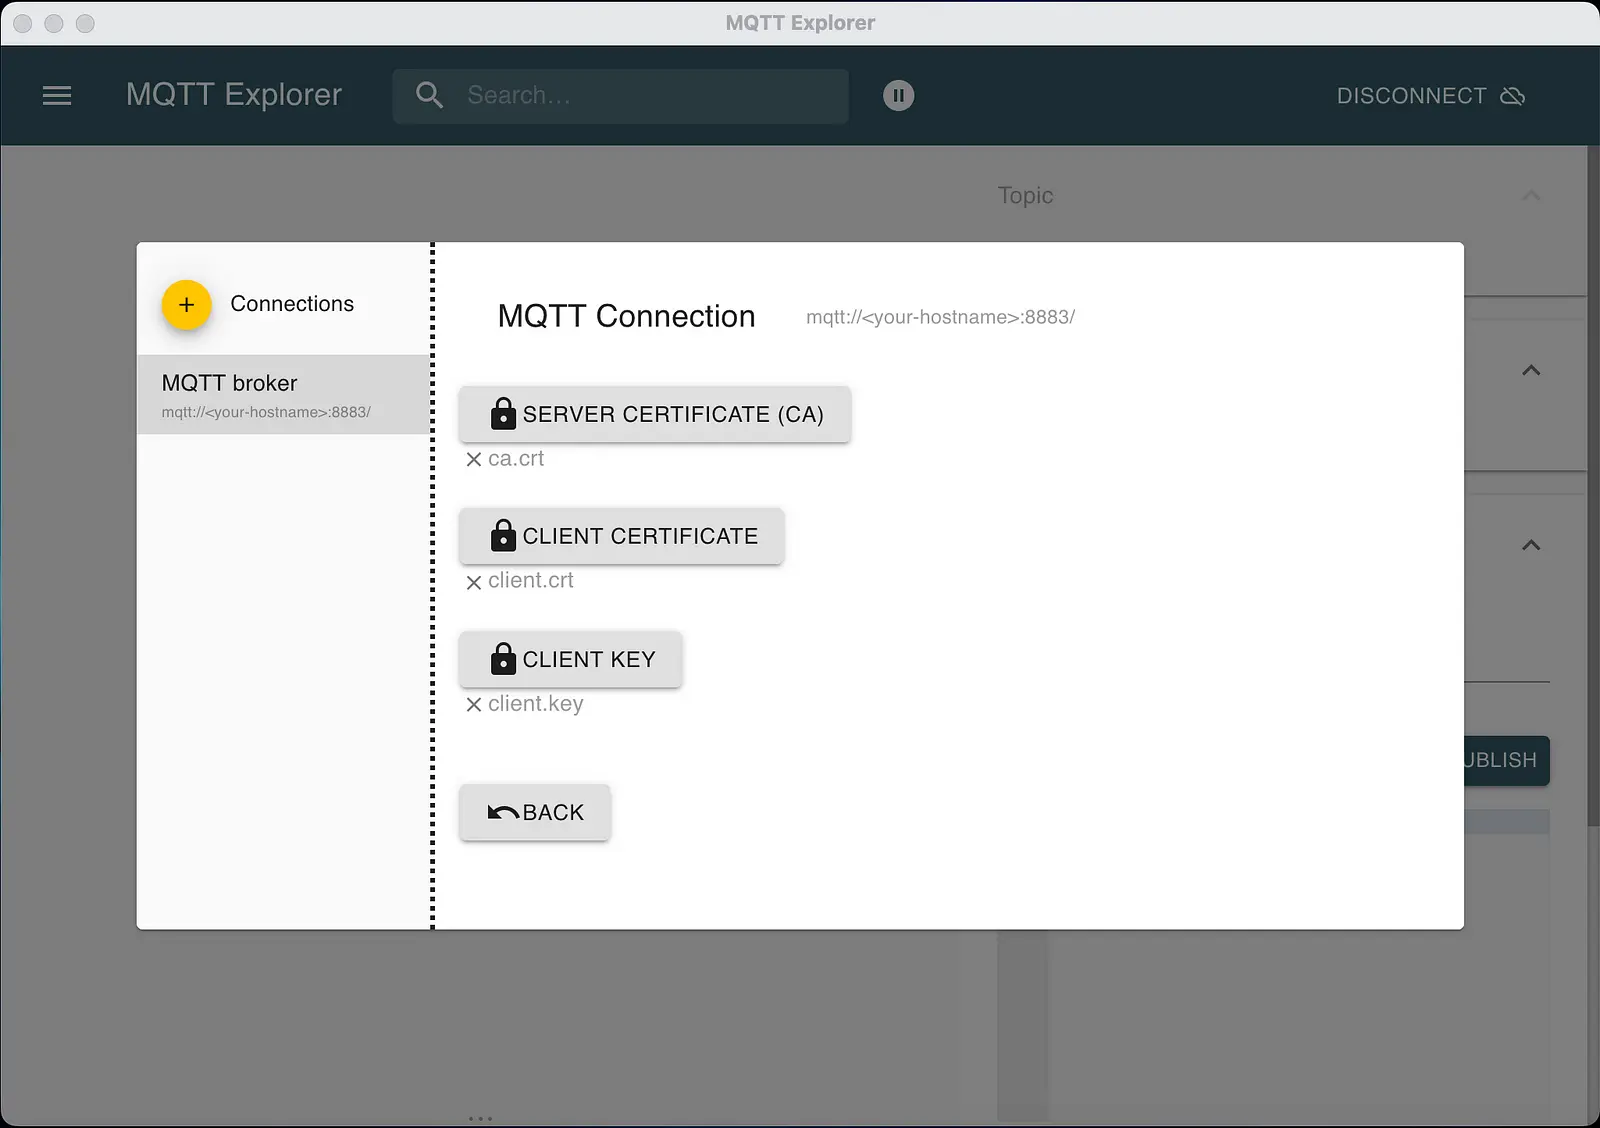
If you set everything correctly, you can use the encrypted MQTT broker. Congratulations. Have fun with it. 🥳
## Conclusion
In this article, you have learned how MQTT works and how you can use it. We also saw how to set up a secure MQTT broker with Docker. In this context, we created TLS certificates, which we finally used in the MQTT Broker and the client application (MQTT Explorer).
In the next article, we will create a **publisher** and a **subscriber** in **Python**. We show you how to include the certificates in your code and how the implementation works. As a result, we can send small data packets via the broker. Stay tuned!
Thanks so much for reading. **Have a great day!**
## Useful literature
### Books
* [Practical Python Programming for IoT: Build advanced IoT projects using a Raspberry Pi 4, MQTT, RESTful APIs, WebSockets, and Python 3](https://www.amazon.de/Practical-Python-Programming-IoT-WebSockets/dp/1838982469/){:target="_blank" rel="noopener"}
* [Hands-On MQTT Programming with Python: Work with the lightweight IoT protocol in Python](https://www.amazon.de/Hands-MQTT-Programming-Python-lightweight-ebook/dp/B07D9RP1BZ/){:target="_blank" rel="noopener"}
### Links
* [Creating a Self-Signed Certificate With OpenSSL](https://www.baeldung.com/openssl-self-signed-cert){:target="_blank" rel="noopener"} (german)
* [Mosquitto Configuration](https://mosquitto.org/man/mosquitto-conf-5.html){:target="_blank" rel="noopener"}
* [Website MQTT Explorer](https://mqtt-explorer.com/){:target="_blank" rel="noopener"}
💡 Do you enjoy our content and want to read super-detailed guides about AI Engineering? If so, be sure to check out our premium offer!