Build Web Apps with Reflex in Minutes Using Pure Python
Are you a data scientist or Python developer with little experience in web development? But you want to finally develop your own SaaS app? Then read this article carefully.

Reflex is an open-source, full-stack Python web framework that lets you build and deploy web apps in minutes. It is designed to be easy to learn, but powerful enough for complex projects.
You can use it to create everything from simple data dashboards to large, multi-page websites without having to write a single line of JavaScript.
In our article, we will walk through everything you need to know to get started with Reflex. We’ll cover its key features, guide you through building your first app, and share our experience.

Why do we use Reflex?
As developers with experience in traditional web stacks like HTML, JavaScript, and React, we understand the challenge of context-switching between different languages for the frontend and backend.
We are also data scientists and appreciate the Python programming language. The ability to build full-stack apps using pure Python is a game-changer. Reflex eliminates the need to manage separate frontend and backend code bases.
The framework allows us to use our existing Python skills to build full-stack web apps.

Key Features of the Reflex Framework
Reflex saves developers a lot of work by abstracting many web development concepts. This allows you to focus entirely on developing your app.
-
Pure Python Development: You can build frontend & backend without JavaScript. Reflex automatically compiles frontend code into React, so you don’t need to learn JavaScript or React directly.
-
Reactive State Management: Reflex follows a reactive paradigm. When the state changes, the user interface automatically updates. This is very helpful for real-time applications, such as those often used in the financial sector.
-
Full-Stack Approach: The framework covers everything from interactive user interfaces to server-side logic. This makes it suitable for small apps as well as enterprise-scale projects.
-
Scalability: You can deploy your application directly with Reflex, any cloud provider, or on-premise.
-
Built-in UI components: Reflex offers ready-to-use elements for creating interactive interfaces. There is also a growing ecosystem with custom components. This makes it much easier to get started with the framework.
-
Authentication: Many apps require authentication to manage users. There are currently solutions that exist outside the core framework as open-source (e.g., Google Auth or Magic Link Auth).
-
Documentation: Reflex has helpful documentation with clear guides and examples. It also has a strong open-source community.
How to Create Your First Reflex App
Ready to dive in? In this section, you will learn how to set up your development environment and create your first Reflex application.
Prerequisites
You will need the following prerequisites:
- Python package manager of your choice (We use conda).
- A code editor of your choice (We use Visual Studio Code).
- macOS (Apple Silicon) users should install Rosetta 2. Run the following command:
/usr/sbin/softwareupdate --install-rosetta --agree-to-license
Setup and Installation
-
Create a directory: First, create a folder with the name
simple-reflex-appwhere you will develop the app. -
Create a conda environment: We highly recommend creating a virtual environment. This keeps your main system clean.
conda create -n reflex-app python=3.12.7
conda activate reflex-app
- Install requirements: Reflex is available as a pip package. Run the following command:
pip install reflex
- Initialize the project: Switch to the project directory and run the following command:
reflex init # Select option 1 (A blank Reflex app) from the selection menu.
Now, the Reflex framework creates the basic project structure.
Project Structure
The project structure is very simple. Let’s go over these directories and files.
simple-reflex-app
├── .web
├── assets
├── requirements.txt
├── rxconfig.py
├── simple_reflex_app
│   ├── __init__.py
│   └── simple_reflex_app.py
.web:
Reflex stores the compiled JavaScript files in this directory. You will usually never need to open this directory. However, it can be useful for troubleshooting.
assets:
In this directory, you store all static assets (e.g., images) that should be publicly available.
rxconfig.py:
You use this file to configure your app (e.g., environment variables and command line arguments). By default, it looks like this:
import reflex as rx

config = rx.Config(
    app_name="simple_reflex_app",
    plugins=[
        rx.plugins.SitemapPlugin(),
        rx.plugins.TailwindV4Plugin(),
    ]
)
Reflex supports Tailwind CSS via a plugin system. However, you don’t have to use Tailwind. As a beginner, we recommend to disable it. To do so, simply remove the line of code.
The SitemapPlugin automatically generates a sitemap.xml file for your application. This helps search engines find and index your pages.
simple_reflex_app:
This directory contains the logic of your app.
Basic Reflex App
During the init process, Reflex generated the following basic app for you. We will now take a detailed look at the code so that you understand how Reflex works.
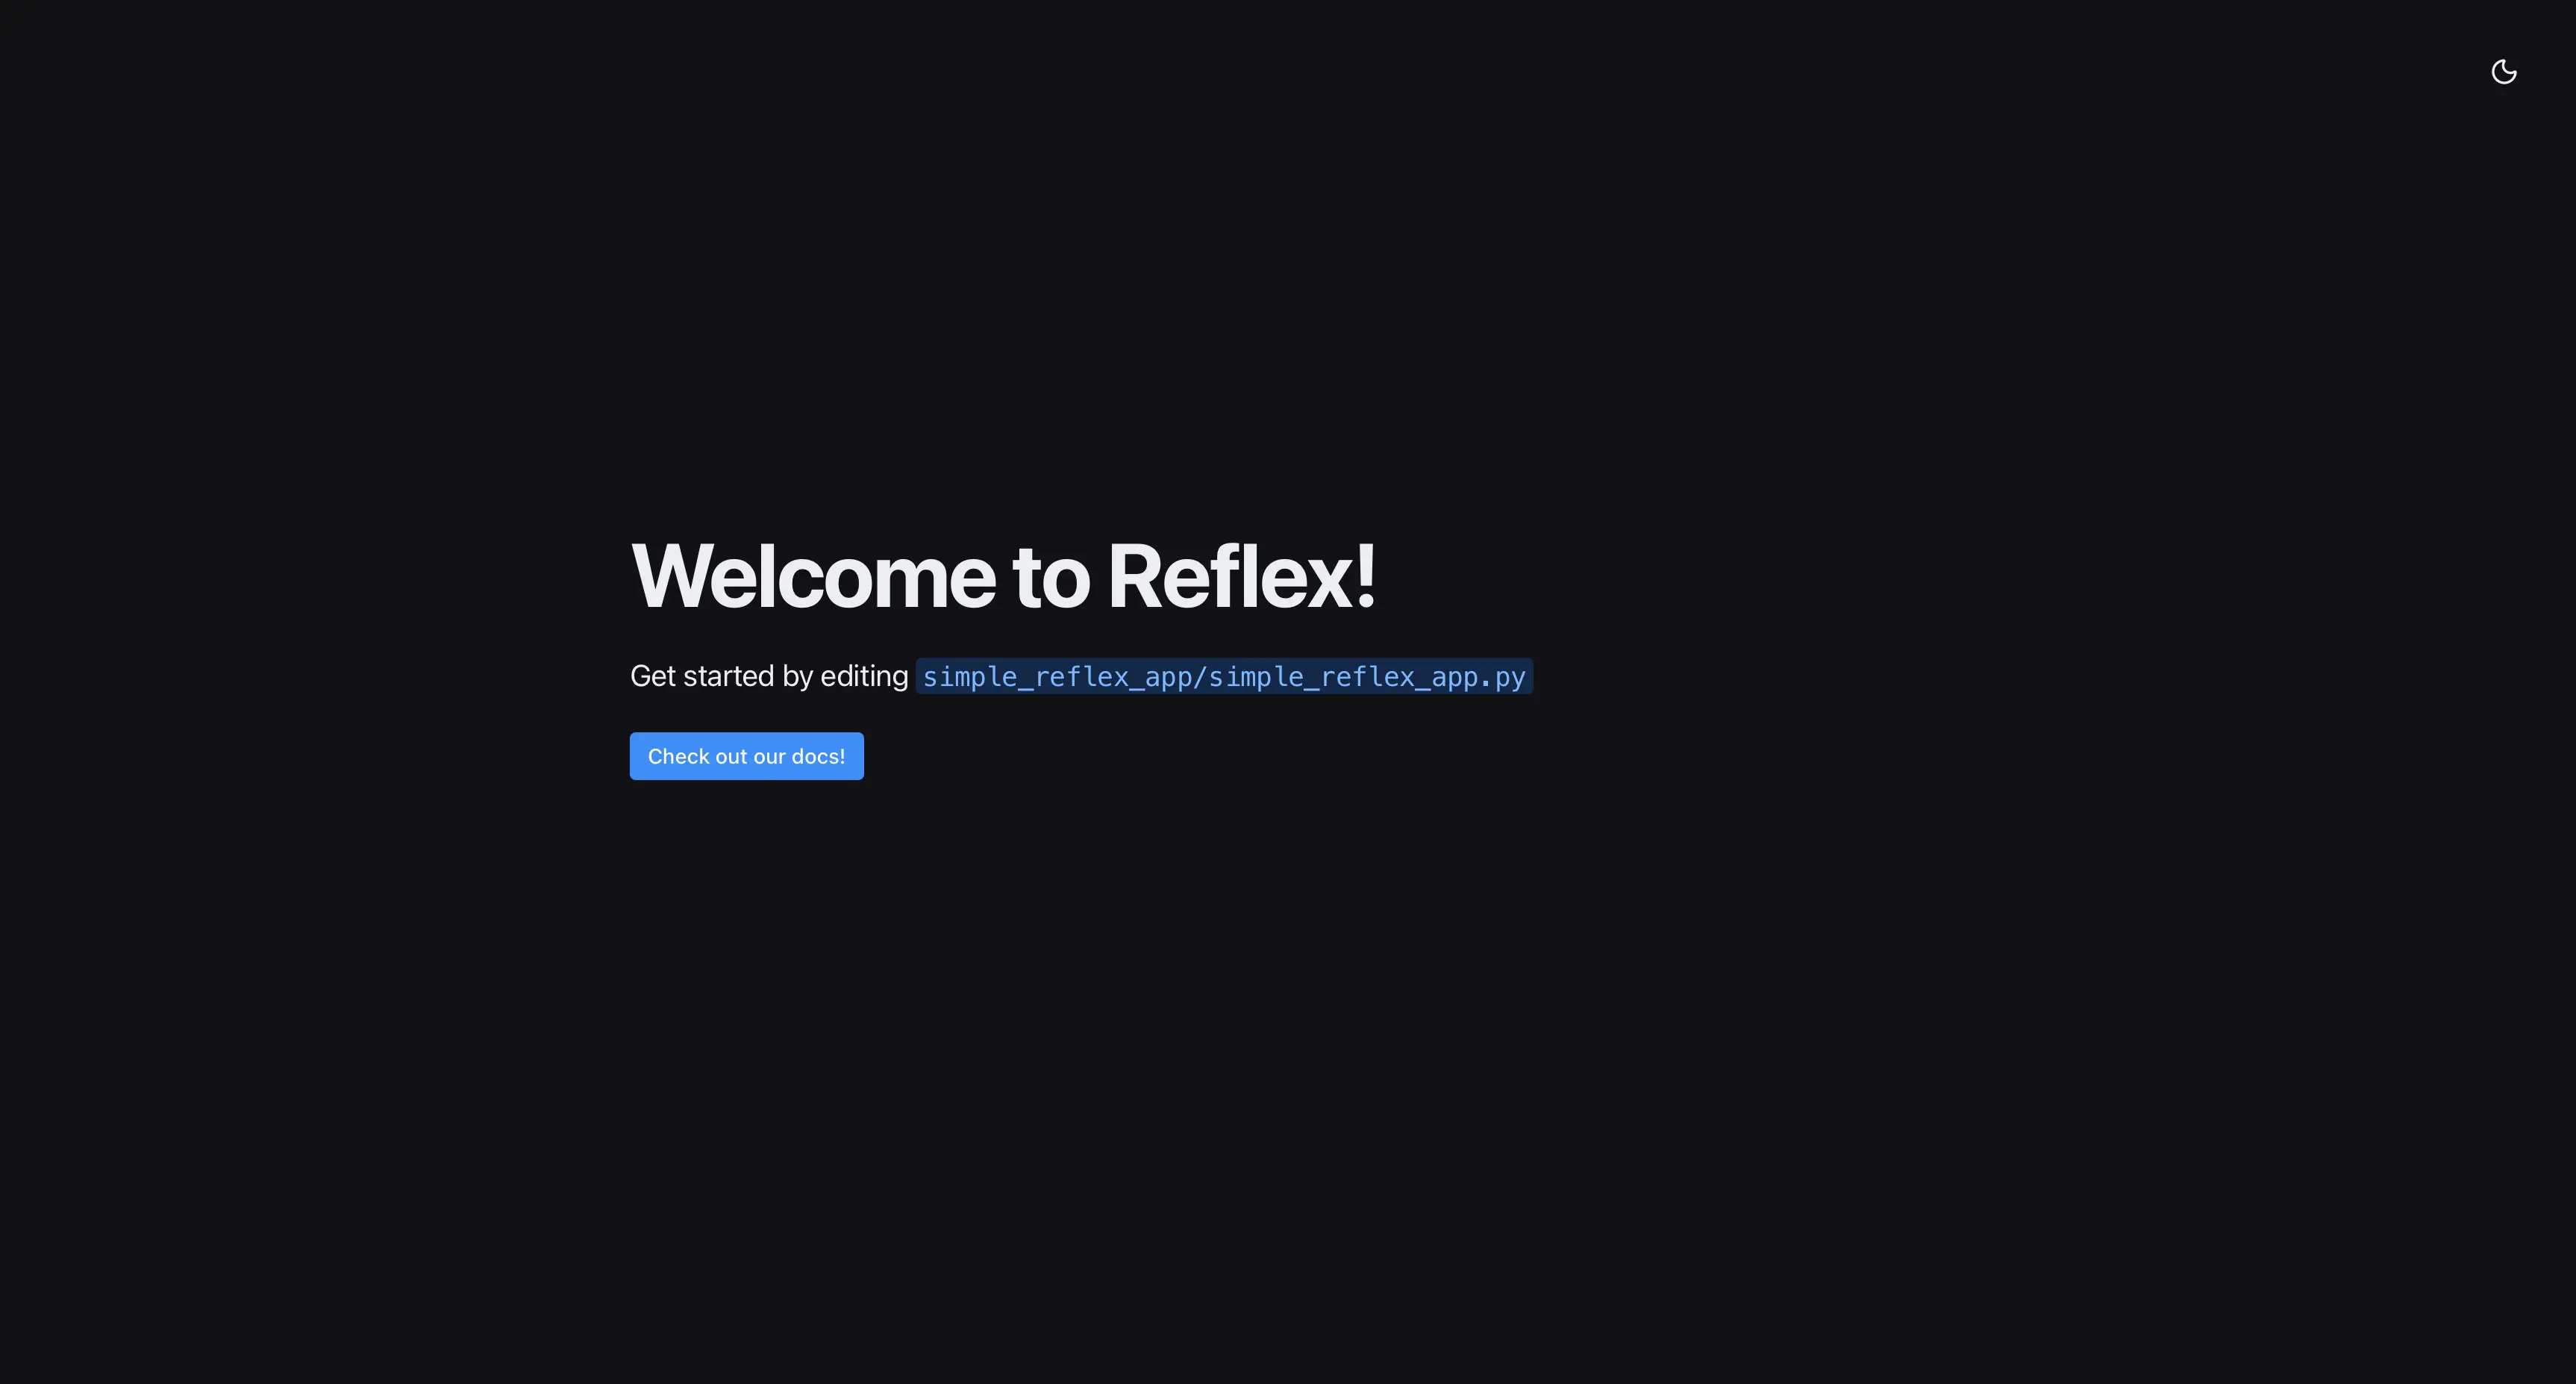
"""Welcome to Reflex! This file outlines the steps to create a basic app."""

import reflex as rx

from rxconfig import config

class State(rx.State):
    """The app state."""

def index() -> rx.Component:
    # Welcome Page (Index)
    return rx.container(
        rx.color_mode.button(position="top-right"),
        rx.vstack(
            rx.heading("Welcome to Reflex!", size="9"),
            rx.text(
                "Get started by editing ",
                rx.code(f"{config.app_name}/{config.app_name}.py"),
                size="5",
            ),
            rx.link(
                rx.button("Check out our docs!"),
                href="https://reflex.dev/docs/getting-started/introduction/",
                is_external=True,
            ),
            spacing="5",
            justify="center",
            min_height="85vh",
        ),
    )

app = rx.App()
app.add_page(index)
Imports:
First, we start by importing the Reflex package (with the alias rx). You can reference Reflex objects as rx.* in your code.
State:
The state is the backend of your app. Here, you can define functions and variables that can be referenced in the frontend. This code runs directly on the server and is not compiled. You can use any external Python library here.
User Interface:
The index() function contains the frontend components. Here, you only use Reflex components, variables, and variable operations. All other logic should be stored in the state.
Page:
Each page is a Python function with a reflex component as a return. You can define multiple pages and add them using app.add_page().
Run the app with the following command:
reflex run
Run the app with more log information for debugging:
reflex run --loglevel debug
Next, you can open your browser at http://localhost:3000/ and see the following page.
Advanced Use Cases
To give you a better idea of what you can build with Reflex, here are some more advanced project examples:
Conclusion
The Reflex framework is a game-changer for any Python developer looking to enter the world of web development. Using Python in the frontend and backend significantly reduces the barriers to creating beautiful full-stack web apps.
This guide has walked you through the core features of Reflex, from its simple setup process to initializing your first project. Thanks to the powerful, component-based architecture, you can turn a simple idea into a deployed application faster than ever before.
Now you have the basic knowledge to build your own web apps with Reflex.
Happy coding!