**Since the release of ChatGPT, everyone has been talking about Large Language Models (LLMs).** 

<figure class="">
  <img src="/assets/img/blog/2023-06-29-constructing-a-chatgpt-like-app-using-langchain-and-plotly-dash/header_img.webp"
       alt="LangChain + Plotly Dash - Build a ChatGPT Clone"><figcaption>
      Generated with Leonardo.Ai

    </figcaption></figure>


So it’s time to take a closer look at it. Many people and developers struggle with starting learning LLMs because they don’t know how to start. In our opinion, you should learn the following three things:

* Learn to program with **Python**.  
* Learn how to use the **OpenAI API**.  
* You should use a framework for programming LLMs. In our opinion, the framework [**LangChain**](https://python.langchain.com/docs/get_started/introduction.html){:target="_blank" rel="noopener"} is a good starting point.

<div class="ad-banner" style="margin-bottom: 0.7rem;">
    <hr class="hr-text" data-content="Advertisement*">
    <a href="/out/elevenlabs/" target="_blank" rel="sponsored nofollow noopener"><img src="../../assets/img/ads/elevenlabs.webp" alt="ElevenLabs Partner*" nopin="nopin"></a>
    <small style="display: block; margin-bottom: 0.5rem; margin-top: 0.5rem;"><strong>✨ Read without banner ads? </strong><a href="https://steady.page/en/tinztwins-hub/about" target="_blank" rel="noopener">Become a member</a> or <a href="https://steady.page/en/log_in?publication=tinztwins-hub" target="_blank" rel="noopener">log in</a></small>
</div>
    
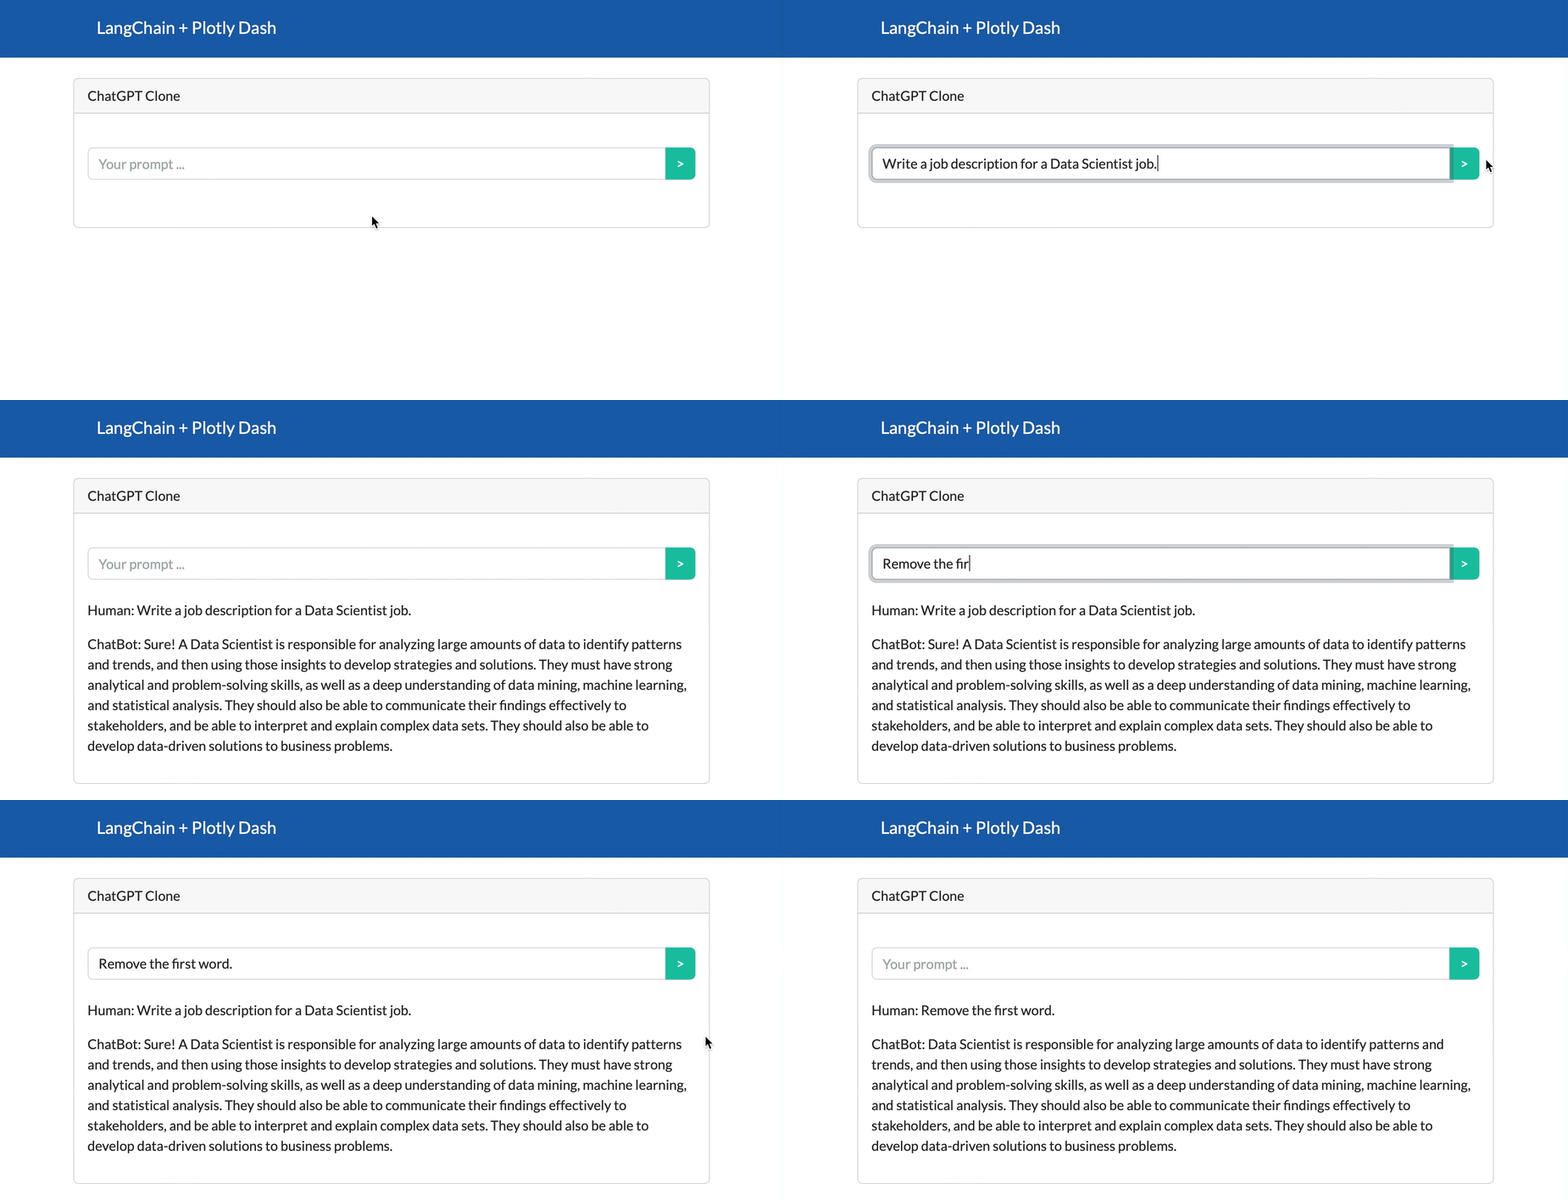
We’ll cover some of these things in this article. You’ll learn how to implement a ChatGPT Clone as a web app with LangChain and Plotly Dash. Do you want to know what the finished app looks like? Here’s a demo of the final web application:
![ChatGPT Clone (GIF by authors)](../../assets/img/blog/2023-06-29-constructing-a-chatgpt-like-app-using-langchain-and-plotly-dash/sneak_peek_chatbot.gif)

We’ll discuss the following points:
* **What is LangChain?**
* **Technical requirements** 
* **Installation and Setup**
* **Basics for building an LLM application** 
* **Implementation of the ChatGPT Clone**
* **Conclusion**

We’ve no time to waste. Let’s start.

<div class="ad-banner" style="margin-bottom: 0.7rem;">
    <hr class="hr-text" data-content="Advertisement*">
    <a href="/out/elevenlabs/" target="_blank" rel="sponsored nofollow noopener"><img src="../../assets/img/ads/elevenlabs.webp" alt="ElevenLabs Partner*" nopin="nopin"></a>
    <small style="display: block; margin-bottom: 0.5rem; margin-top: 0.5rem;"><strong>✨ Read without banner ads? </strong><a href="https://steady.page/en/tinztwins-hub/about" target="_blank" rel="noopener">Become a member</a> or <a href="https://steady.page/en/log_in?publication=tinztwins-hub" target="_blank" rel="noopener">log in</a></small>
</div>

## What is LangChain?
LangChain is a powerful framework that can be used to work with LLMs. You can develop applications with different LLMs very easily. The framework consists of components. 

Components are abstractions for working with LLMs. They are modular and easy to use. In addition, you can use off-the-shelf chains. These are a structured assembly of components for higher-level tasks. You can customize existing chains or build new ones for more complex applications.

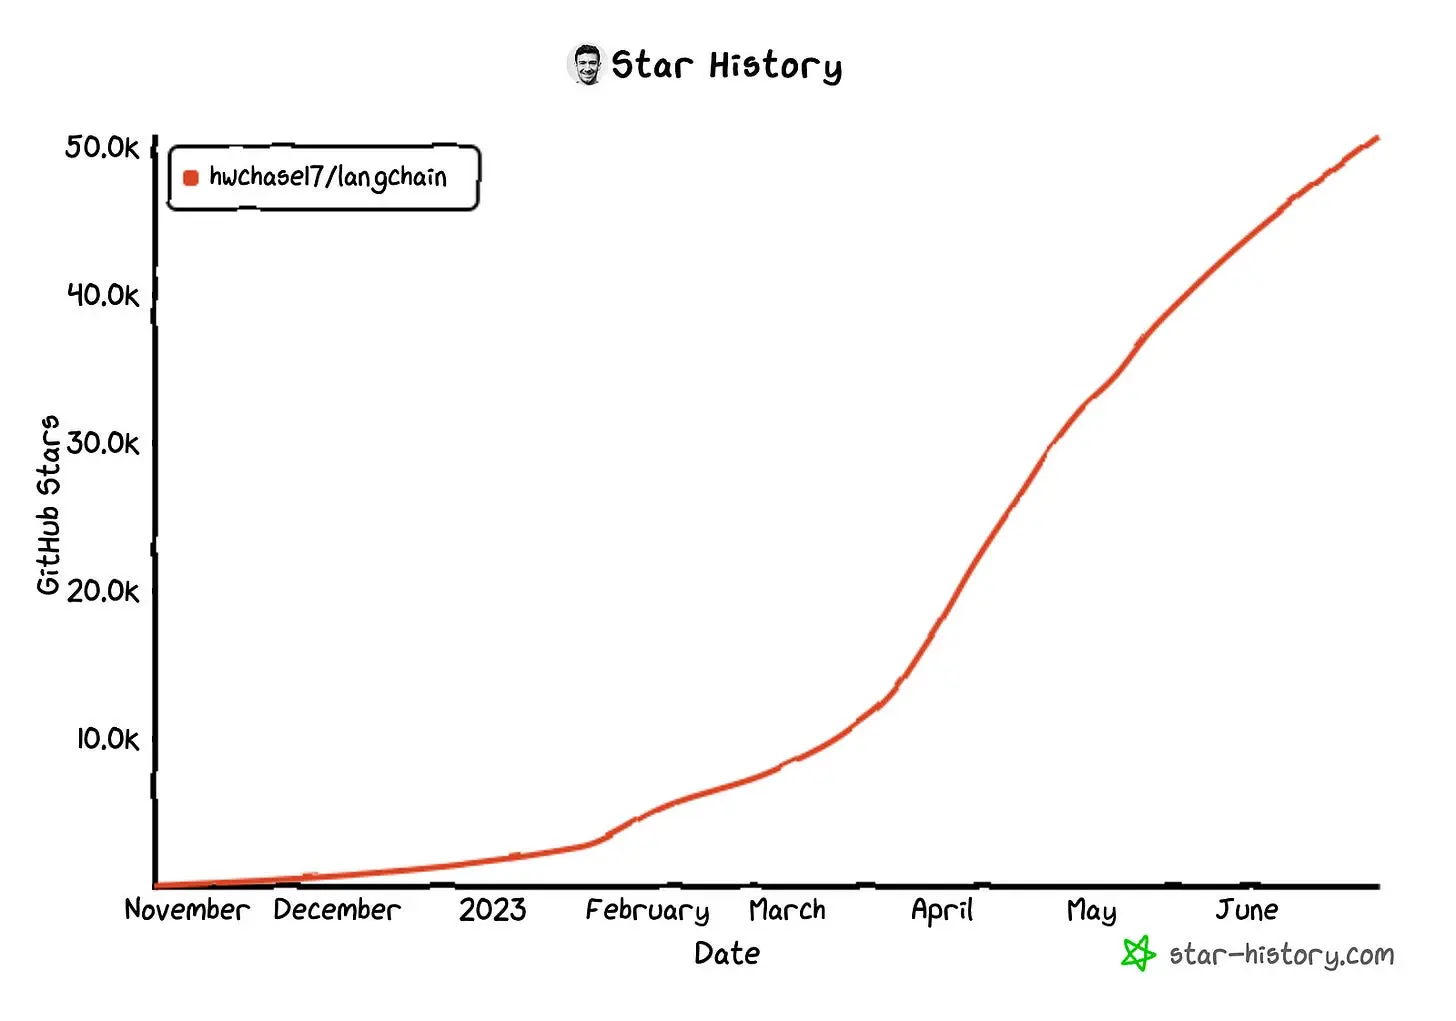
The LangChain framework is very popular, as you can see on the GitHub stars.

<figure class="">
  <img src="/assets/img/blog/2023-06-29-constructing-a-chatgpt-like-app-using-langchain-and-plotly-dash/star_history_langchain.webp"
       alt="Growth of LangChain, impressive! (Image by star-history.com)"><figcaption>
      Growth of LangChain, impressive! (Image by <a href="https://star-history.com/#hwchase17/langchain" target="_blank" rel="noopener">star-history.com</a>)

    </figcaption></figure>
 

You can use LangChain with various LLM providers like OpenAI, Cohere Hugging Face, etc. In this article, we use the OpenAI API with access to gpt-3.5-turbo. Feel free to replace the API key with any other LLM. All concepts we’ll discuss work with other LLMs as well. Let’s take a look at the technical requirements!

<div class="ad-banner" style="margin-bottom: 0.7rem;">
    <hr class="hr-text" data-content="Explore our premium blog articles">
    <a href="https://tinztwinshub.com/membership"><img src="../../assets/img/ads/premium_2.webp" alt="Explore our premium blog articles" nopin="nopin"></a>
    <small style="display: block; margin-bottom: 0.5rem; margin-top: 0.5rem;"><strong>✨ Read without banner ads? </strong><a href="https://steady.page/en/tinztwins-hub/about" target="_blank" rel="noopener">Become a member</a> or <a href="https://steady.page/en/log_in?publication=tinztwins-hub" target="_blank" rel="noopener">log in</a></small>
</div>

## Technical requirements
You’ll need the following prerequisites:
* Installed [Python](https://www.python.org/downloads/){:target="_blank" rel="noopener"} (≥ 3.8.1, &lt; 4.0) 
* Installed conda and pip 
* Access to a bash (macOS, Linux or Windows) 
* Code editor of your choice (We use [VSCode](https://code.visualstudio.com/download){:target="_blank" rel="noopener"}.)

## Installation and Setup
First, we’ve to create a virtual Python environment. Enter the following in your terminal:
* Create a conda environment (env): `conda create -n langchain python=3.9.12` -&gt; Answer the question *Proceed (\[y\]/n)?* with y.  
* Activate the conda env: `conda activate langchain`

<div class="ad-banner" style="margin-bottom: 0.7rem;">
    <hr class="hr-text" data-content="Advertisement*">
    <a href="/out/castmagic/" target="_blank" rel="sponsored nofollow noopener"><img src="../../assets/img/ads/castmagic.webp" alt="CastMagic Partner*" nopin="nopin"></a>
    <small style="display: block; margin-bottom: 0.5rem; margin-top: 0.5rem;"><strong>✨ Read without banner ads? </strong><a href="https://steady.page/en/tinztwins-hub/about" target="_blank" rel="noopener">Become a member</a> or <a href="https://steady.page/en/log_in?publication=tinztwins-hub" target="_blank" rel="noopener">log in</a></small>
</div>

Now, we have a working virtual environment. Great! It’s time to install LangChain with pip.

```bash
$ pip install langchain[llms]
```

Next, we install a model provider. In our case, we use the OpenAI API. So we install their Python package:

```bash
$ pip install openai
```

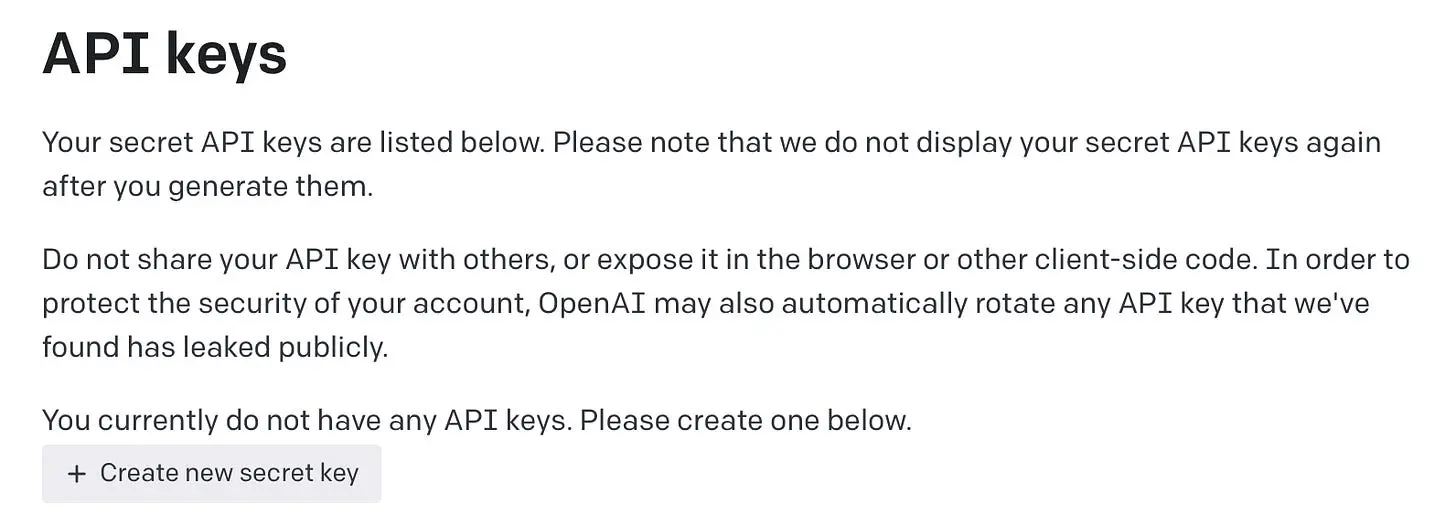
You can only access the OpenAI API when you set your API key. You can generate an API key in your [OpenAI account](https://platform.openai.com/account/api-keys){:target="_blank" rel="noopener"}. If you don’t have an OpenAI account, you must sign up. Then, log in to your OpenAI account and create a new API key.
![Create new OpenAI API keys (Screenshot by authors)](../../assets/img/blog/2023-06-29-constructing-a-chatgpt-like-app-using-langchain-and-plotly-dash/openai_api_keys.webp)

Click on “Create new secret key” and give your API key a name. Then copy the key. Be careful to save the API key because it will no longer display. You get free credit for API access.

Next, we’ve to set the API key. For this, you can use the following command:

```bash
# macOS and linux
$ export OPENAI_API_KEY=[Insert your API Key here.]

# windows
$ set OPENAI_API_KEY=[Insert your API Key here.]
```

Insert your API key at the marked point and delete the square brackets as well. There is also a second option to set the API key via code if you don’t want to set an environment variable.

```python
from langchain.llms import OpenAI

llm = OpenAI(openai_api_key="Insert your API Key here.")
```

This option has the disadvantage that you accidentally push the API key into a public repo. That’s not good. Then anyone can use your API key, which can lead to high costs. We recommend the first option, and we’ll use the first option in this article.

In this article, we’ll build the ChatGPT Clone web app with Plotly Dash. We’ve to install the required dependencies for the dash framework.

```bash
$ pip install dash dash-bootstrap-components
```

<div class="ad-banner" style="margin-bottom: 0.7rem;">
    <hr class="hr-text" data-content="Explore our premium blog articles">
    <a href="https://tinztwinshub.com/membership"><img src="../../assets/img/ads/premium_1.webp" alt="Explore our premium blog articles" nopin="nopin"></a>
    <small style="display: block; margin-bottom: 0.5rem; margin-top: 0.5rem;"><strong>✨ Read without banner ads? </strong><a href="https://steady.page/en/tinztwins-hub/about" target="_blank" rel="noopener">Become a member</a> or <a href="https://steady.page/en/log_in?publication=tinztwins-hub" target="_blank" rel="noopener">log in</a></small>
</div>

## Basics for building an LLM application
There are some essential concepts we’ve to understand before we can start:
* **Large Language Models:** In LangChain is an LLM, the basic building block. An LLM takes in text and generates more text as output. The LLM answers questions and has no memory.  
* **Chat Models:** These are a variation on LLMs. Chat Models use LLMs under the hood, but the interface is a bit different. The input and the output are a message. There are `HumanMessage`, `AIMessage`, `SystemMessage` and `ChatMessage`. LangChain also offers the possibility to use Chat Models in the same way as LLMs. Then the input and the output are also text.   
* **Memory:** LLMs and ChatModels are generally stateless. So we need to give the models a memory so that they can be used meaningfully as chatbots.  
* **Chains:** You can link together multiple primitives, like models and a memory. This is useful for the implementation of chatbots, like in our example.
    
There are also other concepts like [Agents](https://python.langchain.com/docs/modules/agents/){:target="_blank" rel="noopener"} and Prompt templates, but we don’t need these for our example. For this, you can check out the [LangChain documentation](https://python.langchain.com/docs/get_started/introduction.html){:target="_blank" rel="noopener"}. Now it’s time to build a ChatGPT Clone with LangChain and Plotly Dash!

## Implementation of the ChatGPT Clone
In this section, we’ll explain how you can implement a ChatGPT Clone. The focus of the explanation is on the implementation of a ChatBot with LangChain and not on the implementation of a Plotly Dash App. If you’re interested in how to build apps with Plotly Dash, we recommend our [article](/software-engineering/a-comprehensive-guide-to-building-enterprise-level-plotly-dash-apps/) on this topic.

Now, we take a look at the implementation. You find the complete source code for the web app in the appendix. In the following, you can see the LangChain implementation.

```python
from langchain import OpenAI, ConversationChain
from langchain.memory import ConversationBufferMemory

chat = OpenAI(temperature=0)

conversation = ConversationChain(
    llm=chat, 
    verbose=True,
    memory=ConversationBufferMemory()
)

# ... Dash App stuff

result_ai = conversation.predict(input=human_prompt)

# ... Dash App stuff
```

We have omitted the code for the Dash app. First, we import all relevant libraries. Next, we create our LLM model `chat = OpenAI(temperature=0)`. In this case, we choose a `temperature` of zero. You can use the `temperature` parameter to control the level of randomness or creativity. A lower `temperature` results in more conservative output text, and a higher `temperature` leads to more unexpected output text. In other words, a high `temperature` generates text that deviates from the training data. This can result in more creative output texts.

Next, we use a chain for implementing the memory of our LLM. We define a memory buffer. This buffer ensures that we can chat with our LLM. The LLM knows what it has said in previous messages. In the demo at the beginning, you have seen that the LLM has recognized what it has said in previous messages.

Then you can see the `conversation.predict()` function in the code. This function generates an output text based on the human prompt. That’s all the magic behind the web app. Congratulations, you’ve built your first LLM App!

## Conclusion
In this article, we guided you to build your first LLM App. In addition, you’ve learned the basics behind the framework LangChain. As a result, you can run your own ChatGPT clone web app. In future posts, we plan to replace the part with the OpenAI API and use instead a model trained on our own data. Be curious about our next article.

Thanks so much for reading. **Have a great day!**

<div class="ad-banner">
  <hr>
  💡 Do you enjoy our content and want to read super-detailed guides about AI Engineering? If so, be sure to check out our premium offer!

  <div style="text-align: center; margin-top: 0.7rem;">
    <a href="https://steady.page/en/tinztwins-hub/about" class="btn btn--primary">Unlock Premium</a>      
  </div>
</div>

<div class="ad-banner">
    <hr class="hr-text" data-content="Our Merch Shop">
    <a href="https://shop.tinztwinshub.com/merch/"><img src="../../assets/img/ads/ai_and_coding_merch.webp" alt="AI and Coding Merch" nopin="nopin"></a>
    <small style="display: block; margin-bottom: 0.5rem; margin-top: 0.5rem;"><strong>✨ Read without banner ads? </strong><a href="https://steady.page/en/tinztwins-hub/about" target="_blank" rel="noopener">Become a member</a> or <a href="https://steady.page/en/log_in?publication=tinztwins-hub" target="_blank" rel="noopener">log in</a></small>
</div>

### **Appendix**

Here you can find the complete source code to run the ChatGPT Clone web app. First, you create a Python file (for example: `app.py`). Then you paste the following code in the file and start the app with `python app.py`:

```python
import dash_bootstrap_components as dbc
from dash import Dash, html, Input, Output, State, callback
from langchain import OpenAI, ConversationChain
from langchain.memory import ConversationBufferMemory

chat = OpenAI(temperature=0)   # level of randomness or creativity

conversation = ConversationChain(
    llm=chat, 
    verbose=True,
    memory=ConversationBufferMemory()   # memory of the LLM
)

app = Dash(__name__,
           external_stylesheets=[dbc.themes.FLATLY])

app.layout = html.Div(
    [
        dbc.NavbarSimple(
            brand="LangChain + Plotly Dash",
            brand_href="/",
            color="#165AA7",
            sticky='top',
            links_left=True,
            dark=True,
            expand=True
        ),

        html.Br(),

        dbc.Container(
                    fluid=True,
                    children=[
                        dbc.Row(
                            [
                                dbc.Col(
                                    width=1,
                                ),
                                dbc.Col(
                                    width=10,
                                    children=dbc.Card(
                                        [
                                            dbc.CardHeader("ChatGPT Clone"),
                                            dbc.CardBody([
                                                html.Br(),
                                                dbc.InputGroup([
                                                    dbc.Input(id='prompt', value="", placeholder='Your prompt ...', type='text'),
                                                    dbc.Button(id='sendPrompt', children=">", color="success", n_clicks=0),
                                                    ],
                                                ),
                                                html.Br(),
                                                html.P(id='outputHuman', children=""),
                                                html.P(id='outputChatBot', children=""),
                                            ])
                                        ],
                                    )
                                ),
                                dbc.Col(
                                    width=1,
                                ),
                            ]
                        )
                    ]
                ),

    ]
)

@callback(
    Output(component_id='outputHuman', component_property='children'),
    Output(component_id='outputChatBot', component_property='children'),
    Output(component_id='prompt', component_property='value'),
    Input(component_id='sendPrompt', component_property='n_clicks'),
    State(component_id='prompt', component_property='value')
)
def call_openai_api(n, human_prompt):
    if n==0:
        return "", "", ""
    else:
        result_ai = conversation.predict(input=human_prompt)
        human_output = f"Human: {human_prompt}"
        chatbot_output = f"ChatBot: {result_ai}"

        return human_output, chatbot_output, ""

if __name__ == '__main__':
    app.run_server(debug=True)
```