**Do you want to make your web app accessible via the Internet?** Deploying your web app gives you many advantages. You can quickly share the app with colleagues and clients. 

<figure class="">
  <img src="/assets/img/blog/2023-10-14-deploying-a-web-application-using-docker-on-render-at-no-cost/header_img.webp"
       alt="Web App With Docker on Render"><figcaption>
      Photo by <a href="https://unsplash.com/@tranmautritam">Tran Mau Tri Tam ✪</a> on <a href="https://unsplash.com" target="_blank" rel="noopener">Unsplash</a>

    </figcaption></figure>


We’ll show you how to deploy a Web App using Docker on Render.com. **It’s free. No credit card is required!** In this context, we create a Docker image of the application and push it to the Docker Hub Registry. Then, we deploy our app via Render.com. After that, our app is accessible via the Internet. Be curious! You will learn many new things.

We’ll discuss the following points:
* **Create and push a Docker Image on Docker Hub**
* **Create a Web Service on Render.com**
* **Limitations of Render.com**  
* **Conclusion**

<div class="ad-banner" style="margin-bottom: 0.7rem;">
    <hr class="hr-text" data-content="Explore our premium blog articles">
    <a href="https://tinztwinshub.com/membership"><img src="../../assets/img/ads/premium_2.webp" alt="Explore our premium blog articles" nopin="nopin"></a>
    <small style="display: block; margin-bottom: 0.5rem; margin-top: 0.5rem;"><strong>✨ Read without banner ads? </strong><a href="https://steady.page/en/tinztwins-hub/about" target="_blank" rel="noopener">Become a member</a> or <a href="https://steady.page/en/log_in?publication=tinztwins-hub" target="_blank" rel="noopener">log in</a></small>
</div>

## Create and push a Docker Image on Docker Hub
First of all, you have to log in to [Docker Hub](https://hub.docker.com/){:target="_blank" rel="noopener"}. If you don’t have an account, please sign up.

### Create a Docker repository on Docker Hub
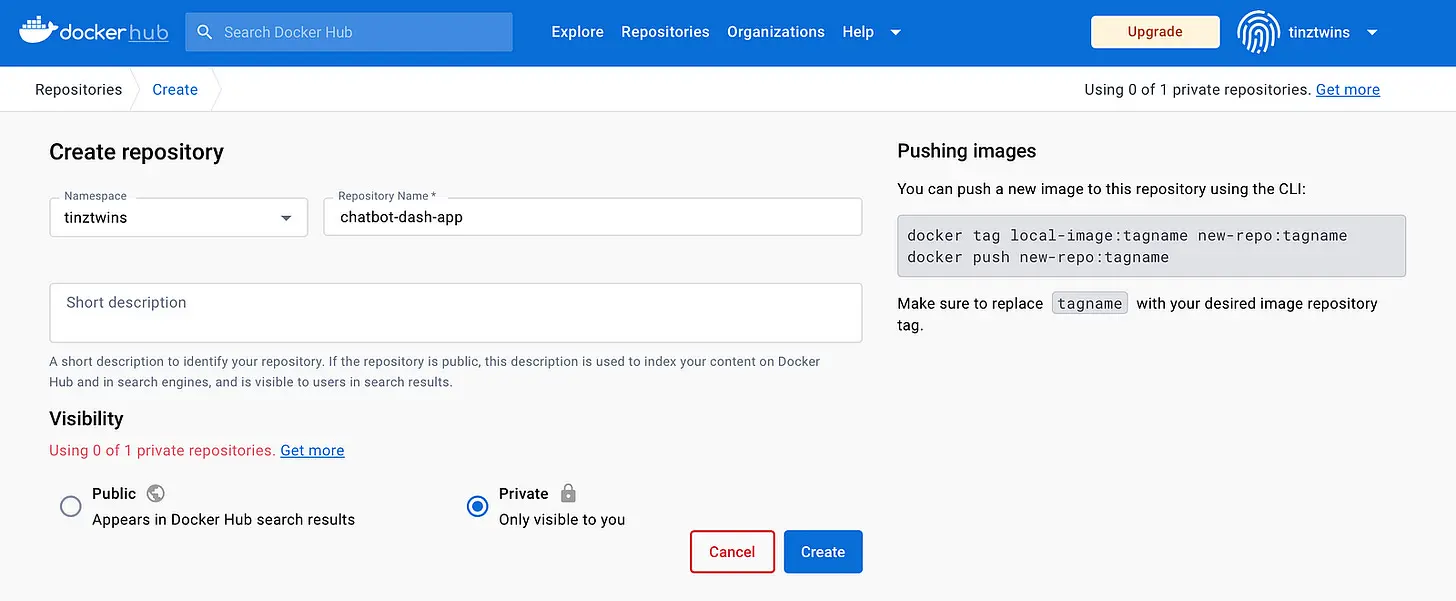
Once you’re logged into Docker Hub, press the button “Create repository”. The following menu appears:
![Create repository (Screenshot by authors)](/assets/img/blog/2023-10-14-deploying-a-web-application-using-docker-on-render-at-no-cost/create_a_repo.webp)

In this tutorial, we use a sample app, a Plotly Dash chatbot. You can create public or private repositories. We choose private. When you have filled out all the required fields, press “Create”.

<div class="ad-banner" style="margin-bottom: 0.7rem;">
    <hr class="hr-text" data-content="Advertisement*">
    <a href="/out/elevenlabs/" target="_blank" rel="sponsored nofollow noopener"><img src="../../assets/img/ads/elevenlabs.webp" alt="ElevenLabs Partner*" nopin="nopin"></a>
    <small style="display: block; margin-bottom: 0.5rem; margin-top: 0.5rem;"><strong>✨ Read without banner ads? </strong><a href="https://steady.page/en/tinztwins-hub/about" target="_blank" rel="noopener">Become a member</a> or <a href="https://steady.page/en/log_in?publication=tinztwins-hub" target="_blank" rel="noopener">log in</a></small>
</div>

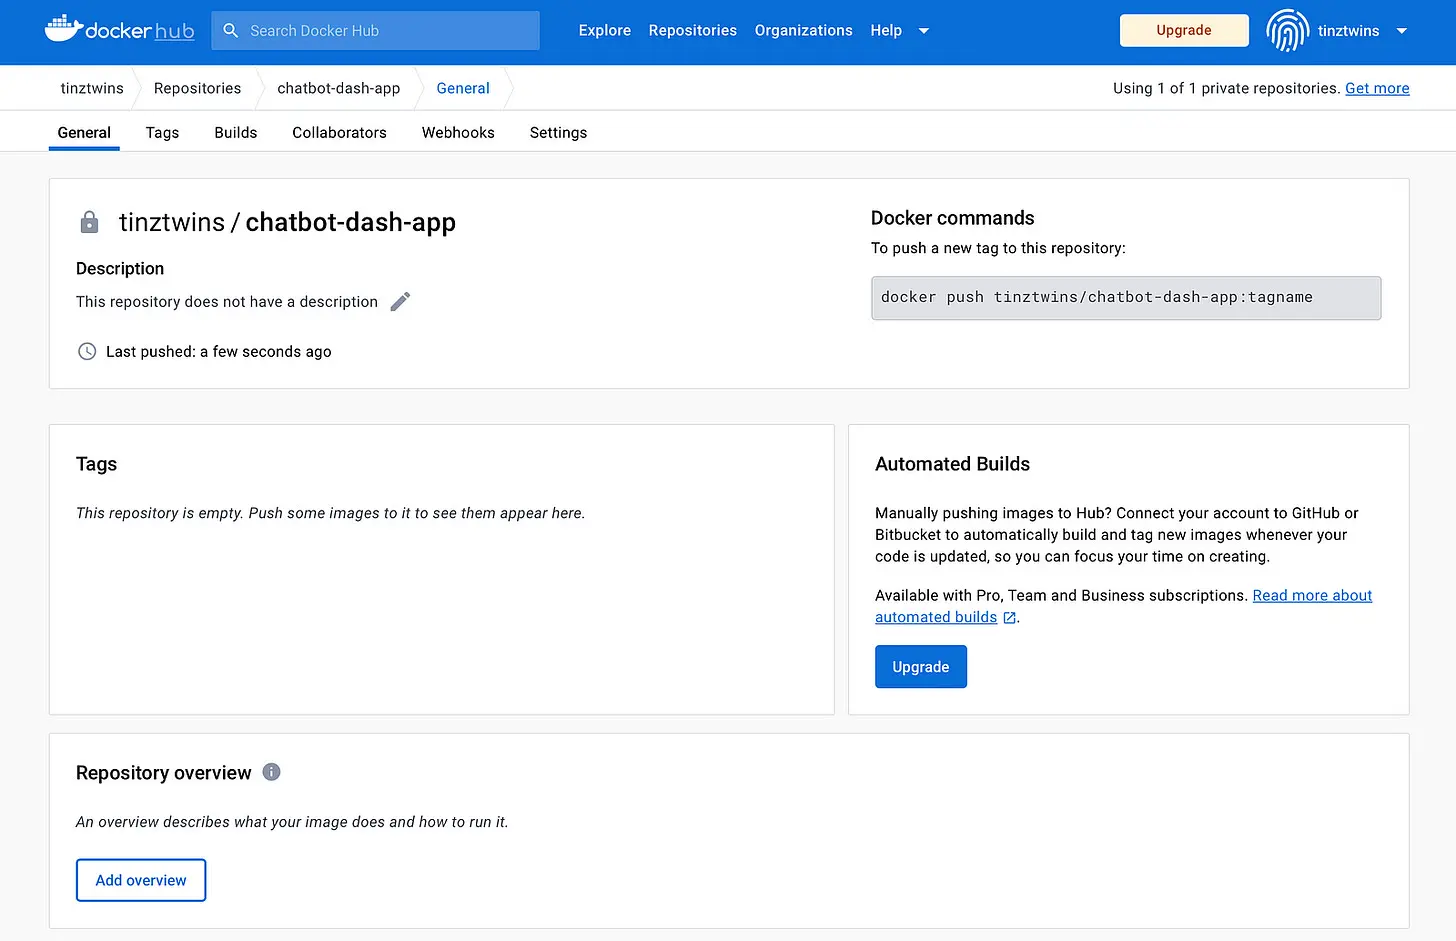
The following menu appears:

![Repository Docker Hub menu (Screenshot by authors)](/assets/img/blog/2023-10-14-deploying-a-web-application-using-docker-on-render-at-no-cost/repo_docker_hub_menu.webp)

At the top right, you see the command to push a new tag to this repository. This command is needed later in the article.

### Create a Docker Image on your local system
You can create a Docker image using a Dockerfile. A Dockerfile is a text file that contains all the commands to create an image. In our example, we use a Dockerfile for a Plotly Dash Web App. You can find a sample Dockerfile for a Dash App in our article “[A Comprehensive Guide to Building Enterprise-Level Plotly Dash Apps](/software-engineering/a-comprehensive-guide-to-building-enterprise-level-plotly-dash-apps/)”.

<div class="ad-banner" style="margin-bottom: 0.7rem;">
    <hr class="hr-text" data-content="Explore our premium blog articles">
    <a href="https://tinztwinshub.com/membership"><img src="../../assets/img/ads/premium_1.webp" alt="Explore our premium blog articles" nopin="nopin"></a>
    <small style="display: block; margin-bottom: 0.5rem; margin-top: 0.5rem;"><strong>✨ Read without banner ads? </strong><a href="https://steady.page/en/tinztwins-hub/about" target="_blank" rel="noopener">Become a member</a> or <a href="https://steady.page/en/log_in?publication=tinztwins-hub" target="_blank" rel="noopener">log in</a></small>
</div>

**Build a Docker Image:**

```bash
docker build -t chatbot-app:latest .
```

The `docker build` command builds a Docker Image from your Dockerfile. Here’s a short explanation of the command:
* `-t`: That is the tag flag. You can give your image optionally a tag. 
* `chatbot-app:latest`: The name of the image is `chatbot-app`, and the tag is `latest`. 
* `.`: This specifies that the path is `.`, and so all files in the local directory are used to create the image.

<div class="ad-banner" style="margin-bottom: 0.7rem;">
    <hr class="hr-text" data-content="Advertisement*">
    <a href="/out/castmagic/" target="_blank" rel="sponsored nofollow noopener"><img src="../../assets/img/ads/castmagic.webp" alt="CastMagic Partner*" nopin="nopin"></a>
    <small style="display: block; margin-bottom: 0.5rem; margin-top: 0.5rem;"><strong>✨ Read without banner ads? </strong><a href="https://steady.page/en/tinztwins-hub/about" target="_blank" rel="noopener">Become a member</a> or <a href="https://steady.page/en/log_in?publication=tinztwins-hub" target="_blank" rel="noopener">log in</a></small>
</div>
    
If the Docker build process is successful, we can test the image locally. For this, we create a Docker container. You can do this with the following command:

```bash
docker run --name chatbot -d -p 7000:7000 chatbot-app
```

The `docker run` command is used to define the container’s resources at runtime. Here is an explanation of the command:
* `--name`: You can specify the container name after `--name`. In our case, it is `chatbot`.
* `-d`: With this flag, you activate the detached mode. That means that a Docker container runs in the background. Using this mode also allows you to close your terminal session.   
* `-p`: After this flag, you can specify the port &lt;host port&gt;:&lt;container port&gt;.  
* `chatbot-app`: That is the name of the Docker image that we have created above.

If everything works well, we are ready to push the image to Docker Hub.

<div class="ad-banner" style="margin-bottom: 0.7rem;">
    <hr class="hr-text" data-content="Advertisement*">
    <a href="/out/elevenlabs/" target="_blank" rel="sponsored nofollow noopener"><img src="../../assets/img/ads/elevenlabs.webp" alt="ElevenLabs Partner*" nopin="nopin"></a>
    <small style="display: block; margin-bottom: 0.5rem; margin-top: 0.5rem;"><strong>✨ Read without banner ads? </strong><a href="https://steady.page/en/tinztwins-hub/about" target="_blank" rel="noopener">Become a member</a> or <a href="https://steady.page/en/log_in?publication=tinztwins-hub" target="_blank" rel="noopener">log in</a></small>
</div>

### Push the image to the Docker Hub registry
First, you need to log in to Docker Hub via your terminal. You can use the following command:

```bash
docker login -u <username>

# Enter password
Password:
```

Enter your username and password. After that, you can push the image to Docker Hub. We have to tag the target image that refers to the source image. We will demonstrate this with our example. We give the target image the name “tinztwins/chatbot-dash-app” and the tag “latest”.

```bash
docker tag chatbot-app:latest tinztwins/chatbot-dash-app:latest
```

Then, we can push the image to Docker Hub.

```bash
docker push tinztwins/chatbot-dash-app:latest
```

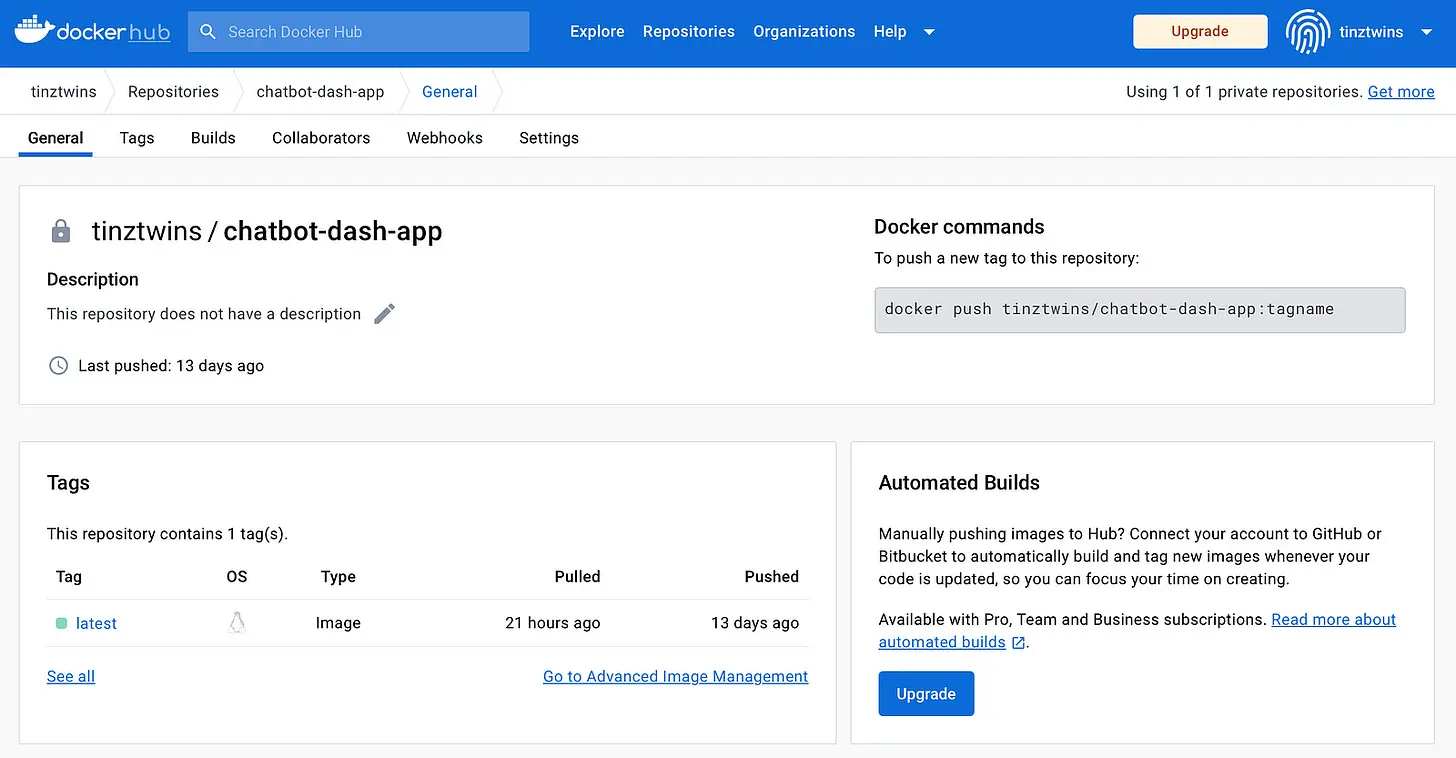
After that, the Docker image appears on your Docker Hub account.
![Docker Image Overview (Screenshot by authors)](/assets/img/blog/2023-10-14-deploying-a-web-application-using-docker-on-render-at-no-cost/docker_image_overview.webp)

<div class="ad-banner" style="margin-bottom: 0.7rem;">
    <hr class="hr-text" data-content="Explore our premium blog articles">
    <a href="https://tinztwinshub.com/membership"><img src="../../assets/img/ads/premium_1.webp" alt="Explore our premium blog articles" nopin="nopin"></a>
    <small style="display: block; margin-bottom: 0.5rem; margin-top: 0.5rem;"><strong>✨ Read without banner ads? </strong><a href="https://steady.page/en/tinztwins-hub/about" target="_blank" rel="noopener">Become a member</a> or <a href="https://steady.page/en/log_in?publication=tinztwins-hub" target="_blank" rel="noopener">log in</a></small>
</div>

## Create a Web Service on Render.com
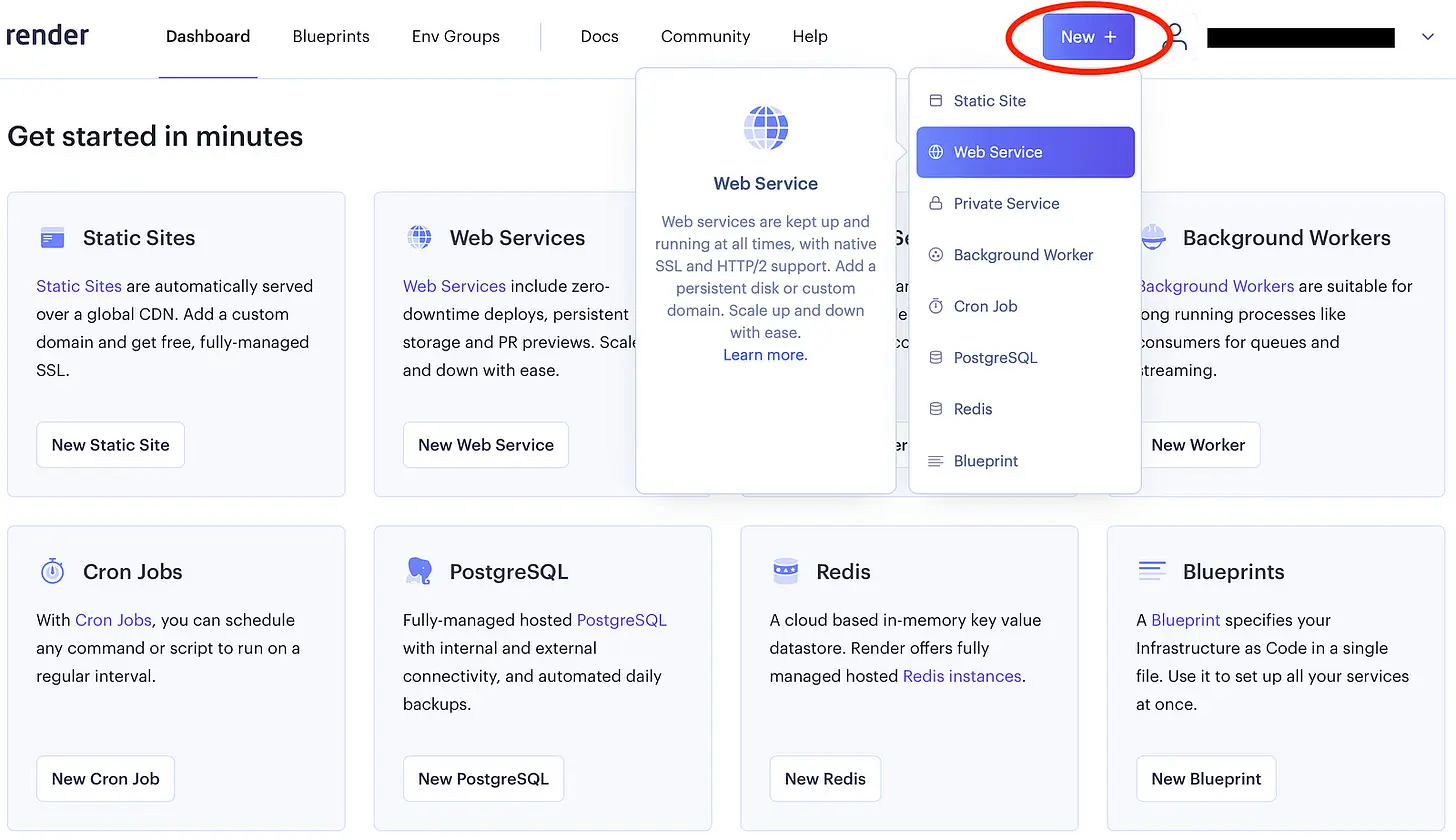
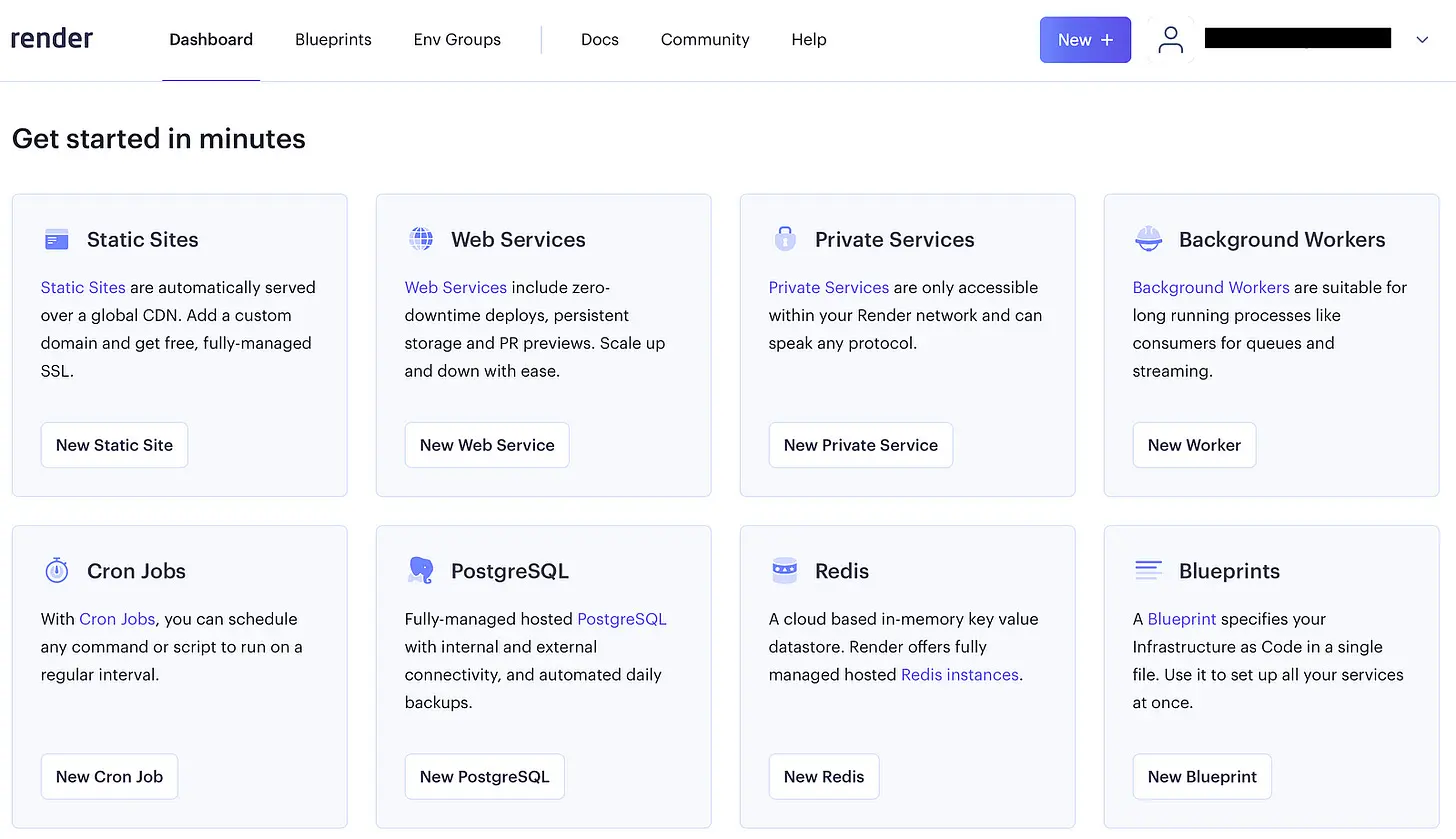
You need to log in at [render.com](https://dashboard.render.com/). If you don’t have an account yet, please create one. Once you have logged in, the following page will be displayed.
![Render Start page (Screenshot by authors)](/assets/img/blog/2023-10-14-deploying-a-web-application-using-docker-on-render-at-no-cost/render_start_page.webp)

Next, you have to create a Web Service. To do this, click **New -&gt; Web Service**.

![Create new Web Service (Screenshot by authors)](/assets/img/blog/2023-10-14-deploying-a-web-application-using-docker-on-render-at-no-cost/create_new_web_service.webp)

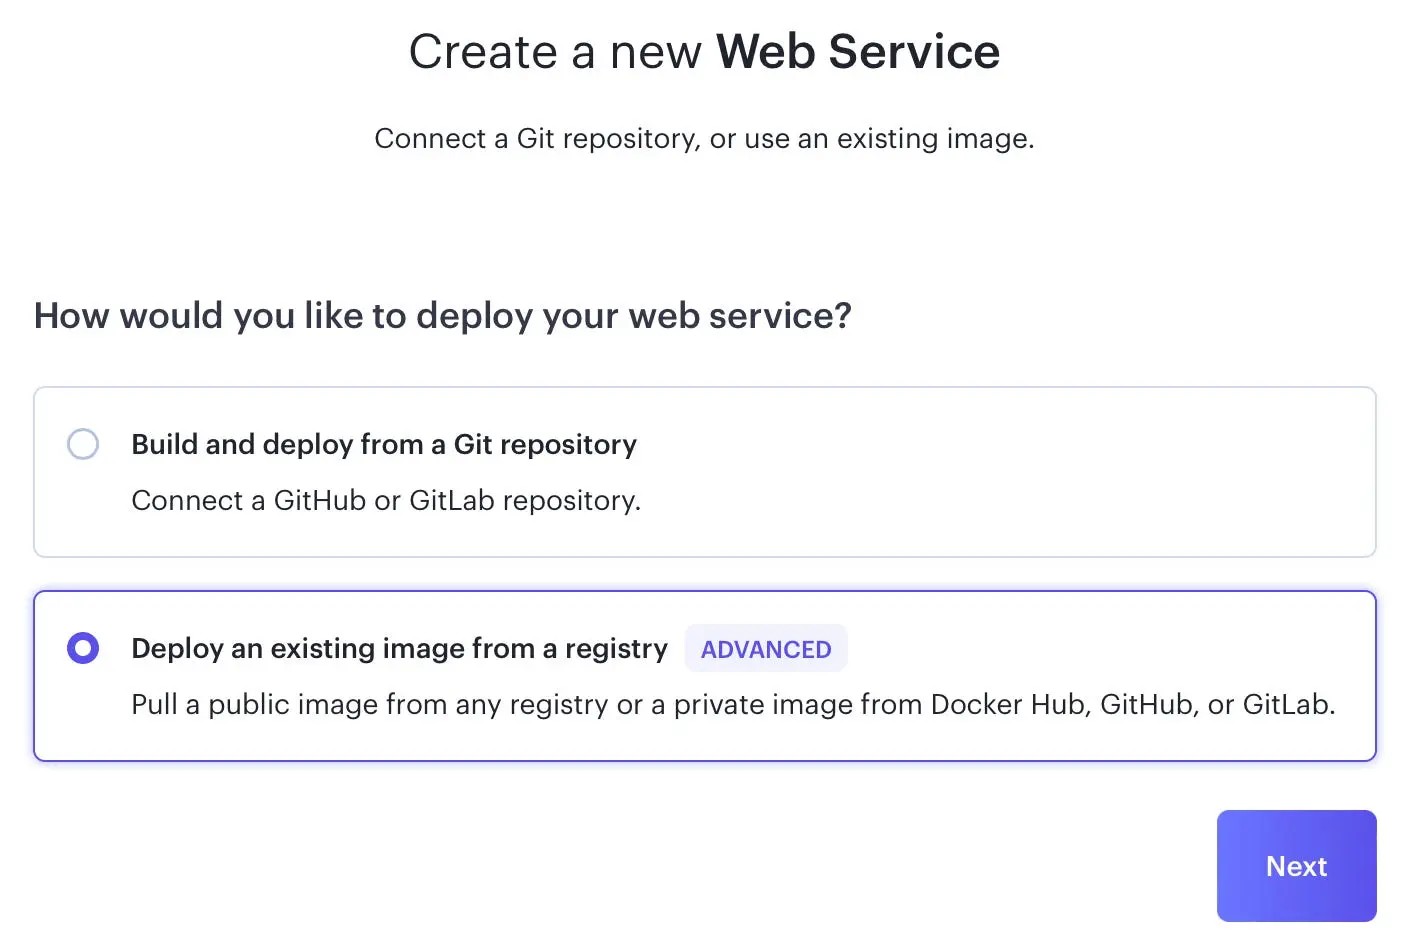
The following menu appears:

![How would you like to deploy your web service? (Screenshot by authors)](/assets/img/blog/2023-10-14-deploying-a-web-application-using-docker-on-render-at-no-cost/create_new_web_service_1.webp)

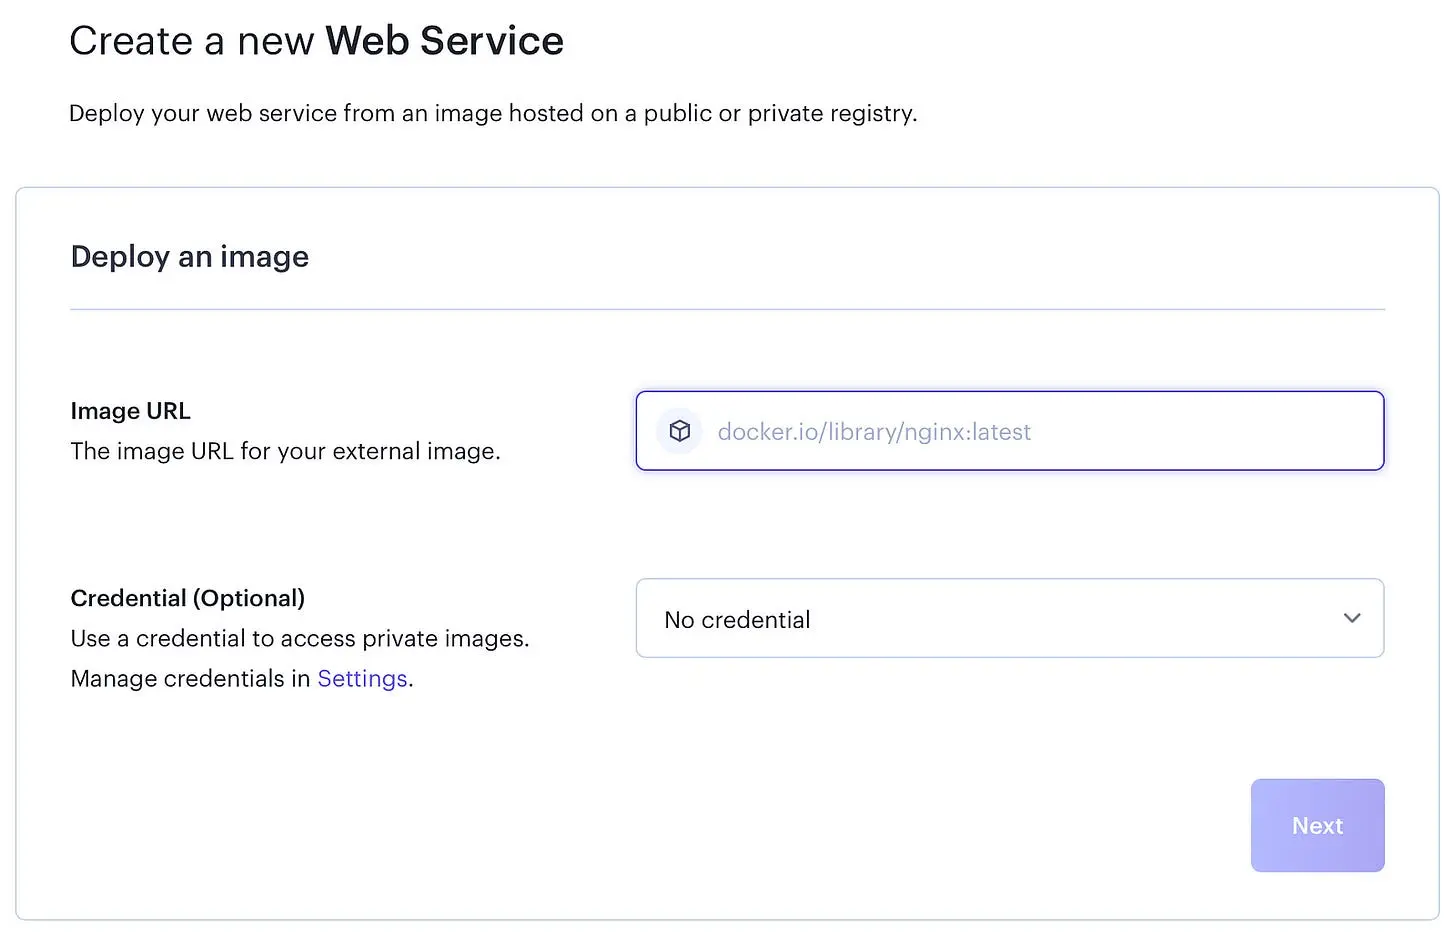
Now, you can deploy directly from your GitHub or GitLab Repository. But in this tutorial, we want to deploy an existing Docker Image from Docker Hub. For this reason, we choose the second option. Click “Next”.
![Deploy an image (Screenshot by authors)](/assets/img/blog/2023-10-14-deploying-a-web-application-using-docker-on-render-at-no-cost/deploy_image.webp)

Now, you have to enter the URL of your Docker Image and the credentials for private images. Enter this and click “Next”.
![Choose name, region and instance type (Screenshot by authors)](/assets/img/blog/2023-10-14-deploying-a-web-application-using-docker-on-render-at-no-cost/choose_name_region_instance.webp)

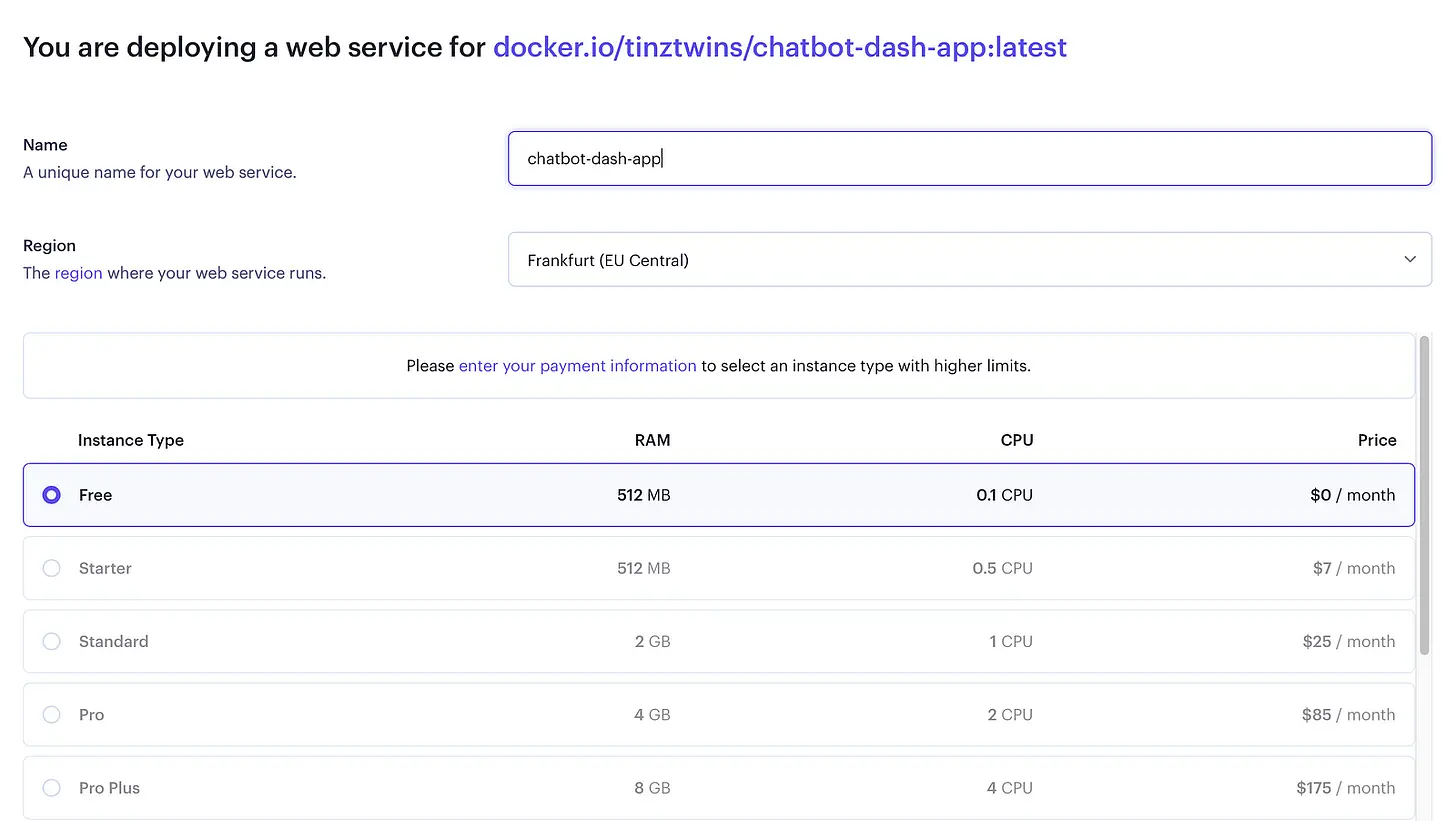
In the last step, we give our app a unique name and select a hosting region. We also choose the **Free** instance. Then, Render.com automatically deploys your app. In the Render Web UI, you can see events, logs, environments, and other details.

URL of our Plotly Dash App: [https://chatbot-dash-app.onrender.com](https://chatbot-dash-app.onrender.com/){:target="_blank" rel="noopener"}

Best of all, your app will always be updated when you push a new Docker image to Docker Hub. Render and Docker Hub work well together.

## Limitations of Render.com
In the last few days, we played around with Render.com. We have found out that Render.com spins down free instances with inactivity. As a result, the app has a very long loading time. You don’t have this disadvantage with a Hugging Face Spaces deployment, for example. We have described how to use Docker on Hugging Face in [another article](/software-engineering/how-to-deploy-your-plotly-dash-app-to-hugging-face-using-docker-its-free/) in detail.

## Conclusion
In this article, we have shown you how to deploy a Docker image on Render.com. In this context, you learned how to push a Docker image to Docker Hub. With Render, you can easily deploy a Docker Image from Docker Hub. Finally, we have presented you with the limitations of Render based on our experience.

Thanks so much for reading. **Have a great day!**

<div class="ad-banner">
  <hr>
  💡 Do you enjoy our content and want to read super-detailed guides about AI Engineering? If so, be sure to check out our premium offer!


  <div style="text-align: center; margin-top: 0.7rem;">
    <a href="https://steady.page/en/tinztwins-hub/about" class="btn btn--primary">Unlock Premium</a>      
  </div>
</div>

<div class="ad-banner">
    <hr class="hr-text" data-content="Our Merch Shop">
    <a href="https://shop.tinztwinshub.com/merch/"><img src="../../assets/img/ads/ai_and_coding_merch.webp" alt="AI and Coding Merch" nopin="nopin"></a>
    <small style="display: block; margin-bottom: 0.5rem; margin-top: 0.5rem;"><strong>✨ Read without banner ads? </strong><a href="https://steady.page/en/tinztwins-hub/about" target="_blank" rel="noopener">Become a member</a> or <a href="https://steady.page/en/log_in?publication=tinztwins-hub" target="_blank" rel="noopener">log in</a></small>
</div>