**Our experience has shown that software projects are often insufficiently documented. But why? Most software projects have a limited budget and a tight schedule. Documentation is then often neglected.**
Generated with Bing DALL-E
Insufficient documentation increases the costs of maintaining a project. For this reason, good documentation is essential. Good documentation includes more than just the technical description of the code. Many development teams use Markdown files for documentation. It’s easy to lose track of the many Markdown files in large projects.
Automatically generated documentation addresses this challenge because maintaining such documentation requires less effort. In addition, the information between your code and the documentation pages is automatically linked. There are a lot of tools for project documentation. In this article, we’ll show you how to document a Plotly Dash App with MkDocs.
## Why is documentation crucial?
Documentation is an essential aspect of software projects because it ensures that the developer team can understand, maintain and update the code base. Here are the main advantages of **comprehensive** documentation.
* **Save time for developers**
* **Simplifies the maintenance of the code base**
* **Improve collaboration between developer**
* **Knowledge sharing**
* **Save money for the company**
## Why MkDocs?
There are many documentation frameworks to document software projects. [MkDocs](https://www.mkdocs.org/){:target="_blank" rel="noopener"} is a popular tool in the Python community. From our point of view, MkDocs is the best choice to document a Python project in a clear and maintainable way. The advantage of MkDocs is that it’s easy to set up. In addition, you can use Markdown files for documentation. MkDocs finally makes these Markdown files available via a web interface. For the code documentation, you can use docstrings so that MkDocs generates the code documentation automatically.
## Best Practices for Project Documentation
For the project documentation, we use the [Diátaxis documentation framework](https://diataxis.fr/){:target="_blank" rel="noopener"}. The name Diátaxis comes from the Ancient Greek: dia (“across”) and taxis (“arrangement”). This framework is widely used in the Python community. In addition, the framework aims to solve the problem with the structure in the technical documentation. It contains the following four types of documentation:
* **Tutorials:** Learning-oriented
* **How-to guides:** Goal-oriented
* **Technical reference:** Information-oriented
* **Explanation:** Understanding-oriented
We explicitly separate all related concepts through these four types. This procedure makes the documentation **maintainable, comprehensive** and **clear**.
## Integration of MkDocs into a Plotly Dash App
In our article “[A Comprehensive Guide to Building Enterprise-Level Plotly Dash Apps](/software-engineering/a-comprehensive-guide-to-building-enterprise-level-plotly-dash-apps/)”, we showed you how to create a well-structured Dash App. In this article, we’ll extend the Plotly Dash App with MkDocs documentation.
As a reminder, the Plotly Dash App has the following file structure:
```plaintext
.
├── dash-app
│ └── assets # this folder contains style files
│ │ ├── style.py
│ │ └── typography.css
│ ├── components # this folder contains reusable components
│ │ ├── dropdown.py
│ │ └── navbar.py
│ ├── environment # this folder contains environment settings
│ │ ├── .env
│ │ ├── .env_development
│ │ └── settings.py
│ ├── pages # this folder contains the pages
│ ├── plots # this folder contains different plots
│ ├── utils # this folder contains helper functions
│ ├── app.py
│ ├── Dockerfile
│ ├── index.py
│ └── requirements.txt
```
We recommend working in a virtual environment like [conda](https://docs.conda.io/en/latest/){:target="_blank" rel="noopener"}. In this environment, we install the dependencies.
### Install necessary dependencies
To use the MkDocs framework, we need the following Python packages:
* `mkdocs`: Package for creating static pages from Markdown files
* `mkdocstrings[python]`: Package for auto-generating documentation from your code
* `mkdocs-material`: Package for styling your documentation
Install the packages with the following command:
```python
pip install mkdocs "mkdocstrings[python]" mkdocs-material
```
### Docstrings
The package mkdocstrings uses the information from the code to create the code documentation. We must use docstrings in our Python code to generate code documentation automatically. It is also necessary to place an `__init__.py` file in each folder of the Plotly Dash template.
MkDocs supports three types of docstring formats:
* [Google-Style Docstrings](https://google.github.io/styleguide/pyguide.html#38-comments-and-docstrings){:target="_blank" rel="noopener"}
* [NumPy Docstrings](https://numpydoc.readthedocs.io/en/latest/format.html#docstring-standard){:target="_blank" rel="noopener"}
* [Sphinx Docstrings](https://sphinx-rtd-tutorial.readthedocs.io/en/latest/docstrings.html#the-sphinx-docstring-format){:target="_blank" rel="noopener"}
We use Google-Style Docstrings in our Plotly Dash App Project.
**Example function render\_dropdown() :**
We always use VSCode as IDE for our Python projects. In VSCode, you can use the “[autoDocstring — Python Docstring Generator](https://marketplace.visualstudio.com/items?itemName=njpwerner.autodocstring){:target="_blank" rel="noopener"}” extension to generate the docstrings automatically.
Example autoDocstring:
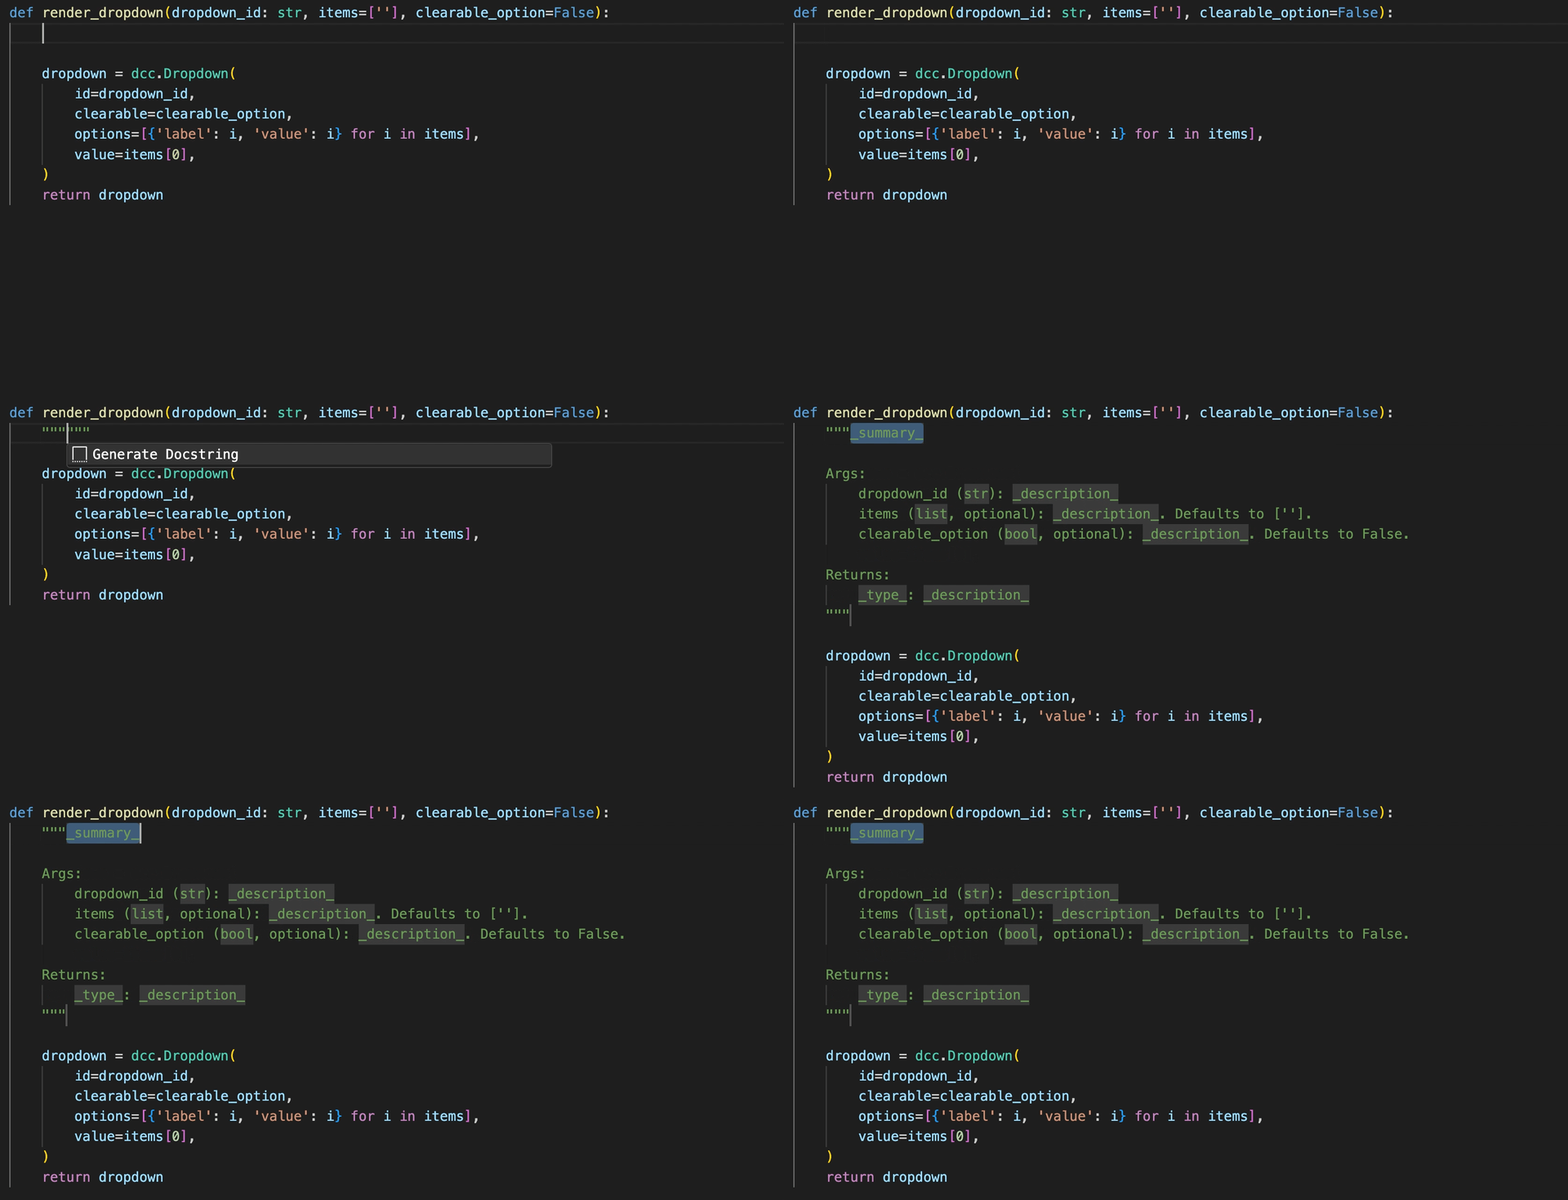
Now, we fill in the missing fields. That’s it! The function then looks like this:
```python
def render_dropdown(dropdown_id: str, items=[''], clearable_option=False):
"""This function can be used to render a dropdown menu.
Args:
dropdown_id (str): Id of the dropdown menu
items (list, optional): List of items. Defaults to [''].
clearable_option (bool, optional): Option to clear dropdown menu. Defaults to False.
Returns:
dropdown (dcc.Dropdown): Dropdown html component
"""
dropdown = dcc.Dropdown(
id=dropdown_id,
clearable=clearable_option,
options=[{'label': i, 'value': i} for i in items],
value=items[0],
)
return dropdown
```
### Create MkDocs Structure
Now, it’s time to create the MkDocs file structure. You can generate this with a simple command. Execute the following command:
```python
mkdocs new .
```
This command creates a `docs` folder with an `index.md` file and `mkdocs.yml`. You can see the result below:
```python
.
├── dash-app
├── docs/
│ └── index.md
└── mkdocs.yml
```
The `mkdocs.yml` is the configuration file of the MkDocs documentation. Let’s have a look at it.
```python
site_name: My Docs
```
The default `mkdocs.yml` file only contains the element `site_name`. This attribute defines the default name of the documentation. We change it to “Plotly Dash App Docs”. In the next step, we change the default theme with the Material theme. The configuration file looks then as follows:
```python
site_name: Plotly Dash App Docs
theme:
name: "material"
```
Next, we follow the Diátaxis documentation framework that we introduced in the section “Best Practices for Project Documentation”. We split the documentation into four parts: tutorials, how-to guides, technical references, and explanations. After adding these files, the `docs` folder contains the following Markdown files:
```python
docs/
├── explanation.md
├── how_to_guides.md
├── index.md
├── technical_reference.md
└── tutorials.md
```
Every Markdown file is a separate static page. The start page that shows up is always the `index.md` file. Each page has a title. The default title is the filename. But we can change the title of the pages by adding the element `nav` to the `mkdocs.yml` file. We changed some titles as follows:
```python
site_name: Plotly Dash App Docs
theme:
name: "material"
nav:
- Dash App Docs: index.md
- tutorials.md
- How-To Guides: how_to_guides.md
- Technical reference: technical_reference.md
- explanation.md
```
In the last step, we add auto-generating code documentation functionality to our project. That’s very simple. We add just the `plugins` element into the `mkdocs.yml` file. The configuration file looks like this:
```python
site_name: Plotly Dash App Docs
theme:
name: "material"
plugins:
- mkdocstrings
nav:
- Dash App Docs: index.md
- tutorials.md
- How-To Guides: how_to_guides.md
- Technical reference: technical_reference.md
- explanation.md
```
One last thing. We have to add the `dropdown.py` file to the `technical_reference.md` file, so that MkDocs can generate the code documentation. Add the following single line to the `technical_reference.md`:
```python
::: dash-app.components.dropdown
```
Now, we’re ready to build our documentation. Execute the following command in your terminal:
```python
mkdocs serve
```
Then, you see the following output:
```python
INFO - Building documentation...
INFO - Cleaning site directory
INFO - Documentation built in 0.54 seconds
INFO - [11:53:36] Watching paths for changes: 'docs', 'mkdocs.yml'
INFO - [11:53:36] Serving on http://127.0.0.1:8000/
```
We can open the documentation via http://127.0.0.1:8000/. Now, you can see the Mkdocs documentation.
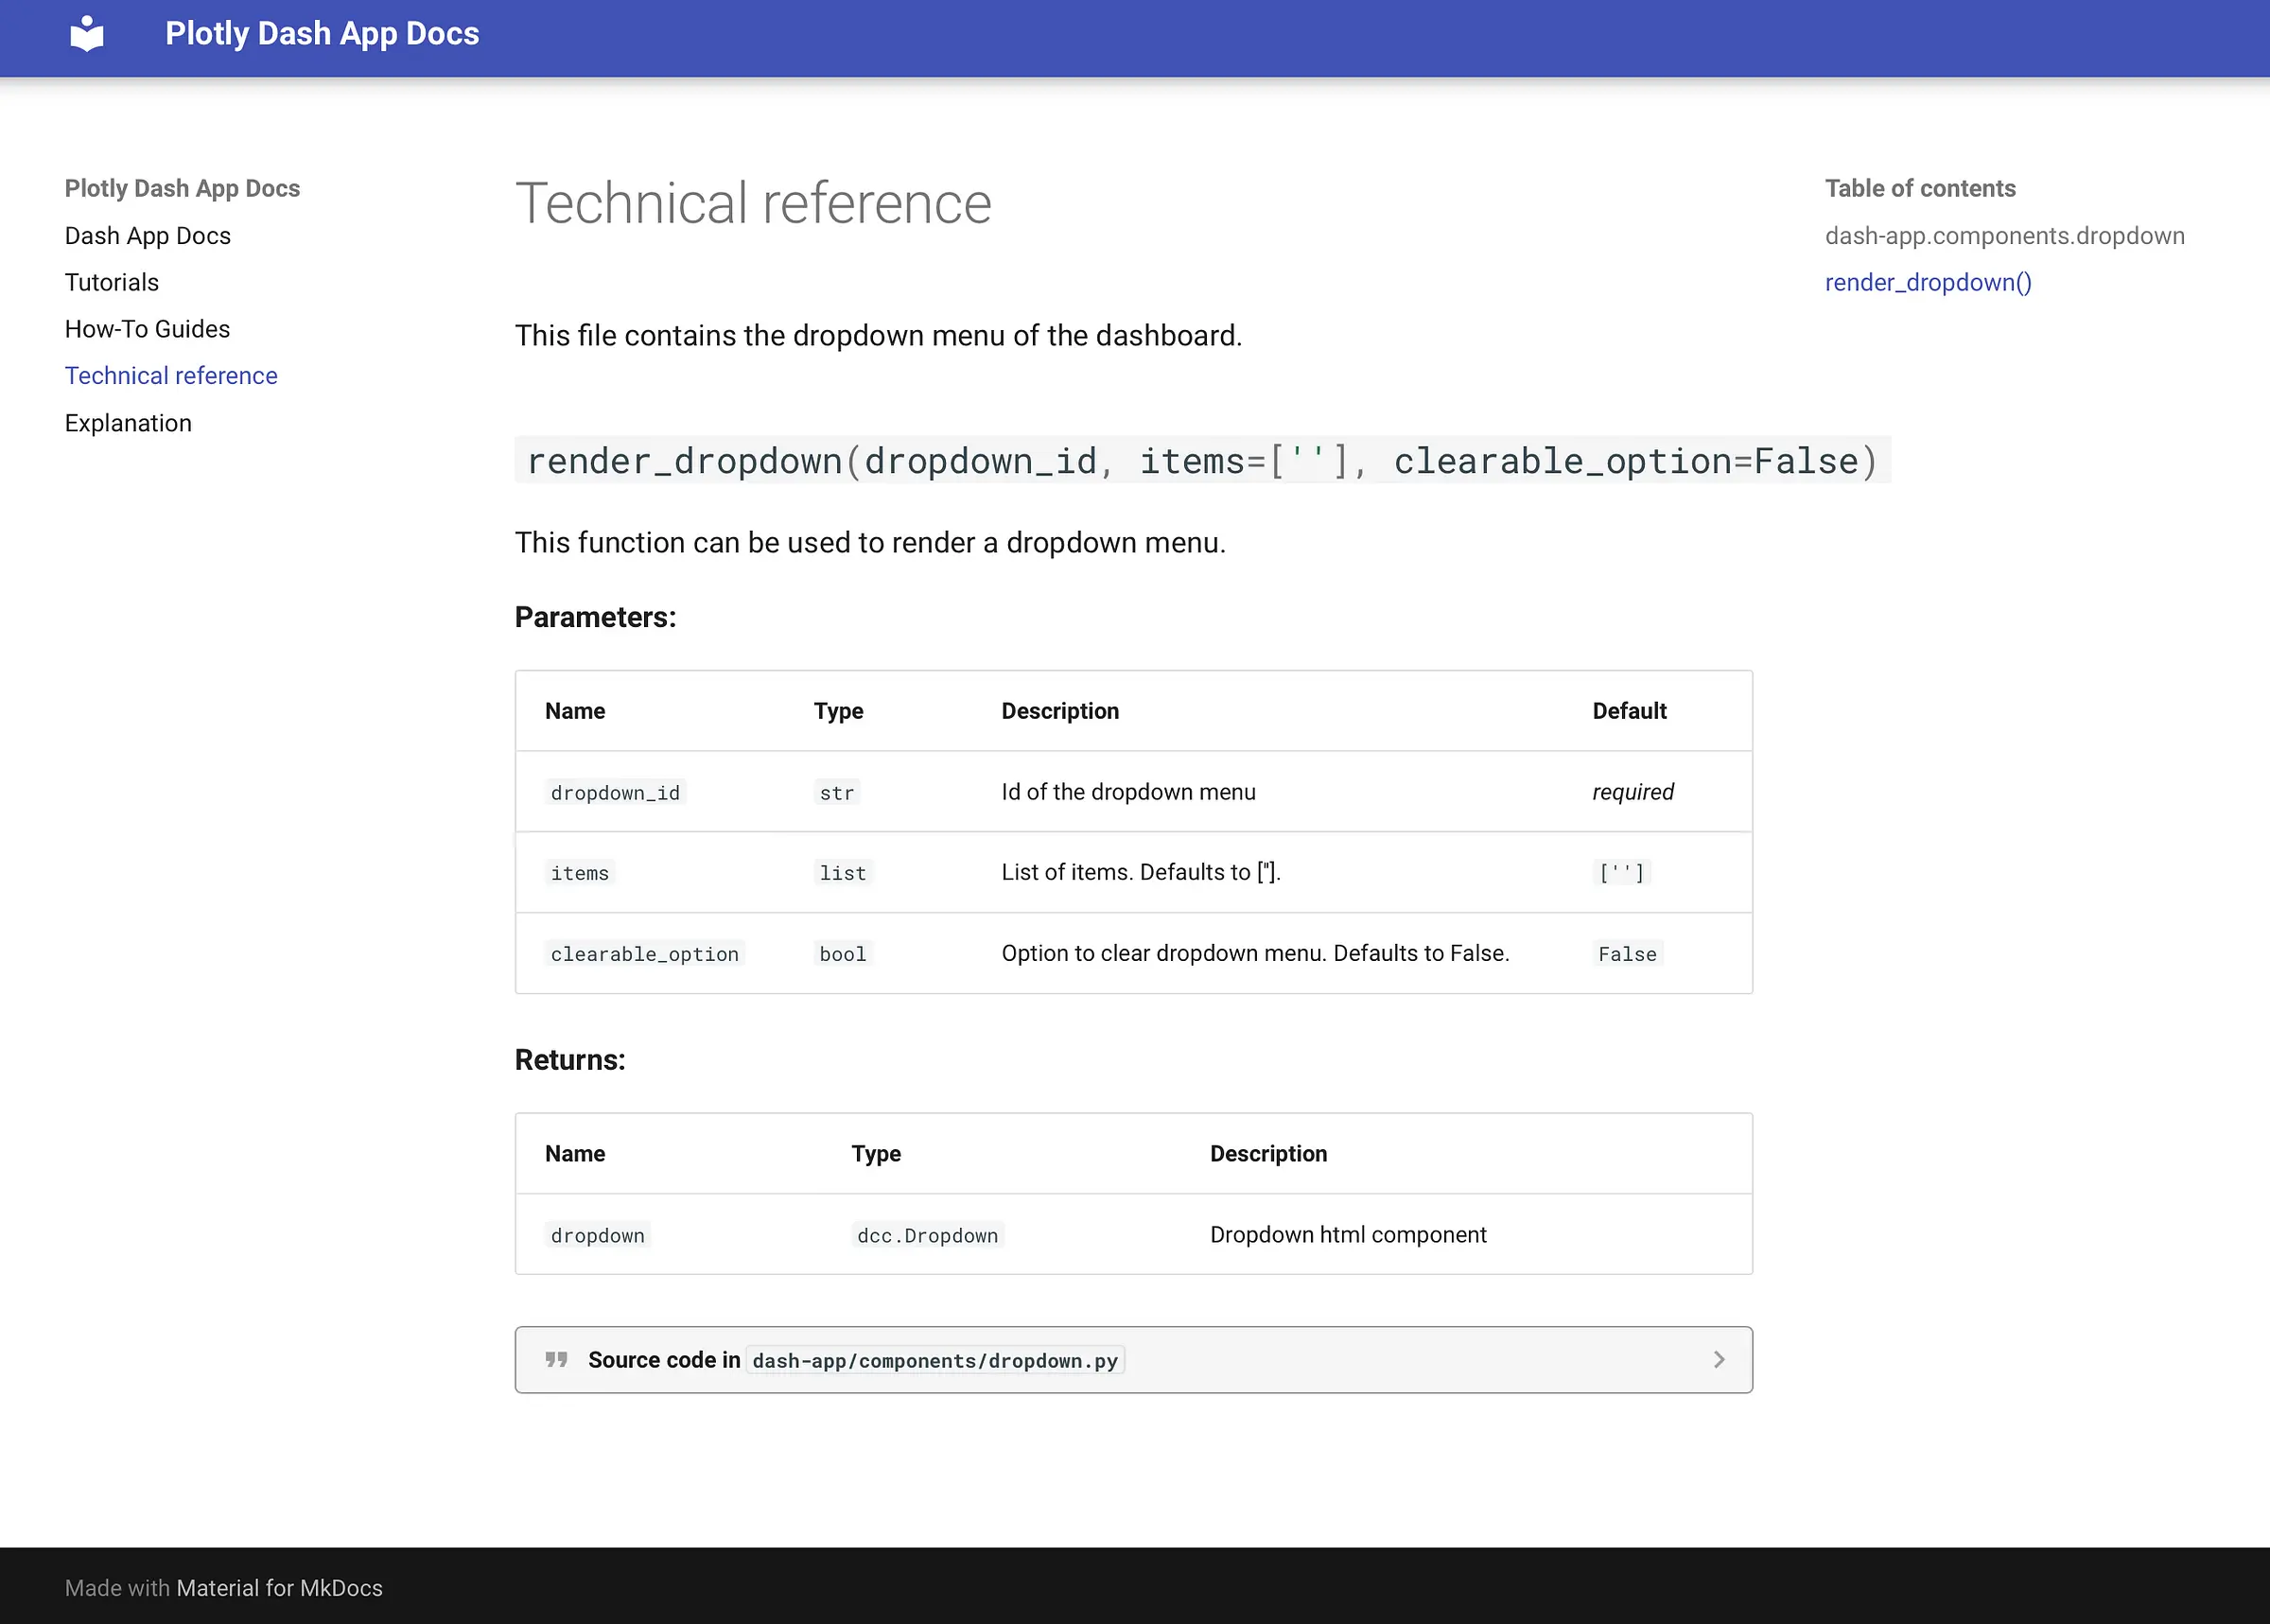
In the screenshot, you can see the Technical reference page. You can navigate via the navigation bar between the individual pages. The screenshot shows the code documentation of the `render_dropdown()` function. We can now apply the same procedure to the rest of the functions of the Plotly Dash template. You can also write further information in the Markdown files Tutorials, How-To Guide, and Explantation. That’s it!
## Conclusion
In this article, we showed you how to build well-structured documentation for a Plotly Dash App. You learned the Best Practices for project documentation. In addition, you learned how to write docstrings for your code. The docstrings are necessary for auto-generated code documentation. MkDocs and mkdocstrings allow you to write Markdown and auto-generate parts. Material for MkDocs makes your documentation gorgeous.
Thanks so much for reading. **Have a great day!**
💡 Do you enjoy our content and want to read super-detailed guides about AI Engineering? If so, be sure to check out our premium offer!