
How to setup an MLflow Workspace with Docker?
MLflow is an open-source platform to manage the Machine Learning (ML) lifecycle. By using MLflow, the code, data, and results can be tracked for each ML experiment, meaning all processing steps can be viewed at any later time. All experiments are reproducible and you can share and deploy your models with MLflow.

Furthermore, MLflow offers a set of APIs that can be used with many existing ML libraries like TensorFlow, PyTorch or sklearn, wherever you run the ML code (e.g. in jupyter notebooks on-premise or in the cloud). MLflow is library-agnostic. All functions are accessible via a REST API and CLI. In addition, the MLflow project includes a Python API, R API and Java API.
As a Data Scientist, you spend a lot of time optimizing ML models. The best models often depend on an optimal hyperparameter or feature selection and it is difficult to find an optimal combination. Also, you have to remember all the combinations, which is very time-consuming. MLflow is an efficient open-source platform to deal with these challenges.
In this post, we will introduce the basic functionalities of MLflow and show a setup with Docker. In this context, MLflow is set up in a docker stack with a Postgres database, an SFTP server and a JupyterLab. The steps are the following:
- MLflow basics
- Technical requirements
- Setup with Docker
- Conclusion
- Useful literature and links
MLflow basics
Currently, MLflow offers four components. You can see them in the following figure.
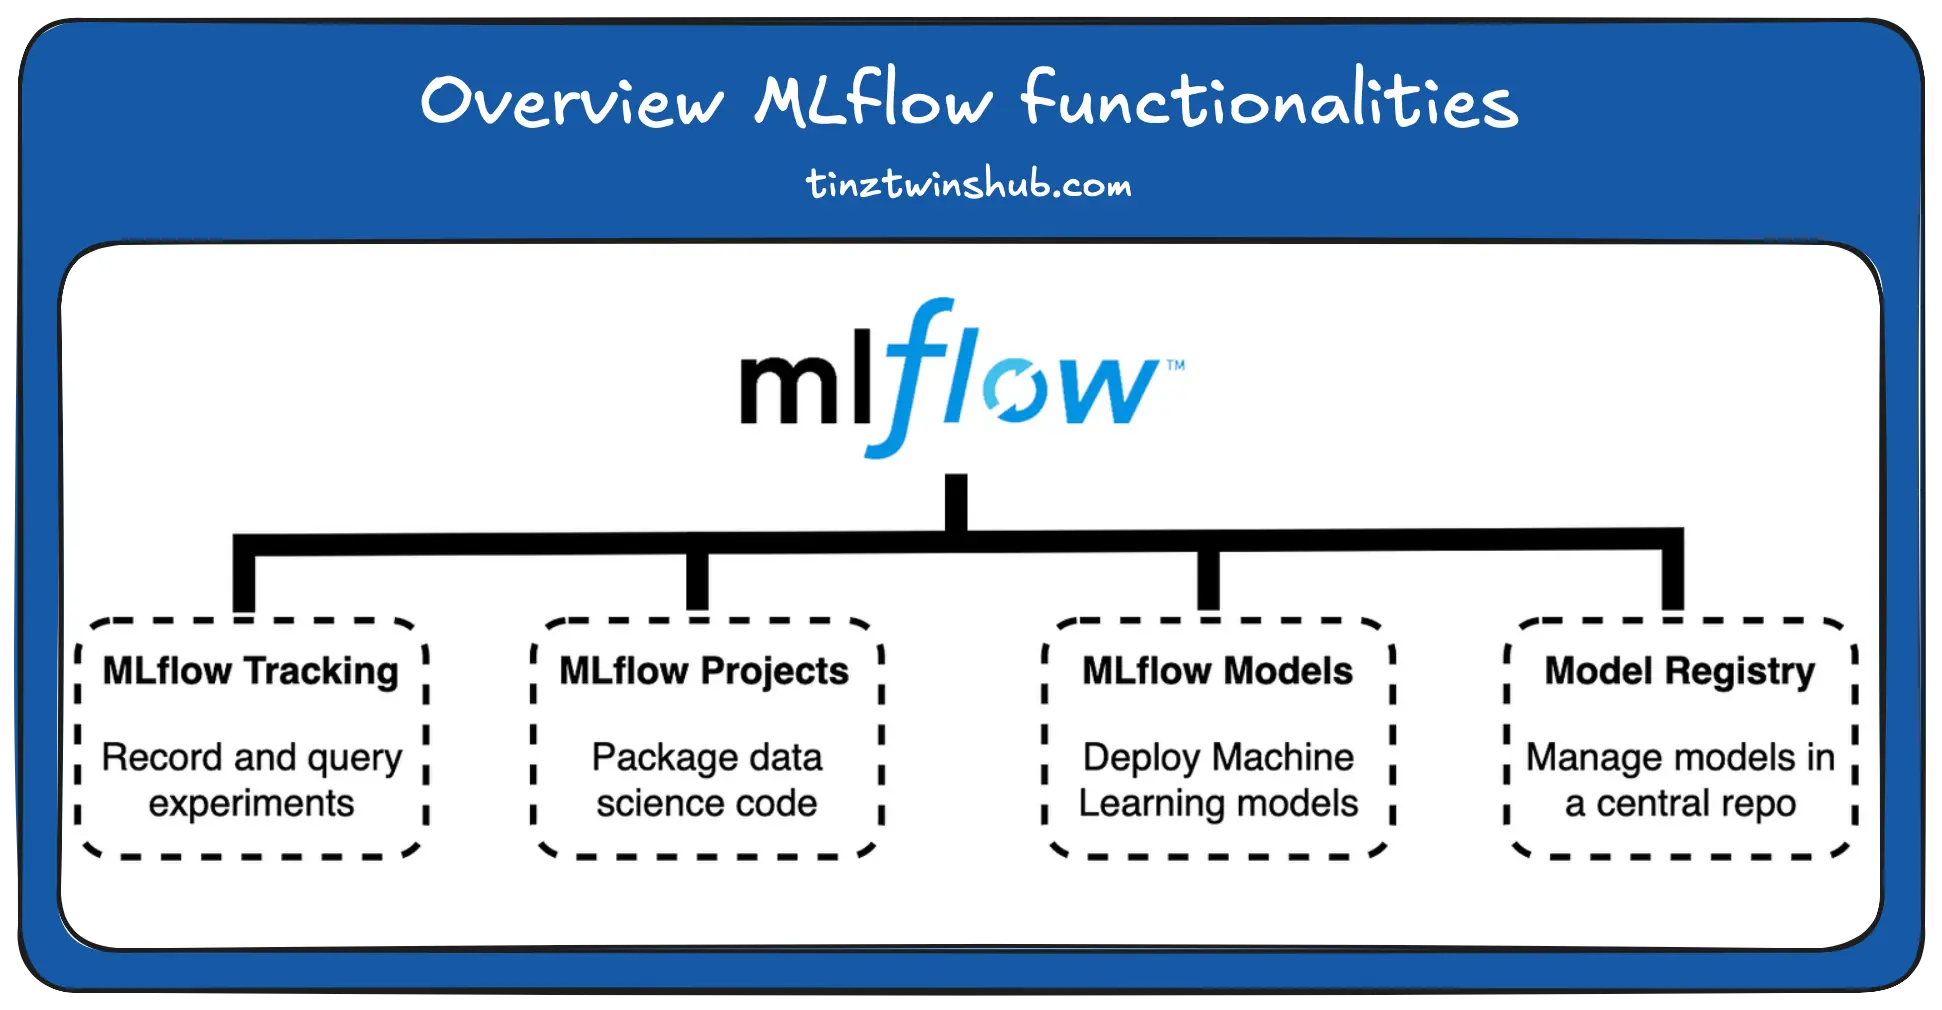
- MLflow Tracking is used to track and query experiments. It tracks the model parameters, code, data and model artifacts. In addition, MLFlow’s tracking server provides a Web UI, which shows the tracked ML models. The MLflow library already provides the Web UI. The tracking server is organized in the form of experiments. In the experiments, the ML models can be compared by visualizing the results.
- MLflow Project is a component used for packaging data science code in a reusable and reproducible way.
- The MLflow Model format provides a uniform storage format for ML models created with different libraries (e.g. TensorFlow, PyTorch or sklearn). The uniform format enables deployment in diverse environments.
- The Model Registry component allows providing the chronology of produced models from staging to production. It enables the management of ML models in a central model repository.
You can learn more about the individual components in the official documentation and the GitHub repo of MLflow.
Technical requirements
You will need the following prerequisites:
- The latest version of Docker must be installed on your machine. If you do not have it installed yet, please follow the instructions.
- The latest version of Docker Compose must be installed on your machine. Please follow the instructions.
- Access to a bash (macOS, Linux or Windows).

Setup Workspace with Docker
First, you should check that you have Docker and Docker Compose installed correctly. Open the terminal of your choice and enter the following command:
$ docker --version
# Example output: $ Docker version 20.10.21
If the installation is correct, the Docker version is output. You can check the same for your Docker Compose installation.
$ docker-compose --version
# Example output: $ Docker Compose version v2.12.2
Yeah. Everything is ok. Now we can start with our Docker Compose stack.
There are several ways to use MLflow. You can use MLflow with localhost or you deploy a complete stack for a production environment. We will focus on the second option in this post. The stack contains four services, which you can see in the following figure.
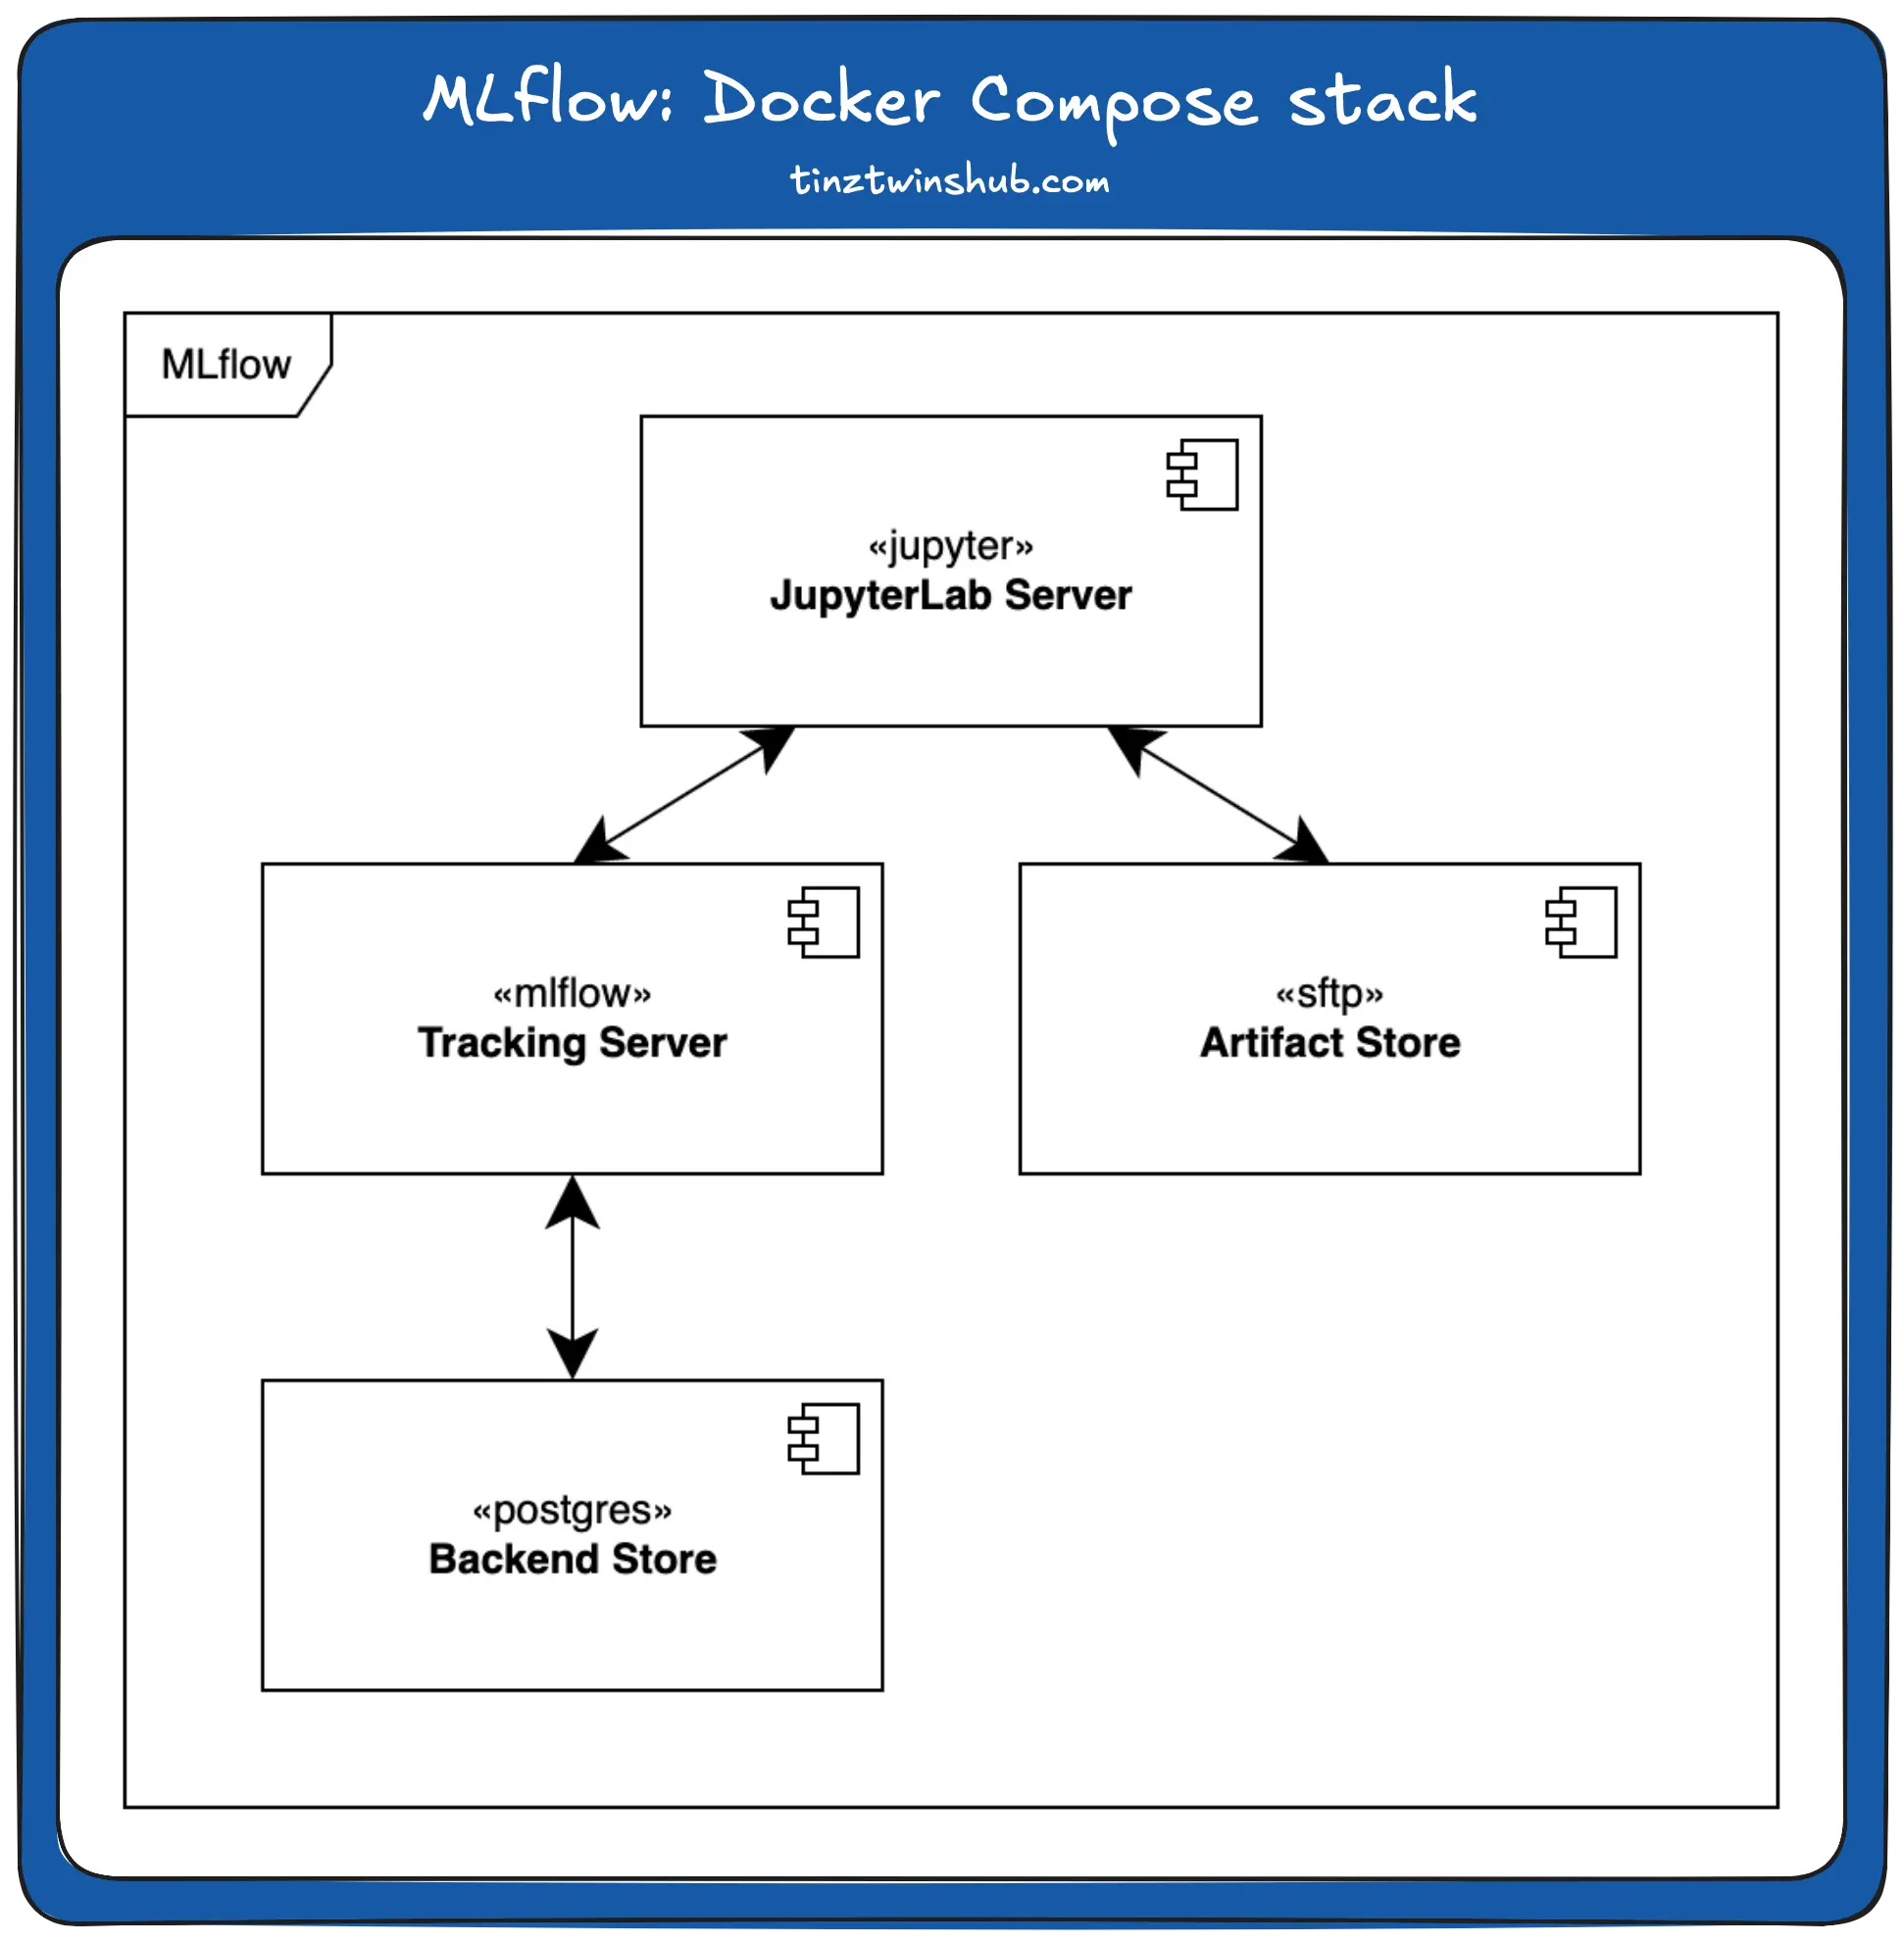
In the following, we describe the individual services. You can find the complete docker-compose stack in our GitHub repo. The exact instructions for starting the stack are in the project readme. We have defined all configurable variables in an .env file.
- JupyterLab is a web-based interactive development environment for notebooks, code and data. It is often used in data science projects. In this post, we use the jupyter/scipy-notebook image from DockerHub. You can also use other Jupyter images, such as JupyterHub. In the workspace setup, it can be used to create and track ML models.
- An SFTP Server is a remote data storage. SFTP (Secure File Transfer Protocol) is a file transfer protocol that provides secure access to a remote computer. In this project, we use the atmoz/sftp image from DockerHub. You can also use other storage technologies, such as AWS S3. In our setup, the SFTP server serves as the artifact store. In this store, we store the trained ML models and other artifacts like the jupyter notebooks.
- The MLflow Tracking Server provides the MLflow Web UI. On this Web UI, you can see all experiments and take a closer look at specific experiments. We use the python:3.9.15 Docker image. The server is accessible at localhost:5000. You can see a screenshot of the Web UI below.
- Postgres is a free and open-source relational database management system. We use it to store parameters and evaluation metrics. In this post, we use the official postgres docker image from DockerHub.
You can start the docker-compose stack with the following command:
$ docker compose up -d
The flag -d means that the container is running as a daemon. In this mode, the terminal does not output any logs. You can see the logs for a specific container with the following command:
$ docker compose logs --follow <container_name>
The logs show the state of the container. If everything is ok, then you can use the MLflow workspace.
First, you can log in to the JupyterLab server. You have to use the token from the logs of the jupyter container. The URL is localhost:8888, when you start it locally. On the server, you see jupyter notebooks. You can check your setup with the notebook mlflow_example.ipynb. Execute each cell and check that no error appears. No errors? Yeah, your setup was successful.
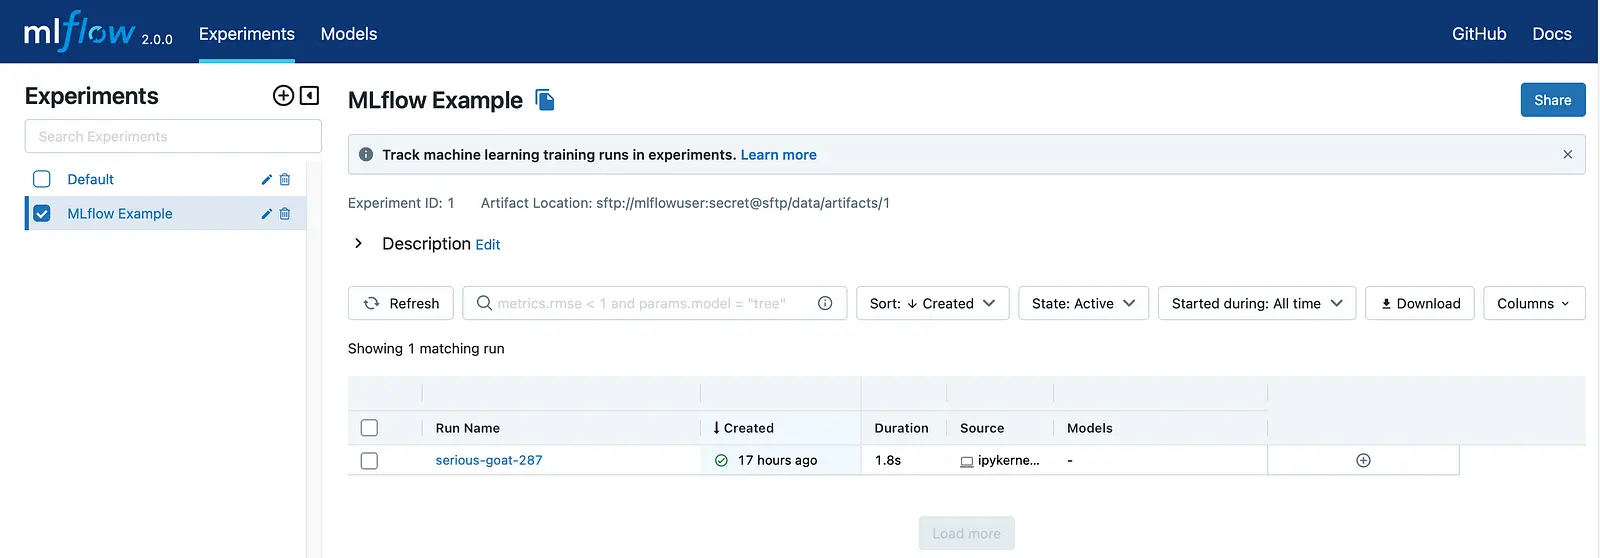
Next, you can check if your experiment was tracked correctly by the MLflow tracking server. Visit the following url: localhost:5000. You should see the MLflow web UI. Now you can select the experiment “MLflow Example” and click on the run. A new page opens. This page shows the tracked parameters, metrics and artifacts.
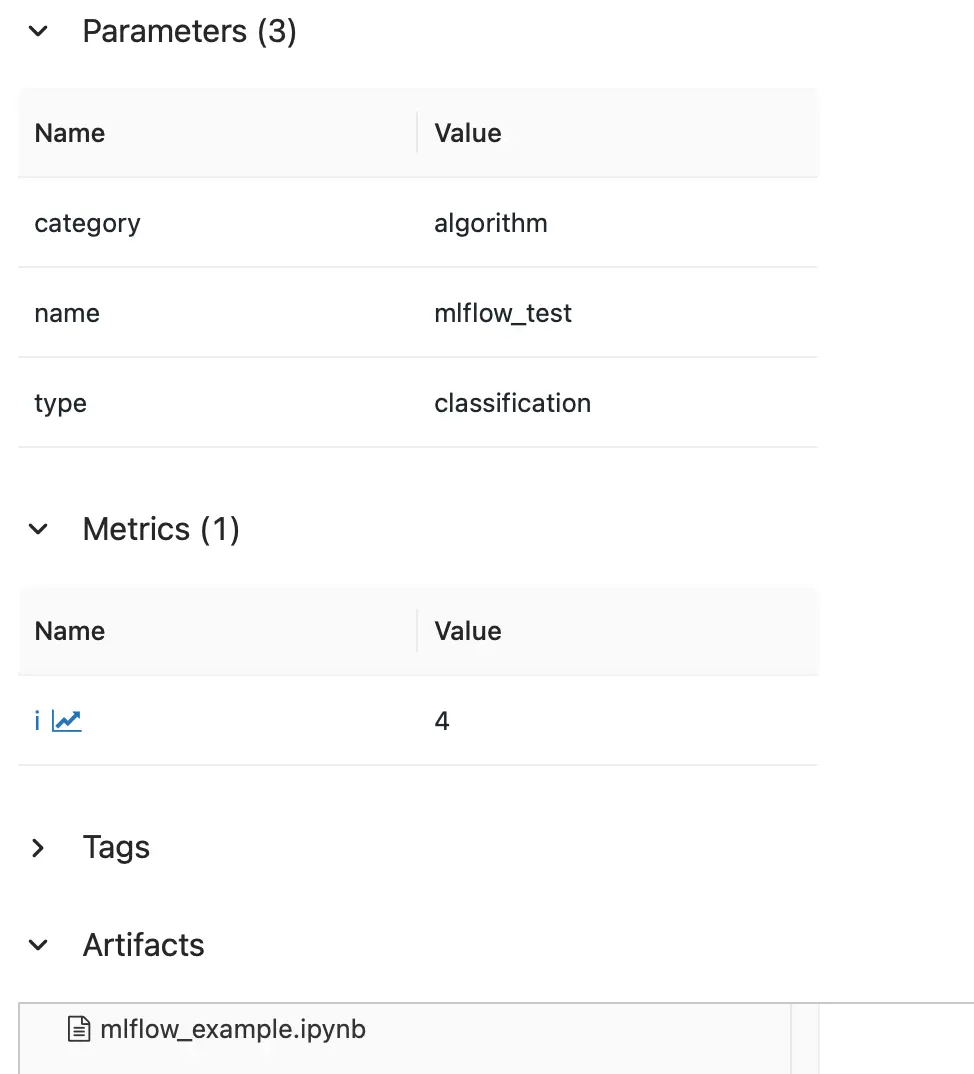
You can also see that the jupyter notebook is tracked. It is always clear by which code the results were generated. Very helpful. Now you can start with your notebooks. Try it out.
Conclusion
In this post, we saw how to set up an MLflow workspace with Docker. In this context, we learned how to interconnect the services to an overall system. We provide the complete source code on our GitHub account. Try it out.
Thanks so much for reading. Have a great day!