**Do you want to create high-performance APIs with minimal code? If so, use FastAPI for your next project.**
Generated with AI
FastAPI is a fast and lightweight framework for building web APIs in Python. It is built on top of [Pydantic](https://docs.pydantic.dev/){:target="_blank" rel="noopener"} and [Starlette](https://www.starlette.io/){:target="_blank" rel="noopener"}. Pydantic enables automatic data validation. Starlette is a framework for building async web services in Python.
The speed of the FastAPI framework is comparable to Node.js and Go. This is due to the use of the asynchronous programming model and the use of modern Python functions.
In this post, we will introduce the basics of FastAPI and show how to build a FastAPI application. The steps are the following:
* **Technical requirements**
* **What is FastAPI?**
* **Build a FastAPI application**
* **Conclusion**
## Technical requirements
You will need the following prerequisites:
* Python package manager of your choice like [conda](https://docs.conda.io/en/latest/miniconda.html){:target="_blank" rel="noopener"}.
* A code editor of your choice like [Visual Studio Code](https://code.visualstudio.com/){:target="_blank" rel="noopener"}.
## What is FastAPI?
FastAPI is a modern, powerful and lightweight web framework for creating APIs with Python. The web framework has the following seven key features:
* **Fast:** It is a very high-performance framework, comparable with Node.js and Go, thanks to Starlette and Pydantic. Two amazing Python frameworks! In addition, it allows you to increase your development speed.
* **Reduced number of bugs:** It reduces the errors induced by developers.
* **Intuitive:** Great editor support, completion everywhere and less time debugging.
* **Straightforward:** It is designed for easy and uncomplicated use. You spend less time reading docs.
* **Short:** It minimizes code duplication.
* **Robust:** It provides production-ready code.
* **Standard-based:** It uses the open standards for APIs ([OpenAPI](https://github.com/OAI/OpenAPI-Specification){:target="_blank" rel="noopener"} and [JSON Schema](https://json-schema.org/){:target="_blank" rel="noopener"}). It provides automatically generated interactive documentation based on OpenAPI.
FastAPI is a framework for developing RESTful APIs in Python. REST stands for representational state transfer. The REST architecture style is one of the most popular methods for creating APIs. If you are not yet familiar with the REST architecture style, you can read our [article on this topic](/software-engineering/rest-api-the-key-player-in-modern-web-development/){:target="_blank" rel="noopener"}.
## Build a FastAPI application
Enough theory. Let’s jump into the practical part!
In the first step, you must create a folder called **app**. We put all our files in this folder.
### Create a conda environment
It makes sense to create a virtual environment to keep your main system clean.
```bash
conda create -n fastapi-app python=3.9.12
conda activate fastapi-app
```
### Install requirements
Now, you must create the following requirements.txt file in the **app** folder.
**requirements.txt**
```
fastapi==0.94.0
uvicorn[standard]==0.21.0
```
The requirements.txt includes the following Python packages:
* ```fastapi```: Web framework for building APIs with Python.
* ```uvicorn[standard]```: [Uvicorn](https://www.uvicorn.org/){:target="_blank" rel="noopener"} is an ASGI web server for Python. With [standard] you install uvicorn with minimal (pure Python) dependencies.
Next, you can install the requirements with the following command:
```bash
pip install -r requirements.txt
```
This process takes a few seconds.
### FastAPI application
Now, we are ready for coding! You can use the example presented here as a template for your first FastAPI app. If you are building large applications or web APIs, it makes sense not to put everything in a single file. Our FastAPI example doesn’t involve a lot of code, but we still made sure that the app is modular.
The project structure looks as follows:
```
.
├── app # "app" is a Python package
│ ├── __init__.py # this file makes "app" a "Python package"
│ ├── main.py # "main" module
│ └── routers # "routers" is a "Python subpackage"
│ ├── __init__.py # makes "routers" a "Python subpackage"
│ ├── companies.py # "companies" submodule
│ └── models # "models" folder for Pydantic classes
```
The Python package ```app``` contains the file ```main.py``` and the subpackage ```routers```. The ```main.py``` file is the entry point of the FastAPI app. The Python subpackage ```routers``` contains the definition of the endpoints. The ```models``` folder contains the Pydantic classes. More about this later.
In the following, we present all the files in detail.
**app/main.py**
```python
"""
This file is the entry point of the fastapi app.
"""
import uvicorn # ASGI Server
from fastapi import FastAPI
from routers.companies import company_router
APP_NAME = "FastAPI Template"
DESCRIPTION = "REST API Documentation for " + APP_NAME + ". The documentation was created using Open API Specification. "
app = FastAPI(
title="REST API Documentation for " + APP_NAME,
description=DESCRIPTION,
version="1.0.0",
contact={
"name": APP_NAME
},
)
# add router
app.include_router(company_router)
if __name__ == '__main__':
uvicorn.run('main:app', host='localhost', port=8000, log_level='info', reload=True)
```
First, we import the ```uvicorn``` and ```fastapi``` package. In addition, we import the ```company_router``` object. You declare path operations with a router (e.g. get, post or put endpoints). We assign the name of the app to the variable ```APP_NAME```. The ```DESCRIPTION``` contains the description of the WebAPI. This description will also be displayed later in the interactive documentation. With ```FastAPI()```, we create the app. We can also specify additional information like title, description, version or contact. With the statement ```include_router()```, we add the ```company_router``` to the app. We start the app via the uvicorn server. We pass the following parameters to the server:
* ```main:app```: [name of the entry point file]:[name of the app]
* ```host```: IP adress
* ```port```: Port (e.g. 8000)
* ```log_level```: log information (e.g. info or debug)
* ```reload```: True or False
**app/routers/models/company.py**
```python
"""
This file contains the classes.
"""
from pydantic import BaseModel
class Company(BaseModel):
"""
Pydantic Class for REST-API
"""
isin: str
name: str
symbol: str
```
The ```company.py``` file defines a Python class ```Company``` that inherits from BaseModel class from the [pydantic module](https://docs.pydantic.dev/){:target="_blank" rel="noopener"}. ```BaseModel``` is a class that allows the easy creation of data models by specifying the fields and their corresponding types.
The ```Company``` class has three fields:
* ```isin``` (type string): It represents the International Securities Identification Number (ISIN) of the company.
* ```name``` (type string): It represents the name of the company.
* ```symbol``` (type string): It represents the stock symbol of the company.
The ```BaseModel``` class can validate and ensure the passed data. This makes it easier to handle and manipulate data in Python code, especially when the data comes from external sources such as REST APIs.
**app/routers/companies.py**
```python
"""
This file contains the router for companies.
"""
from fastapi import APIRouter, HTTPException
from typing import List
from routers.models.company import *
company_router = APIRouter(
prefix="/companies",
tags=["companies"],
)
# demo data
aapl = Company(isin="US0378331005", name="Apple", symbol="AAPL")
tsla = Company(isin="US88160R1014", name="Tesla", symbol="TSLA")
sq = Company(isin="US8522341036", name="Block", symbol="SQ")
pltr = Company(isin="US69608A1088", name="Palantir", symbol="PLTR")
company_list = [aapl, tsla, sq, pltr]
company_dict = {
"US0378331005": aapl,
"US88160R1014": tsla,
"US8522341036": sq,
"US69608A1088": pltr
}
@company_router.get("/", response_model=List[Company])
async def get_companies():
return company_list
@company_router.get("/{company_isin}", response_model=Company)
async def get_company_by_id(company_isin: str):
if company_isin not in company_dict:
raise HTTPException(status_code=404, detail="Resource not found")
else:
company = company_dict[company_isin]
return company
```
First, we import the two modules ```APIRouter``` and ```HTTPException``` from the ```fastapi``` package, and ```List``` from the ```typing``` package. We also import the ```Company``` class from the ```routers.models.company``` module.
Then, we create an instance of ```APIRouter``` called ```company_router``` with the prefix ```/companies``` and the tags ```["companies"]```. We can use the router to define routes and handlers for HTTP requests related to companies in a FastAPI app.
The ```prefix``` parameter sets the URL prefix for all the routes defined within the router. All routes within the ```company_router``` instance will have a URL starting with ```"/companies"```. The ```tags``` parameter is used to group related endpoints together in the FastAPI documentation.
In addition, we create some demo stock data. We create four instances of the class ```Company``` and assign them to the variables ```aapl```, ```tsla```, ```sq``` and ```pltr```. Finally, we save these variables in a list and a dictionary.
Next, we define two HTTP GET endpoints with the ```company_router```. The function ```get_companies()``` is asynchronous and handles incoming requests to the endpoint. The response is a list of ```Company``` objects, which will be automatically converted to JSON format. The second endpoint returns a company for a specific ISIN.
Start the app with following command:
```bash
python main.py
```
**Interactive documentation**
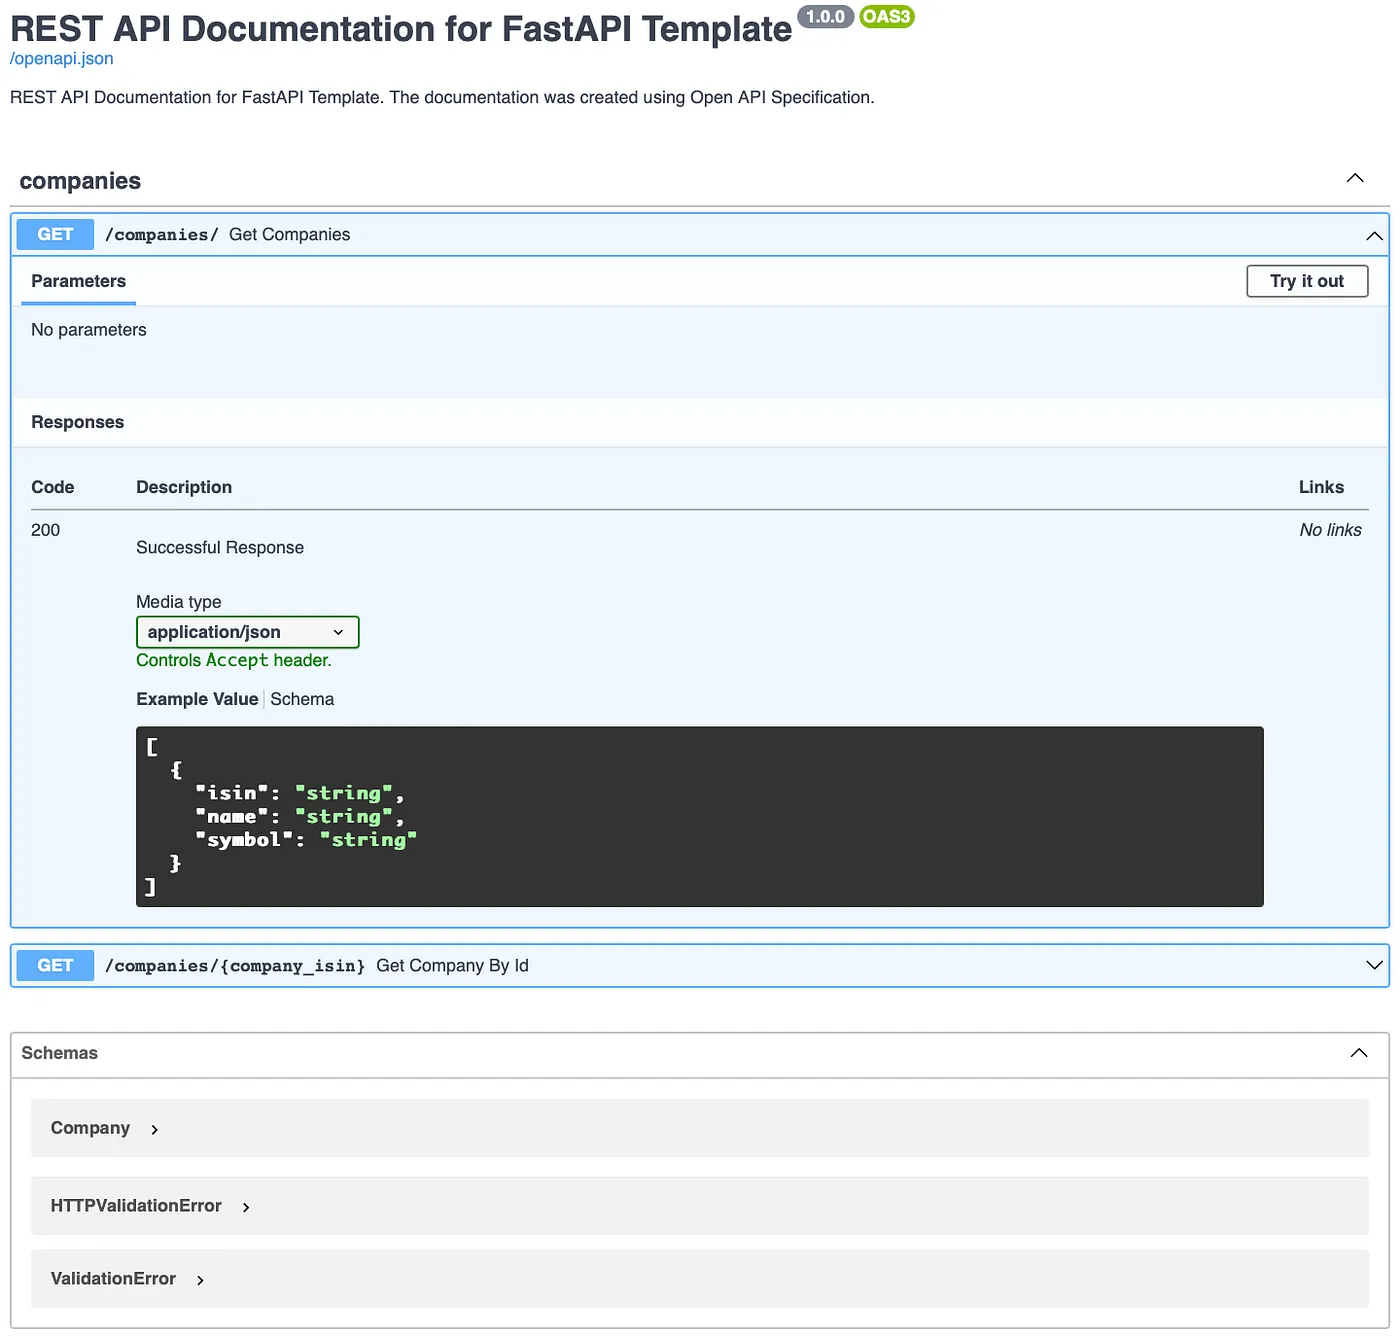
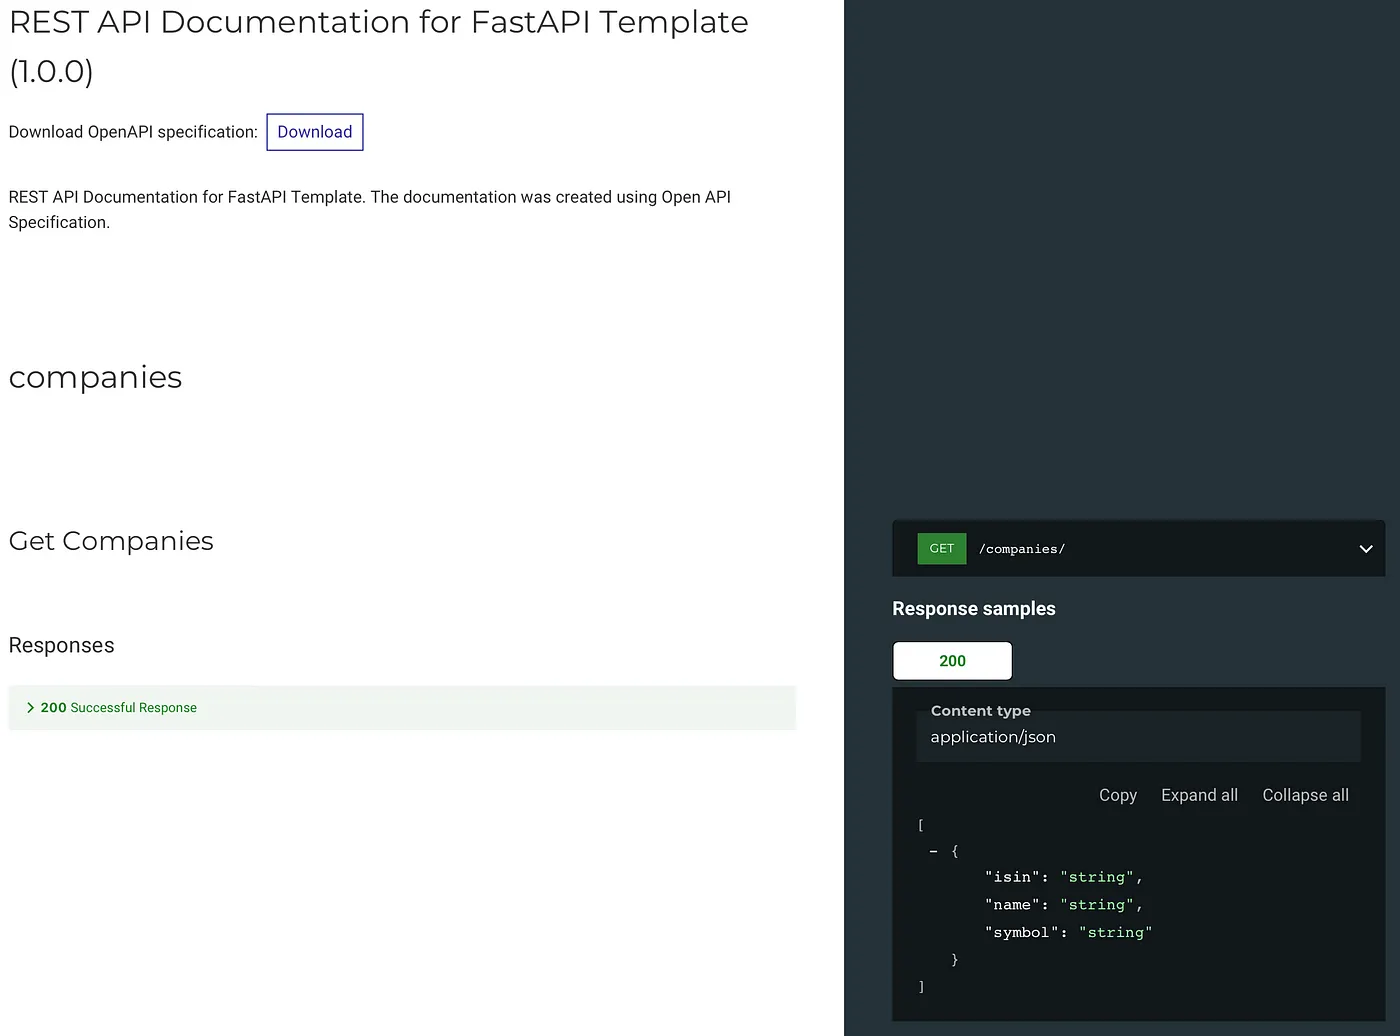
The great thing about FastAPI is that it automatically creates interactive API documentation. FastAPI provides a [Swagger](https://github.com/swagger-api/swagger-ui){:target="_blank" rel="noopener"} and [ReDoc UI](https://github.com/Redocly/redoc){:target="_blank" rel="noopener"}. The documentation is based on the [OpenAPI](https://github.com/OAI/OpenAPI-Specification){:target="_blank" rel="noopener"} standard. OpenAPI defines a schema for your API.
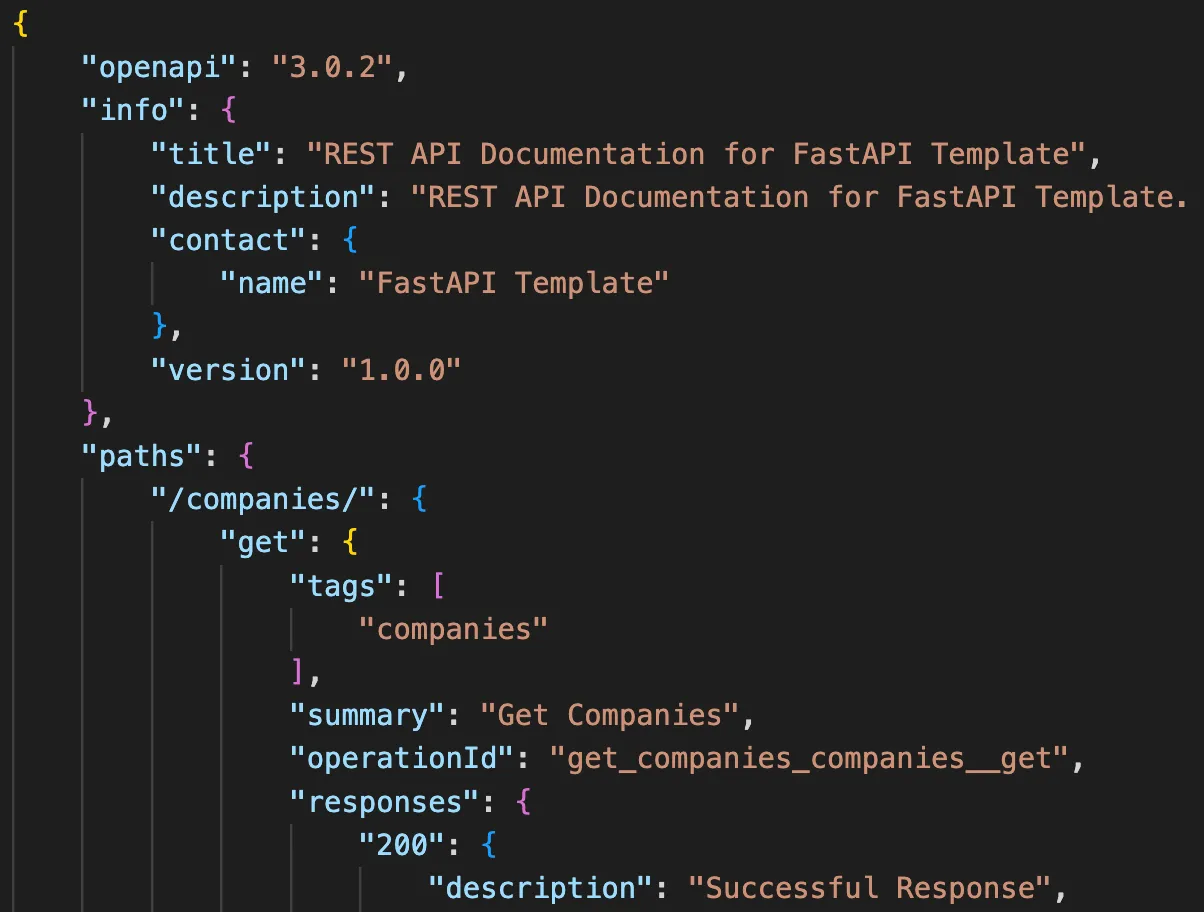
A schema is an abstract description of the API. The API schema contains for example your API paths or the possible parameters. FastAPI automatically generates a JSON schema, a file named ```openapi.json```. The schema includes the abstract description of your API with all possible paths. You can see the schema at: http://127.0.0.1:8000/openapi.json
Excerpt OpenAPI JSON Schema (Screenshot by authors)
The Swagger UI you can see at: http://127.0.0.1:8000/docs
Interactive API documentation - Swagger UI (Screenshot by authors)
The ReDoc you can see at: http://127.0.0.1:8000/redoc
Interactive API documentation - ReDoc (Screenshot by authors)
The OpenAPI schema is the basis for the two interactive documentation systems. You can also use OpenAPI Schema to automatically generate code for clients. The clients can then communicate with your API (e.g. frontend, mobile or IoT applications).
## Conclusion
In this article, you have learned how you can create a FastAPI application. We have also shown you how to build large modular applications. You can use the FastAPI template presented here as the basis for your first API project in Python.
💡 Do you enjoy our content and want to read super-detailed guides about AI Engineering? If so, be sure to check out our premium offer!