A **Progressive Web App (PWA)** is a web application that has the characteristics of a native app.
Generated with Bing DALL-E
This article is the second part of a series on PWAs. Please read the [first part](/software-engineering/understand-service-workers-of-a-pwa-part-1/) first so that you have a basic understanding of a PWA.
The article shows how you can implement a PWA with JavaScript. First, we review the basics of PWAs. Then we focus on the implementation of offline storage. Finally, we show you useful tools for development. **Be curious!**
The steps are the following:
1. **Recap**
2. **Offline Storage — IndexedDB**
3. **Offline Storage — CacheAPI**
4. **Useful Tools**
5. **Conclusion**
## Recap
A PWA has the following features:
* **Progressive (logical):** Independence of the web browser
* **Responsive:** Scalable to any screen (desktop, smartphone or tablet)
* **Offline support:** Offline use is possible
* **Up-to-date:** No manual updates
* **Secure:** Use of HTTPS
* **Findable:** SEO optimization
* **Customer loyalty:** Support for push notifications
* **Installable:** Add to the home screen
* **Linkable:** Distribution via URLs is possible
In this article, we focus on offline functionality.
## Offline Storage — IndexedDB
The Service Worker (SW) can compose responses to network requests independently. You can implement this via the CacheAPI or the IndexedDB. First, we start with the IndexedDB.
The Indexed Database API (IndexedDB) implements a JavaScript-based and object-oriented browser database to which the web application and SW have access. The IndexedDB is very well suited for storing structured application data. The native IndexedDB interface is difficult to use, you can use the [Dexie.js](https://dexie.org/){:target="_blank" rel="noopener"} library instead.
You can create a new database connection with the following code:
```javascript
self.myDB = new Dexie('MyDB');
```
The constructor function `Dexie('MyDB')` creates a new database called `MyDB`. You can set the database schema as follows:
```javascript
self.myDB.version(1).stores({ student: '++id, firstName, lastName, studNumber' });
```
IndexedDB databases build on the versioning principle, so you must access it via a version number. You can call the `stores()` method on the return value of the `version(1)` method.
Furthermore, you can set the database schema with the `stores()` method. First, you create the object store `student`. The first entry defines the primary key of the table.
In this context, you can set the primary key as an auto-incremented primary key (++id) or a unique index (&id). The name for the primary key ID is freely selectable. You can add initial records with the following code:
```javascript
self.myDB.on('populate', () => {
myDB.student.add({ firstName: 'Max', lastName: 'Mustermann', studNumber: 757733 });
});
```
When the database is created, the `populate` event is triggered. The web application registers itself on this event using the `on()` method. Then you can access the method `add()` via the table `student`. The developer can use the method `add()` to fill the table `student` with an initial record.
You can open a database connection as follows:
```javascript
myDB.open()
.then(() => {
if ('serviceWorker' in navigator) {
return navigator.serviceWorker.register('sw.js');
}
}
```
You can open a database connection using the `open()` method on the database object `myDB`. The SW is then registered.
Furthermore, the SW cannot access the DOM of the parent document, so communication between the web application and the SW can only take place via the `postMessage()` method. The following code shows how to send a message from the web application.
```javascript
navigator.serviceWorker.addEventListener('message', event => console.log('sw:', event.data));
```
The web application must register for the event `message` to receive messages. In the JavaScript file sw.js, the message must be received and responded to accordingly. The following code shows how the SW can register for the event `message` and respond.
```javascript
self.addEventListener('message', event => {
console.log('app:', event.data);
if (event.data === 'the answer to life, the universe and everything') {
event.source.postMessage('42');
}
});
```
The result argument `event` contains the content of the message from the web application in the property `data`. The information about the sender of the message is in the property `source`. Then you can send a response via the method `postMessage()`. Finally, direct communication between the SW and the web application is rarely needed.
## Offline Storage — CacheAPI
### General
The CacheAPI replaces the obsolete HTML5 Application Cache. The local cache of the SW can be accessed using the CacheAPI. The SW cache is very well-suited for storing static source files. Furthermore, offline implementations should always rely on the functionality of the SW in the future.
The SW and the web application can access the cache. However, developers should implement access to the cache via the SW. In addition, the CacheAPI has an asynchronous design, and you can use it only if the website has HTTPS.
### Manage Caches
The developer can give the cache an individual name. Caches should have a unique name and a version number. One possible name would be `cacheName-files-v1`. The following code shows how to open a cache:
```javascript
self.caches.open('cacheAPI-files-v1').then(cache => console.log(cache));
```
You call the method `open()` on the property `caches`. The method `open()` accepts the name of the cache.
The following code shows how to get a listing of all available caches in the browser:
```javascript
self.caches.keys().then(caches => console.log(caches));
```
The method `keys()` returns an array with the names of all available caches.
You can delete the cache with the following code:
```javascript
self.caches.delete('cacheAPI-files-v1').then(success => console.log(success));
```
The method `delete()` deletes the cache with the specified name and returns a bool value.
Furthermore, it is possible to delete individual cache entries:
```javascript
self.caches.open('cacheAPI-files-v1').then(cache => cache.delete('pwa.jpg'));
```
The code section shows how you can open the cache with the name `cacheAPI-files-v1`. Then the method `delete()`removes the jpg file `pwa.jpg` from the cache.
The following code shows the method `add()`:
```javascript
self.caches.open('cacheAPI-files-v1').then(cache => cache.add('pwa.jpg'));
```
You can use this method to retrieve resources and the method saves the response in the cache. In the background, the request sends a `fetch()`. Furthermore, the developer has the option of requesting several resources. In larger projects, there are several HTML, JavaScript, and CSS files and images and you want to request these files in one operation. In this case, a developer can use the method `addAll()`.
Now the question arises of how to retrieve cached answers from the cache. The methods `match()` and `matchAll()` are available for this purpose.
```javascript
// catch the network query and answer from cache or network
self.addEventListener('fetch', function(event) {
console.log('[Service Worker] Fetch', event.request.url);
event.respondWith(
caches.match(event.request).then(function(response) {
return response || fetch(event.request);
})
);
});
```
In this code section, the method `respondWith()` is called on the argument `event`, so the SW takes control of the response. The request is checked against the cache contents using the method `match()`. The cache can answer the request or start a network request using the method `fetch()`. The method `matchAll()` returns all existing cache responses.
### Storage in the web browser
The cache shares a maximum storage space (quota) with the other storage technologies (e.g.: IndexedDB). The storage space depends on the web browser.
* Chrome: Up to 80% of total disk space
* FireFox: Up to 50% of free disk space
* Safari: About 1GB
Source: [https://web.dev/storage-for-the-web/](https://levelup.gitconnected.com/understand-service-workers-of-a-pwa-part-1-325aaea0c62b){:target="_blank" rel="noopener"}
In the Google Chrome web browser, you can view the used website storage under the Application -> Storage tab. At this point, you can also delete the website storage completely using the Clear Site Data button. You can also delete the service worker registration. The option is useful for development purposes. So you can reset the local state of a website completely.
### Caching strategies
Jake Archibald presents various caching strategies on his [blog](https://jakearchibald.com/2014/offline-cookbook/){:target="_blank" rel="noopener"}. There are different caching strategies, which we will discuss in the following sections.
**Caching strategies in a nutshell:**
* Cache Only
* Network Only
* Cache, falling back to the network
* Cache & network race
* Network falling back to the cache
* Cache then network
* Generic fallback
**Cache Only:**
This strategy is the simplest case, because the website’s requests are fetched directly from the cache. Here, all required responses must be available in the cache. The website user sees a connection error if there are no matching answers in the cache. The following listing shows the implementation of this strategy:
```javascript
self.addEventListener('fetch', (event) => {
// If a match isn't found in the cache, the response
// will look like a connection error
event.respondWith(caches.match(event.request));
});
```
This approach is suitable for static content such as the app shell.
**Network Only:**
With this strategy, requests are only answered via the network. The following listing shows the implementation of this strategy:
```javascript
self.addEventListener('fetch', (event) => {
event.respondWith(fetch(event.request));
// or simply don't call event.respondWith, which
// will result in default browser behaviour
});
```
This variant is suitable for requests such as analytical pings or non-GET requests.
**Cache, falling back to network:**
Many projects use this strategy because it combines the “cache only” and “network only” strategies. Answers from the cache come from the cache, and all other answers are answered via the network. The following listing shows the implementation of this strategy:
```javascript
self.addEventListener('fetch', (event) => {
event.respondWith(async function() {
const response = await caches.match(event.request);
return response || fetch(event.request);
}());
});
```
**Cache & network race:**
This strategy attempts to answer a request simultaneously via the network and the cache. This caching strategy is suitable for devices with slow hard disks.
**Network falling back to cache:**
With this strategy, a resource is first requested via the network. The request is only answered by the cache if there is a weak or no internet connection. The following listing shows the implementation of this strategy:
```javascript
self.addEventListener('fetch', (event) => {
event.respondWith(async function() {
try {
return await fetch(event.request);
} catch (err) {
return caches.match(event.request);
}
}());
});
```
**Cache then network:**
This strategy first tries to answer the request via the cache. However, it also tries to answer the request via the network. The user gets the content immediately if the matching answer is available in the cache. If there is no matching answer in the cache, the user sees no content. Regardless of the outcome of the cache query, there is also an answer via the network. If the network request is successful, the user sees the new data. The new data replaces the old data in the cache. If there is no answer by the cache or the network an error message could be issued.
**Generic fallback:**
This strategy is an extension of the “cache, falling back to network” strategy. This variant of caching returns a generic response if the request cannot be answered either by the cache or via the network. For example, the application has a static HTML page in the cache, which informs the user of the PWA that the browser is offline. The following listing shows the implementation of this strategy:
```javascript
self.addEventListener('fetch', (event) => {
event.respondWith(async function() {
// Try the cache
const cachedResponse = await caches.match(event.request);
if (cachedResponse) return cachedResponse;
try {
// Fall back to network
return await fetch(event.request);
} catch (err) {
// If both fail, show a generic fallback:
return caches.match('/offline.html');
}
}());
});
```
You can learn more about caching strategies on the pages [The Cache API: A quick guide](https://web.dev/cache-api-quick-guide/){:target="_blank" rel="noopener"} and [Cache only](https://jakearchibald.com/2014/offline-cookbook/#cache-only){:target="_blank" rel="noopener"}.
## Useful Tools
The following two tools are helpful for the development of PWAs:
### Google Lighthouse
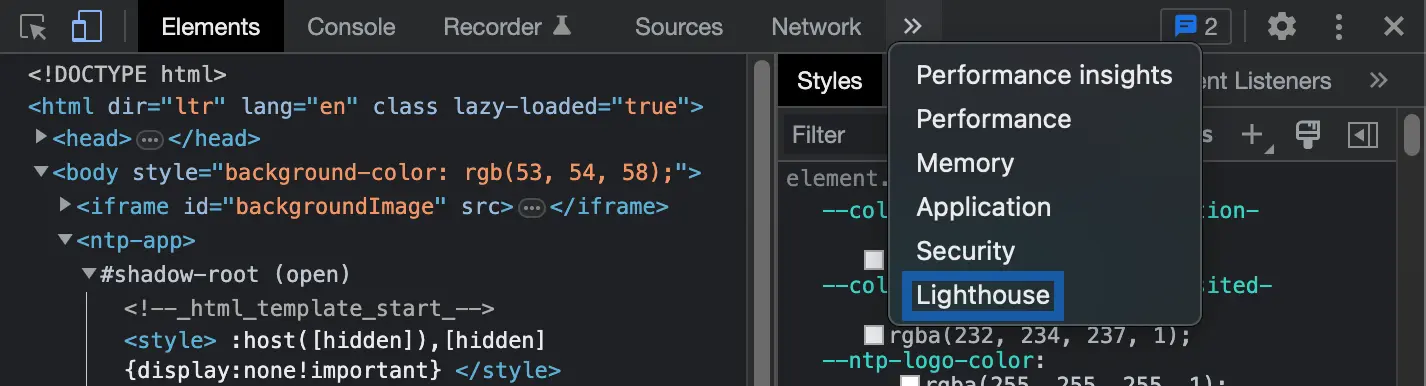
Lighthouse is an open-source tool from Google to examine the quality of a website. That tool provides audits for performance, progressive web apps, best practices, accessibility and SEO. You can use Lighthouse in the Chrome web browser.
**Lighthouse in Chrome DevTools:**
1. Navigate to the website you want to explore.
2. Right-click on the website. Click Inspect.
3. Click on Lighthouse (see Screenshot: blue box).
4\. Click Analyze page load (see Screenshot).
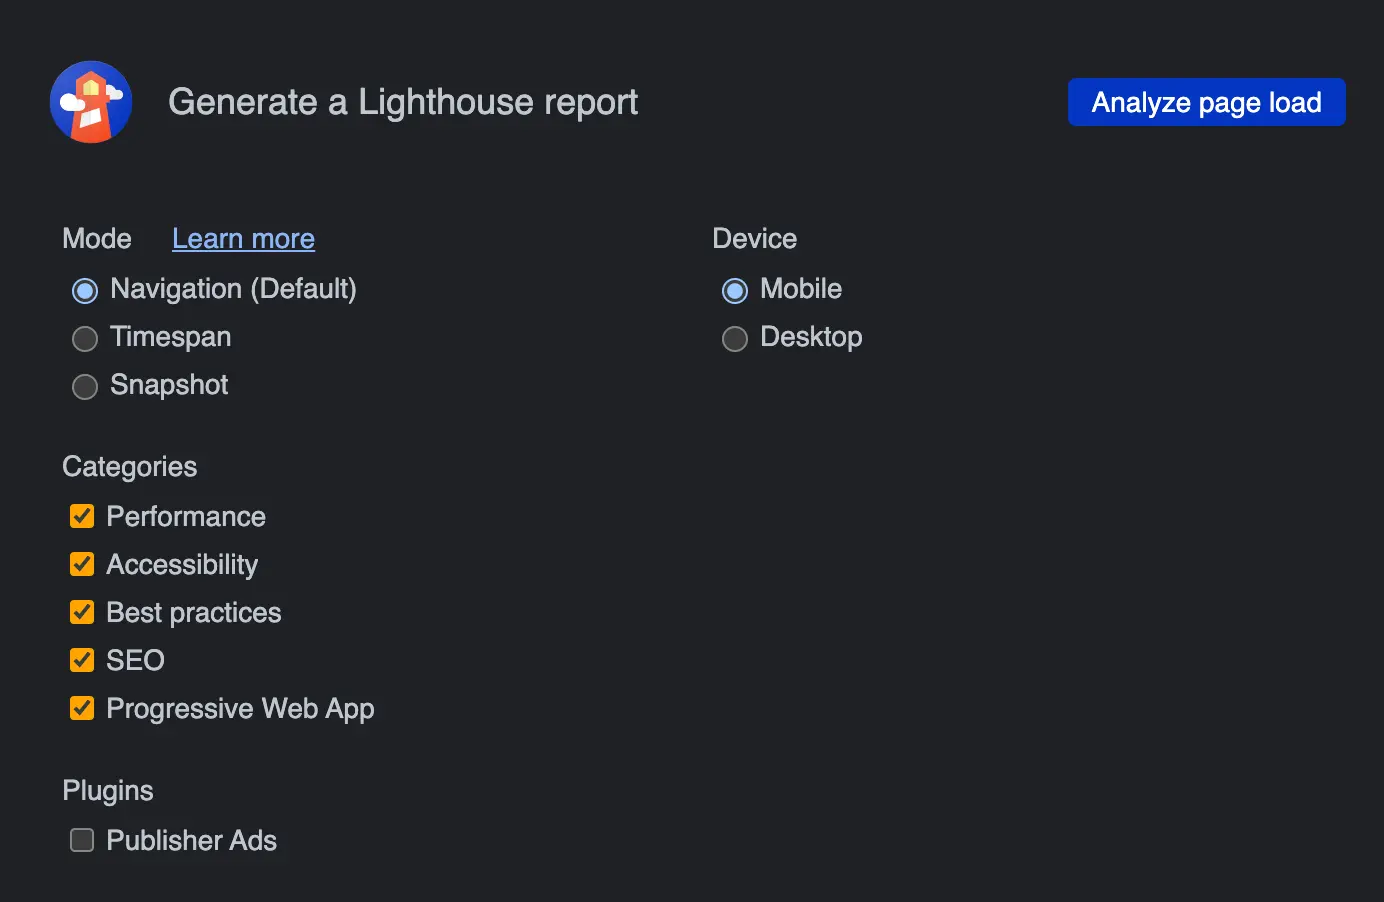
5\. Lighthouse shows an analysis report for the explored website.
Furthermore, you can see all registered service workers in the Chrome browser by typing: chrome://serviceworker-internals
### ngrok and lite-server
You can start your PWA via lite-server and ngrok. First, you need to install the necessary tools:
First, you have to install node.js. You can download it on the [node.js website](https://nodejs.org/en/download/){:target="_blank" rel="noopener"}.
Then you have to install lite-server with the following command:
```bash
$ npm install --global lite-server
```
After that, you can install ngrok from the [ngrok website](https://ngrok.com/download){:target="_blank" rel="noopener"}.
Progressive web apps can also be tested on mobile devices with the help of ngrok because we get an HTTPS connection through ngrok.
## Conclusion
In this article, you have learned how to implement the offline capability of a PWA. We also looked at the two ways to implement offline capability, CacheAPI and IndexedDB. Furthermore, you learned about different caching strategies that you can use depending on your requirements. The code snippets show you how to implement the individual functionalities with JavaScript. Finally, we have shown you tools to test a PWA locally.
Thanks so much for reading. **Have a great day!**
## Additional references and links
* [Introduction to Progressive Web Apps (Instant Loading) — Part 2](https://auth0.com/blog/introduction-to-progressive-web-apps-instant-loading-part-2/){:target="_blank" rel="noopener"}
* [Introduction to Progressive Web Apps (Push Notifications) — Part 3](https://auth0.com/blog/introduction-to-progressive-web-apps-push-notifications-part-3/){:target="_blank" rel="noopener"}
* Progressive Web Apps: Das Praxisbuch (German)
💡 Do you enjoy our content and want to read super-detailed guides about AI Engineering? If so, be sure to check out our premium offer!