**You can use UTM to run different operating systems on your Mac. UTM was created for macOS and only for Apple platforms. Moreover, UTM is completely free and open source.** 

<figure class="">
  <img src="/assets/img/blog/2023-01-04-utm-virtual-machines-for-mac-open-source/header_img.webp"
       alt="Photo by Pietro Jeng on Unsplash"><figcaption>
      Photo by <a href="https://unsplash.com/@pietrozj" target="_blank" rel="noopener">Pietro Jeng</a> on <a href="https://unsplash.com" target="_blank" rel="noopener">Unsplash</a>

    </figcaption></figure>


UTM uses [QEMU](https://www.qemu.org/){:target="_blank" rel="noopener"}, a decades-old, free and open-source emulation software. QEMU is widely used and actively maintained. QEMU is difficult to set up due to the many setting options and flags. [UTM](https://mac.getutm.app/){:target="_blank" rel="noopener"} allows users to use the functionality of QEMU without a steep learning curve.

<div class="ad-banner" style="margin-bottom: 0.7rem;">
    <hr class="hr-text" data-content="Advertisement*">
    <a href="/out/elevenlabs/" target="_blank" rel="sponsored nofollow noopener"><img src="../../assets/img/ads/elevenlabs.webp" alt="ElevenLabs Partner*" nopin="nopin"></a>
    <small style="display: block; margin-bottom: 0.5rem; margin-top: 0.5rem;"><strong>✨ Read without banner ads? </strong><a href="https://steady.page/en/tinztwins-hub/about" target="_blank" rel="noopener">Become a member</a> or <a href="https://steady.page/en/log_in?publication=tinztwins-hub" target="_blank" rel="noopener">log in</a></small>
</div>

In this article, we would like to introduce UTM. In this context, we will take a closer look at the advantages and disadvantages. We will also show you how to install Ubuntu Linux on your Intel Mac.

The steps are the following:
1. Virtualization vs. Emulation
2. Advantages and Disadvantages of UTM
3. Install Ubuntu 22.04 with UTM
4. Conclusion

<div class="ad-banner" style="margin-bottom: 0.7rem;">
    <hr class="hr-text" data-content="Advertisement*">
    <a href="/out/reclaimai/" target="_blank" rel="sponsored nofollow noopener"><img src="../../assets/img/ads/reclaimai.webp" alt="Reclaimai Partner*" nopin="nopin"></a>
    <small style="display: block; margin-bottom: 0.5rem; margin-top: 0.5rem;"><strong>✨ Read without banner ads? </strong><a href="https://steady.page/en/tinztwins-hub/about" target="_blank" rel="noopener">Become a member</a> or <a href="https://steady.page/en/log_in?publication=tinztwins-hub" target="_blank" rel="noopener">log in</a></small>
</div>

## Virtualization vs. Emulation
Virtualization is essentially an additional abstraction layer between the host and guest system. It does not work without the native support of the host system’s processor. An emulator, on the other hand, has no direct access to the hardware. Emulators are usually much slower than the original hardware or comparable virtualization.

## Advantages and Disadvantages of UTM
### Advantages of UTM
On Intel Macs, the x86/x64 operating system can be virtualized. You can also emulate older operating systems with UTM, regardless of whether they are PowerPC, SPARC or x86_64. It is also possible to emulate Windows 10 (x86_64) on a Mac with Apple Silicon. 

For instructions on how to install Windows 10 (x86_64) on a Mac with Apple Silicon, see the [YouTube video by CONATH FILMS](https://www.youtube.com/watch?v=KsNoGPczavw){:target="_blank" rel="noopener"}. You can also find some examples in the [UTM gallery](https://mac.getutm.app/gallery/){:target="_blank" rel="noopener"}. Check it out!

### Disadvantages of UTM
UTM currently does not support GPU emulation/virtualisation under Windows. Therefore, there is no support for 3D acceleration (e.g. OpenGL and DirectX). For Linux, there is experimental support for hardware OpenGL acceleration through [Virgl](https://docs.mesa3d.org/drivers/virgl){:target="_blank" rel="noopener"}.

<div class="ad-banner" style="margin-bottom: 0.7rem;">
    <hr class="hr-text" data-content="Advertisement*">
    <a href="/out/castmagic/" target="_blank" rel="sponsored nofollow noopener"><img src="../../assets/img/ads/castmagic.webp" alt="CastMagic Partner*" nopin="nopin"></a>
    <small style="display: block; margin-bottom: 0.5rem; margin-top: 0.5rem;"><strong>✨ Read without banner ads? </strong><a href="https://steady.page/en/tinztwins-hub/about" target="_blank" rel="noopener">Become a member</a> or <a href="https://steady.page/en/log_in?publication=tinztwins-hub" target="_blank" rel="noopener">log in</a></small>
</div>

## Install Ubuntu 22.04 with UTM
The instructions are based on the [UTM Guide Ubuntu 22.04](https://docs.getutm.app/guides/ubuntu/){:target="_blank" rel="noopener"}.

**Step 1:** First you have to download UTM from [https://mac.getutm.app/](https://mac.getutm.app/){:target="_blank" rel="noopener"} and Ubuntu 22.04 as an [iso file](https://ubuntu.com/download/desktop){:target="_blank" rel="noopener"}.   

**Step 2:** Install UTM on your Mac.

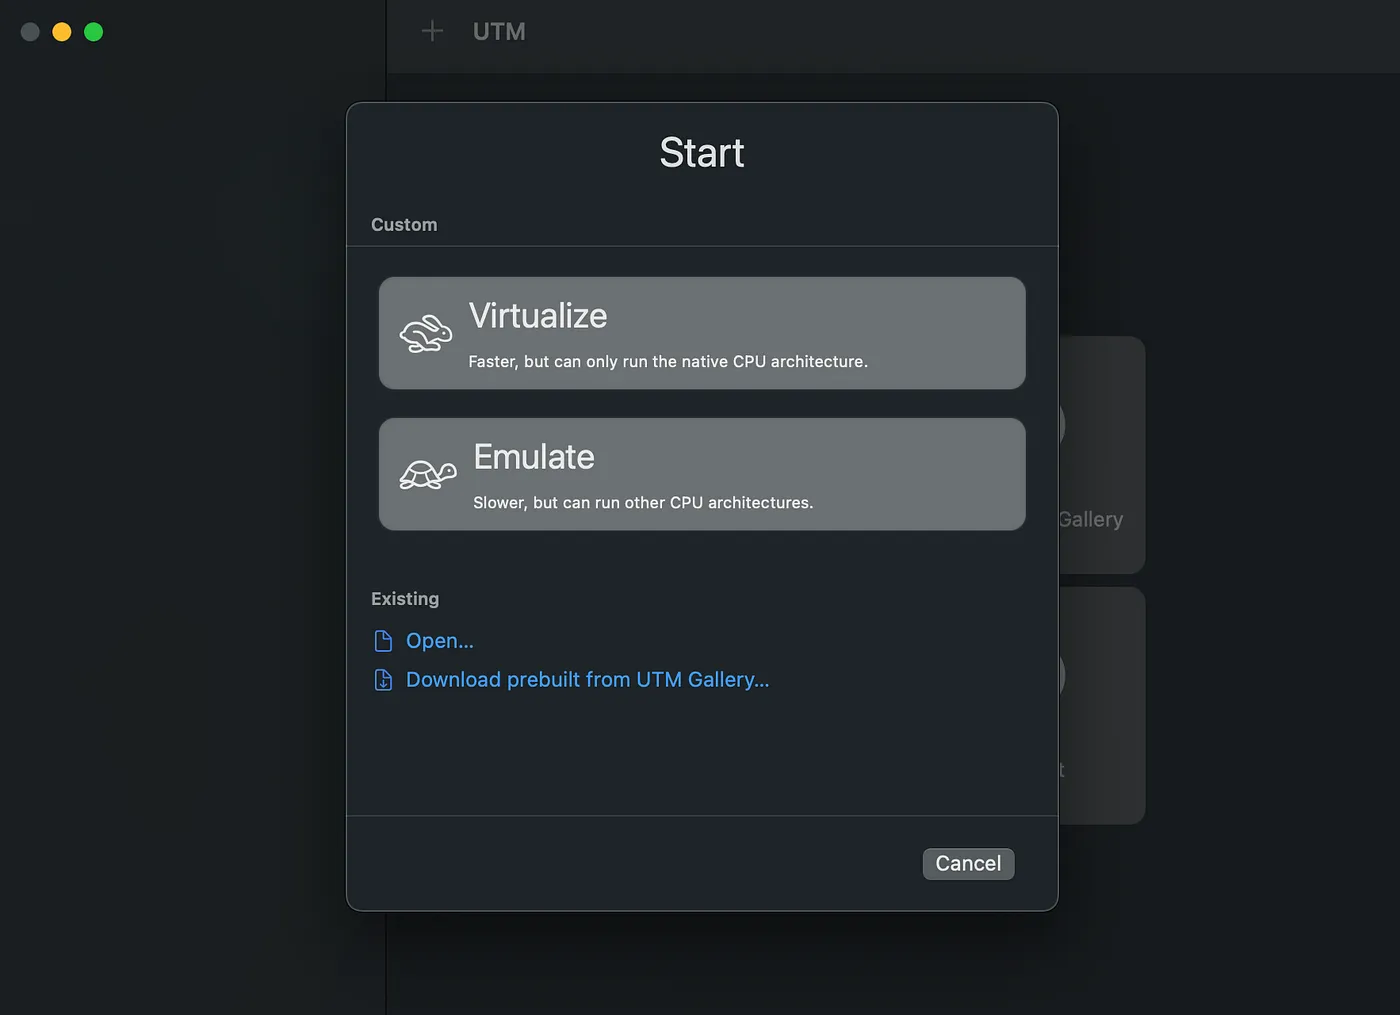
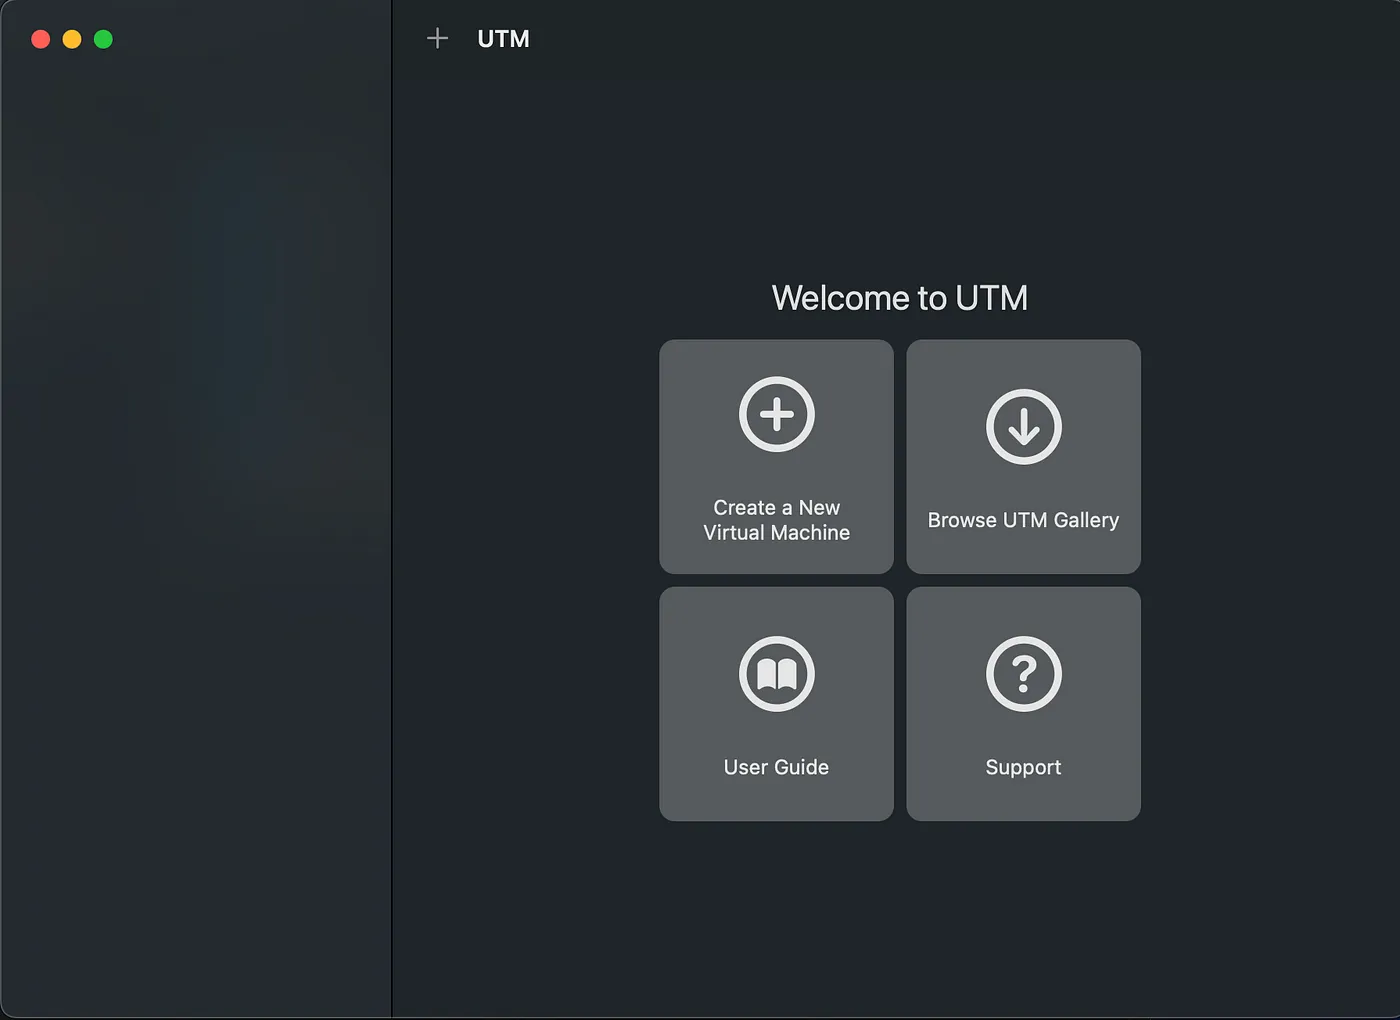
**Step 3:** Open UTM App and click “Create a new Virtual Machine”.

<figure class="">
  <img src="/assets/img/blog/2023-01-04-utm-virtual-machines-for-mac-open-source/UTM_start_menu.webp"
       alt="UTM — Start menu"><figcaption>
      UTM — Start menu (Screenshot by authors)

    </figcaption></figure>


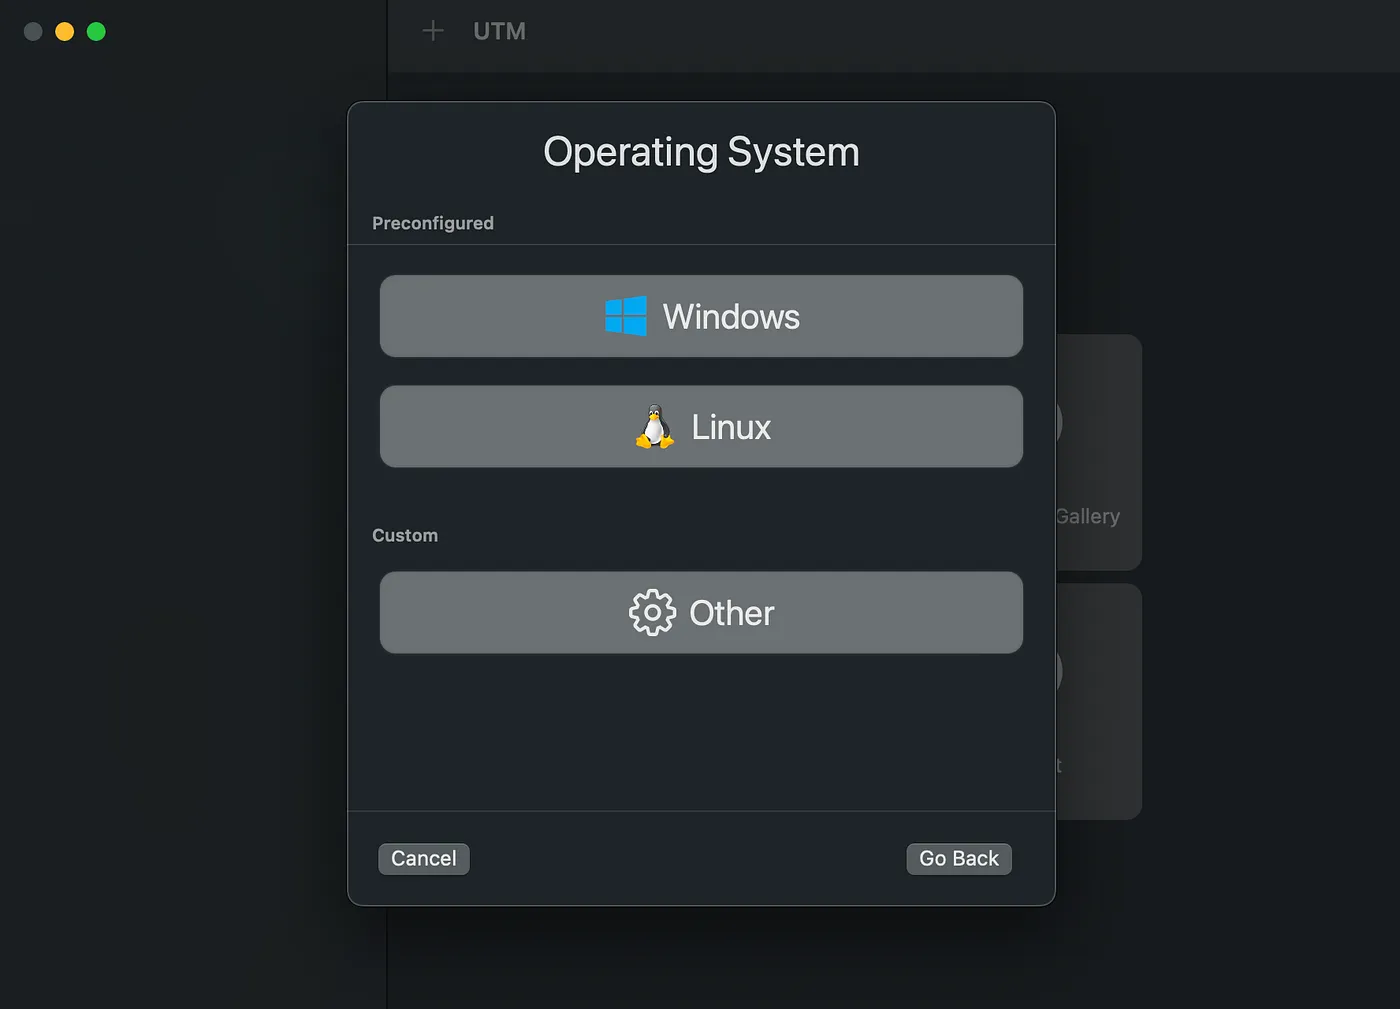
**Step 4:** Select Virtualize and then Linux.

<figure class="">
  <img src="/assets/img/blog/2023-01-04-utm-virtual-machines-for-mac-open-source/Virtualize_or_Emulate.webp"
       alt="Virtualize or Emulate"><figcaption>
      Virtualize or Emulate (Screenshot by authors)

    </figcaption></figure>


<figure class="">
  <img src="/assets/img/blog/2023-01-04-utm-virtual-machines-for-mac-open-source/choose_operating_system.webp"
       alt="Choose operating system"><figcaption>
      Choose operating system (Screenshot by authors)

    </figcaption></figure>


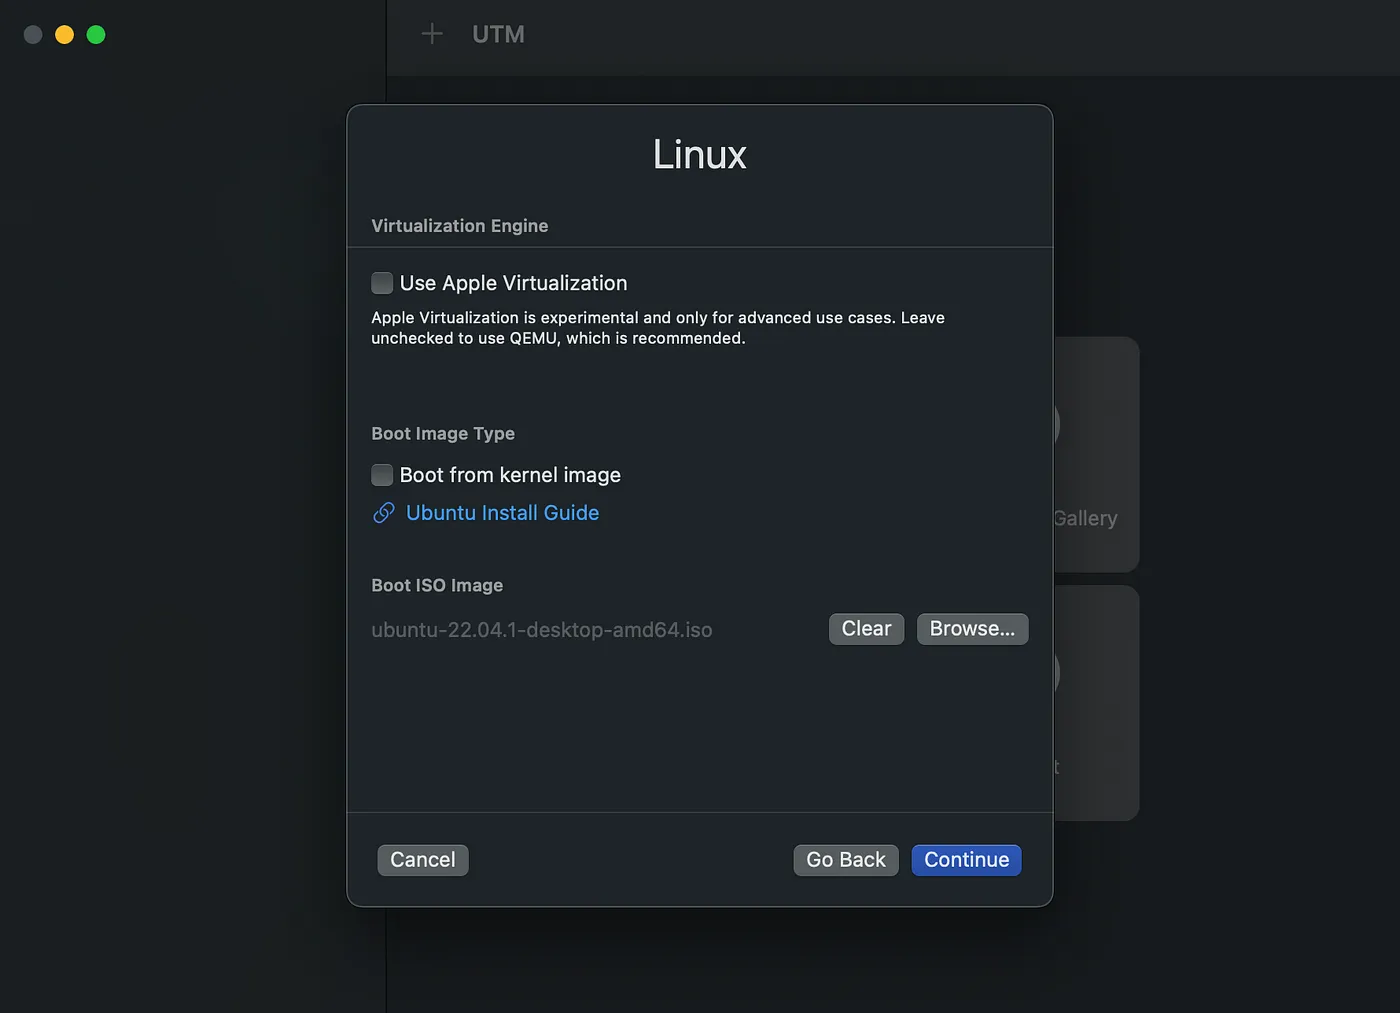
**Step 5:** Uncheck “Use Apple Virtualization” and “Boot from kernel image”. Click “Browse” and select the Ubuntu ISO file. Press “Continue” to continue.

<figure class="">
  <img src="/assets/img/blog/2023-01-04-utm-virtual-machines-for-mac-open-source/Select_Boot_ISO_Image.webp"
       alt="Select Boot ISO Image"><figcaption>
      Select Boot ISO Image (Screenshot by authors)

    </figcaption></figure>


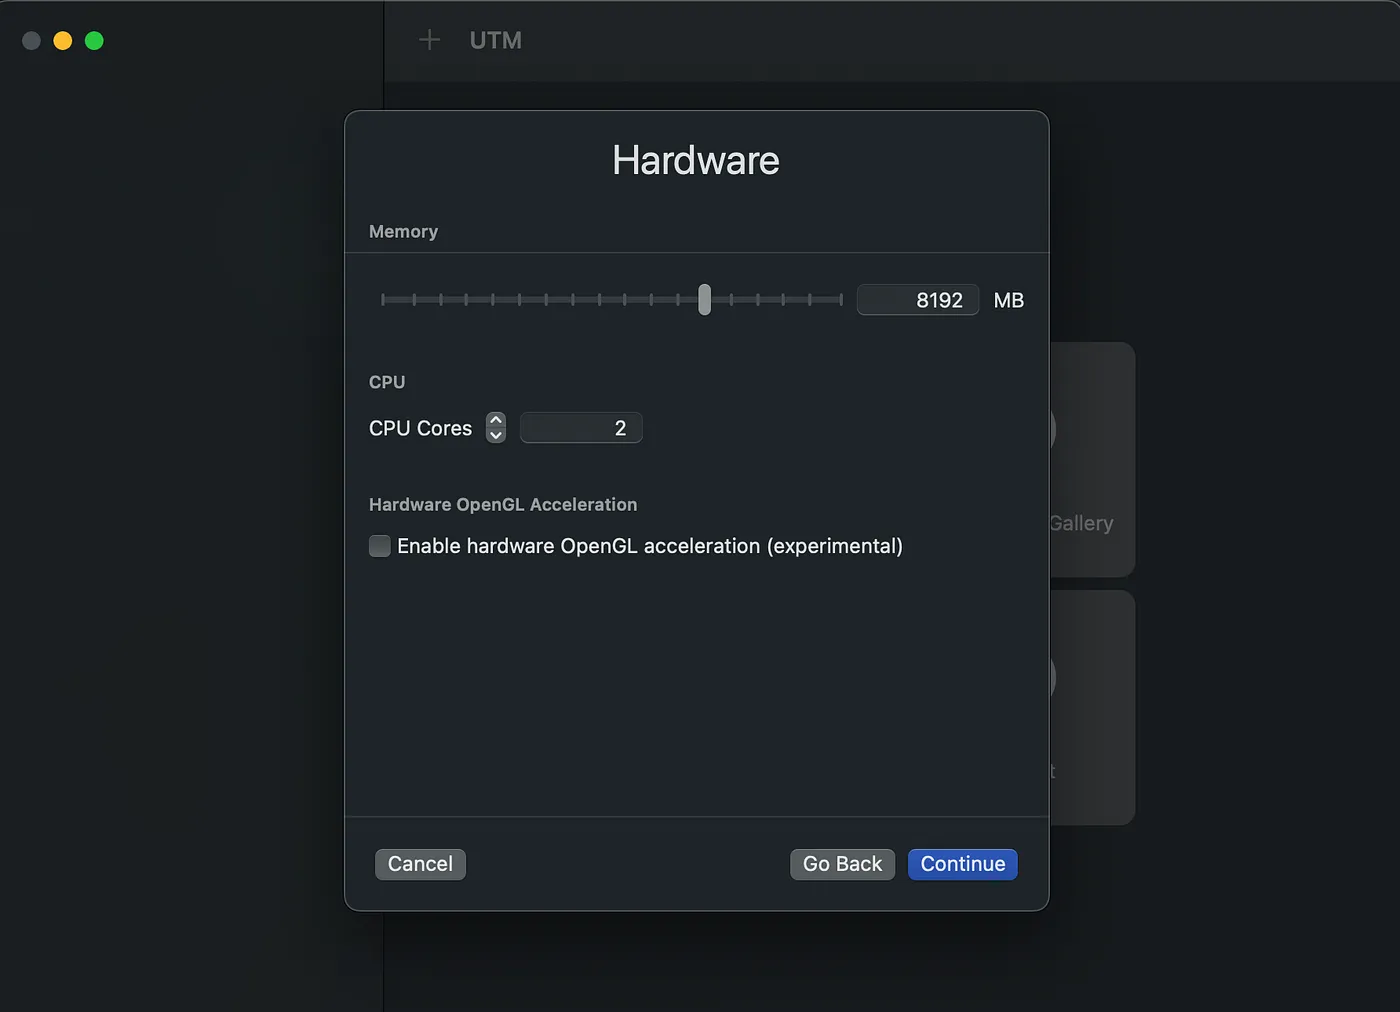
**Step 6:** Select the hardware requirements as follows:

<figure class="">
  <img src="/assets/img/blog/2023-01-04-utm-virtual-machines-for-mac-open-source/configuration_of_the_hardware.webp"
       alt="Configuration of the hardware"><figcaption>
      Configuration of the hardware (Screenshot by authors)

    </figcaption></figure>


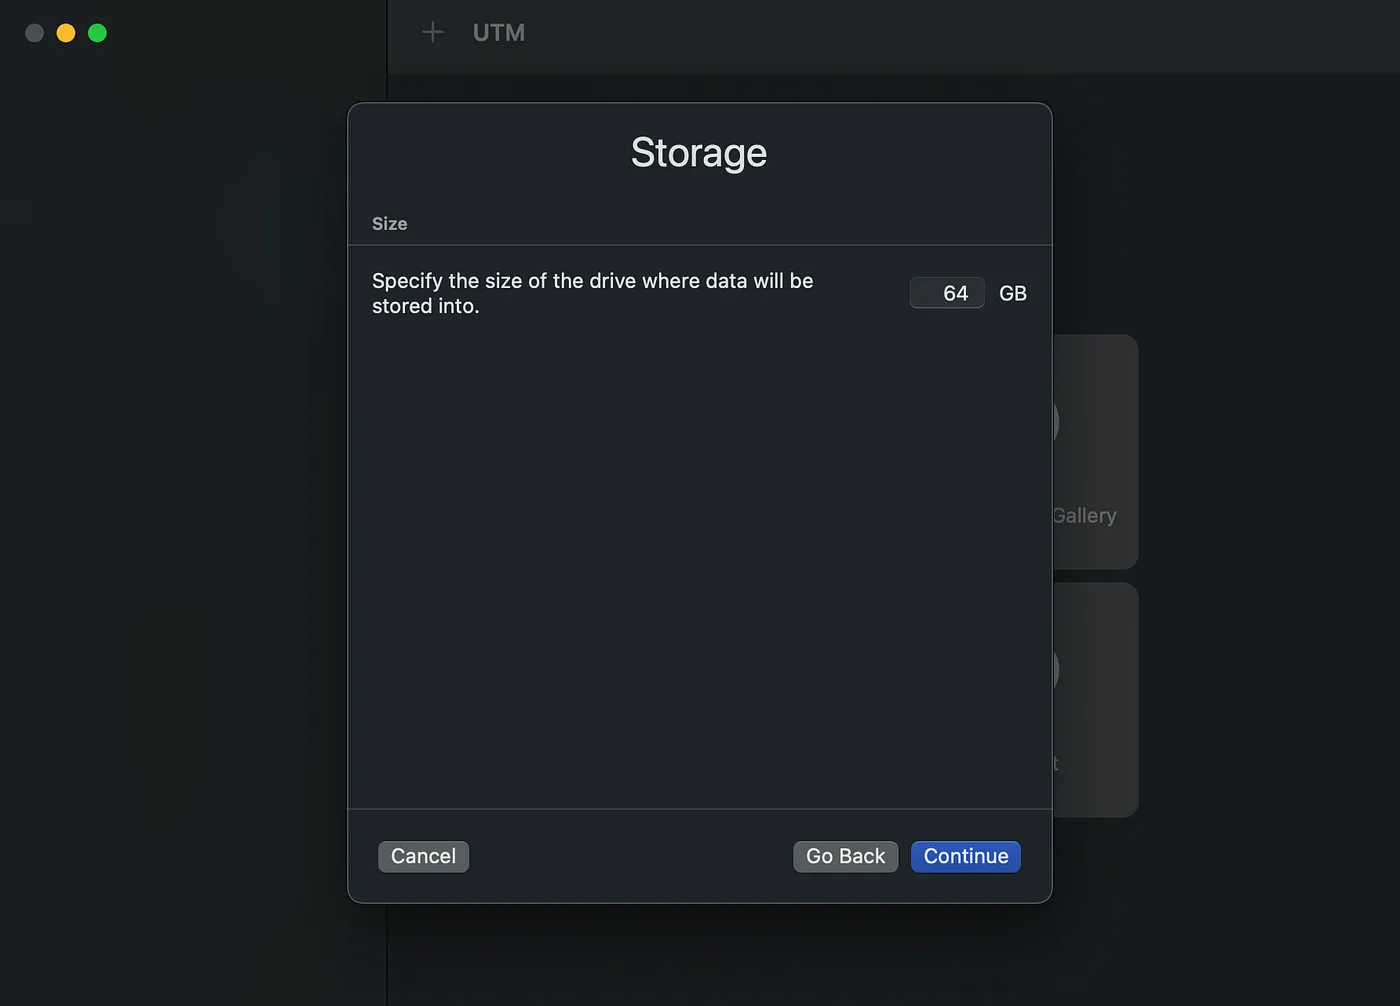
Press “Continue” and select the size of the drive. We recommend selecting at least 32 GB.

<figure class="">
  <img src="/assets/img/blog/2023-01-04-utm-virtual-machines-for-mac-open-source/storage.webp"
       alt="Storage"><figcaption>
      Storage (Screenshot by authors)

    </figcaption></figure>


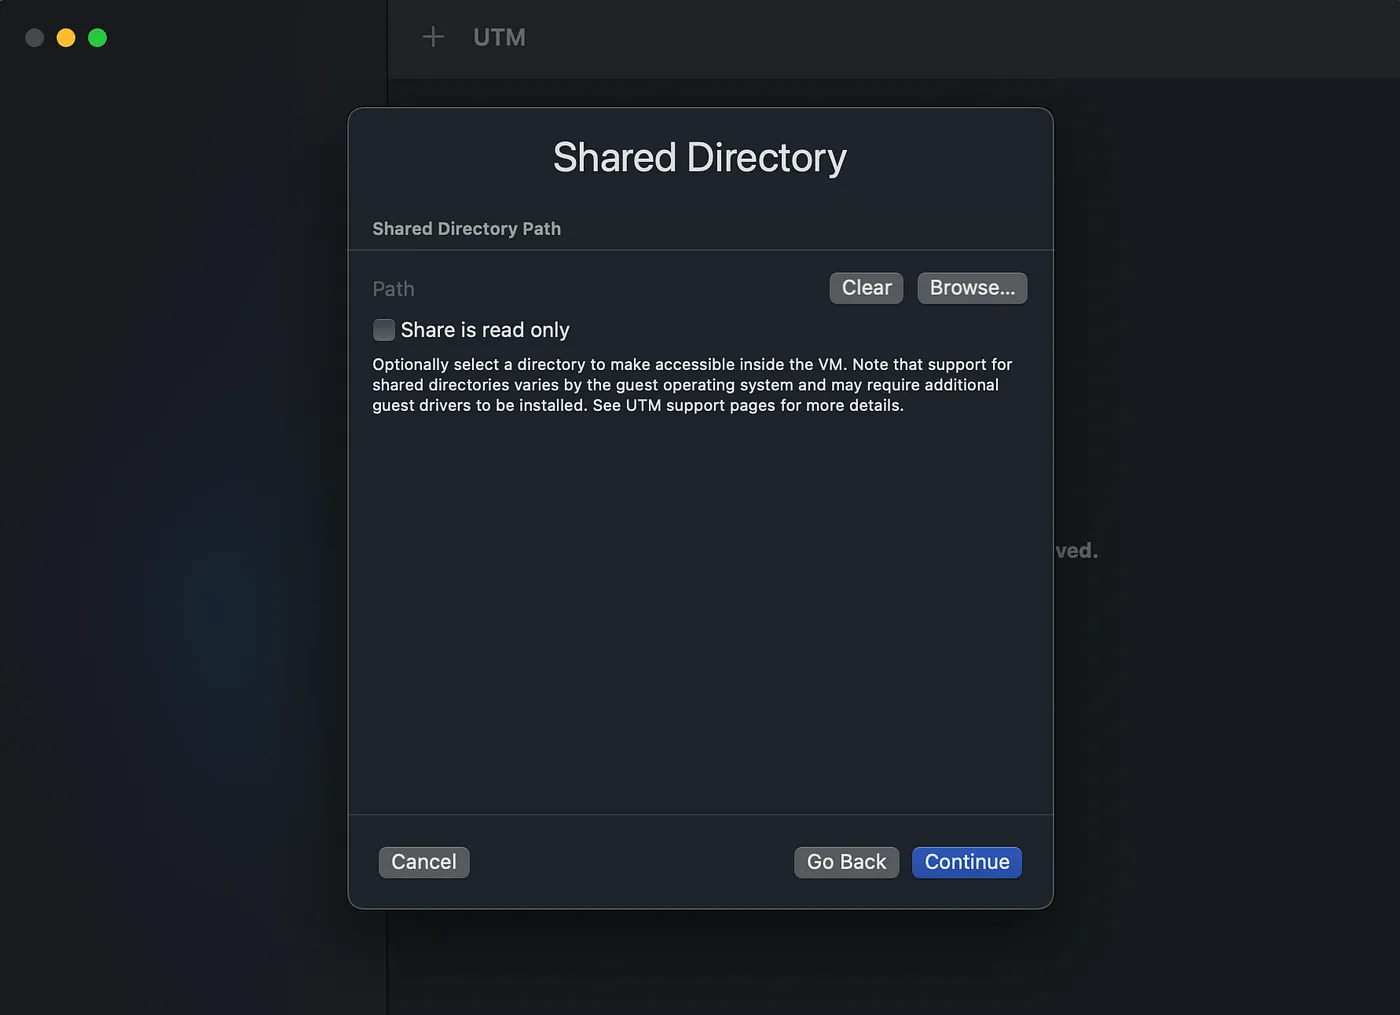
**Step 7:** Press “Continue” and then you can activate Shared Directory.

<figure class="">
  <img src="/assets/img/blog/2023-01-04-utm-virtual-machines-for-mac-open-source/Choose_Shared_Directory.webp"
       alt="Choose Shared Directory"><figcaption>
      Choose Shared Directory (Screenshot by authors)

    </figcaption></figure>


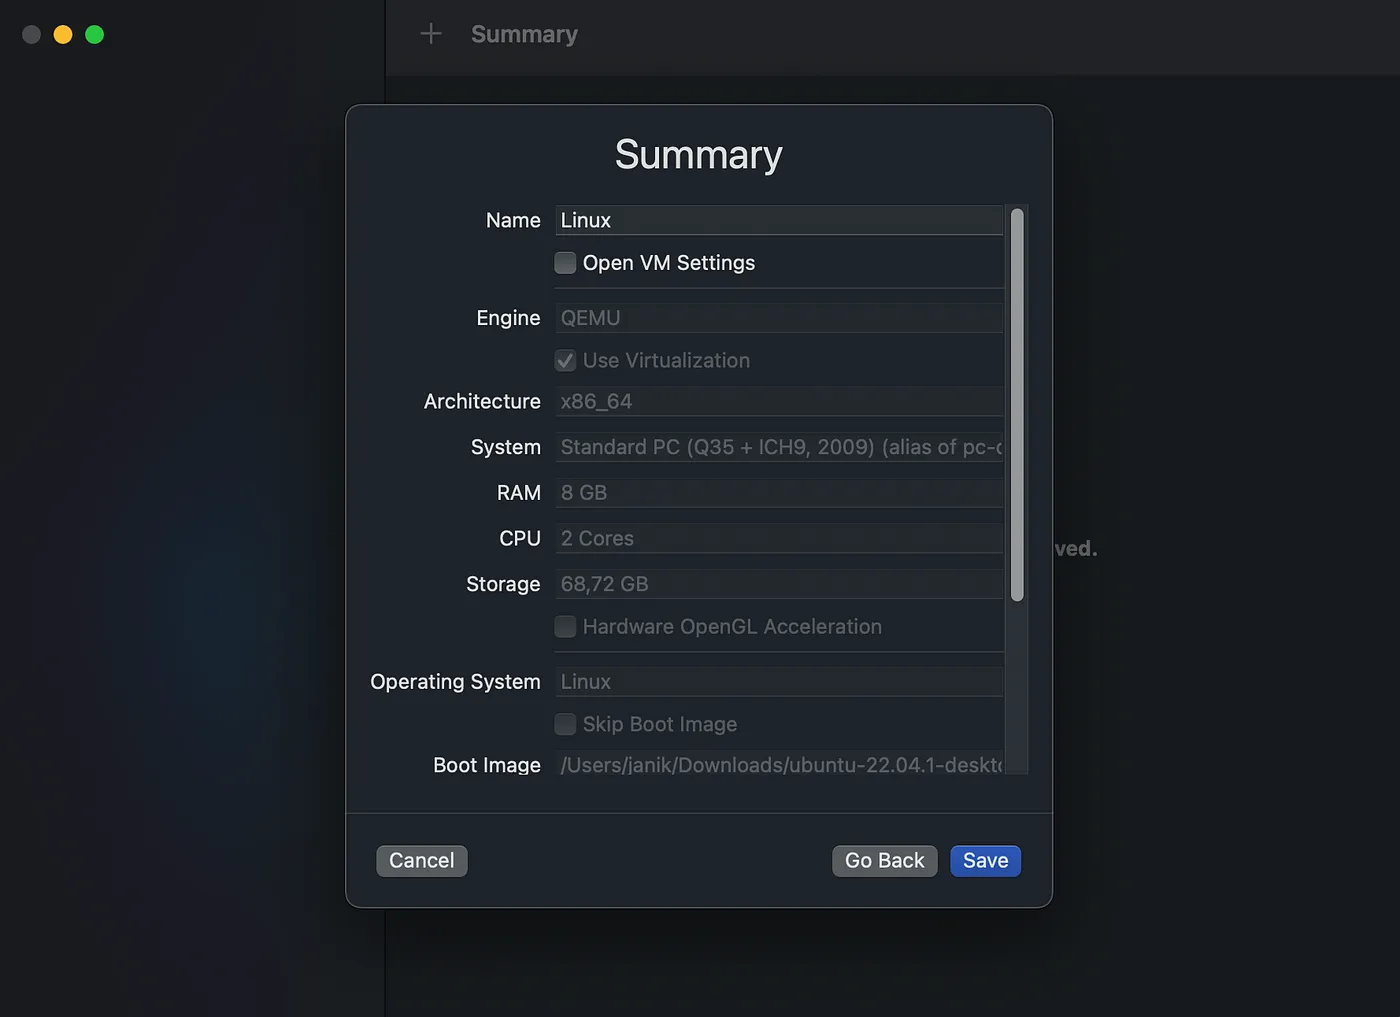
You can select a shared folder between the host and the guest system. Then press “Save”.

<figure class="">
  <img src="/assets/img/blog/2023-01-04-utm-virtual-machines-for-mac-open-source/summary.webp"
       alt="Summary"><figcaption>
      Summary (Screenshot by authors)

    </figcaption></figure>


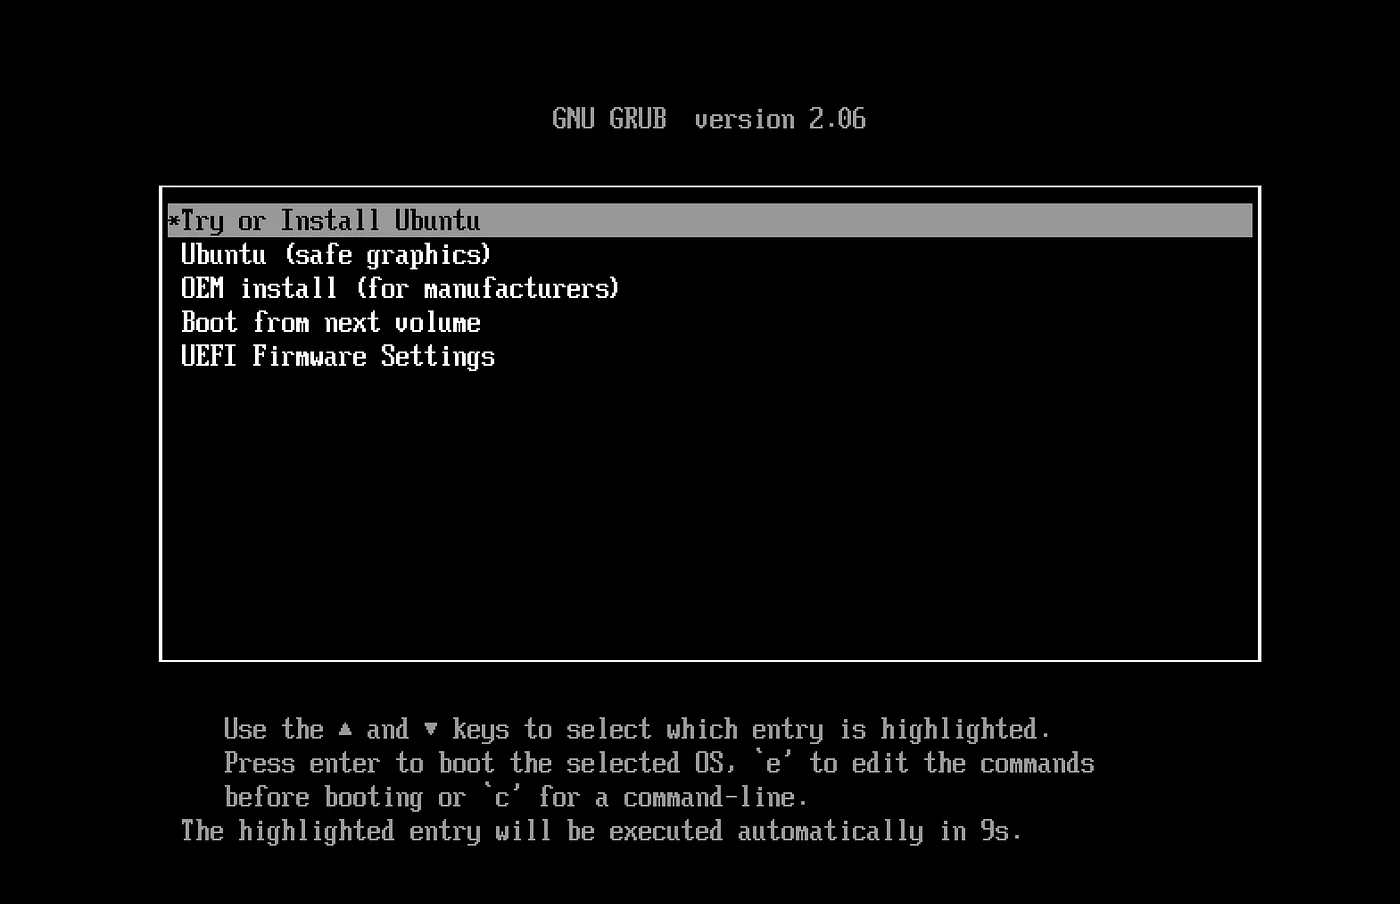
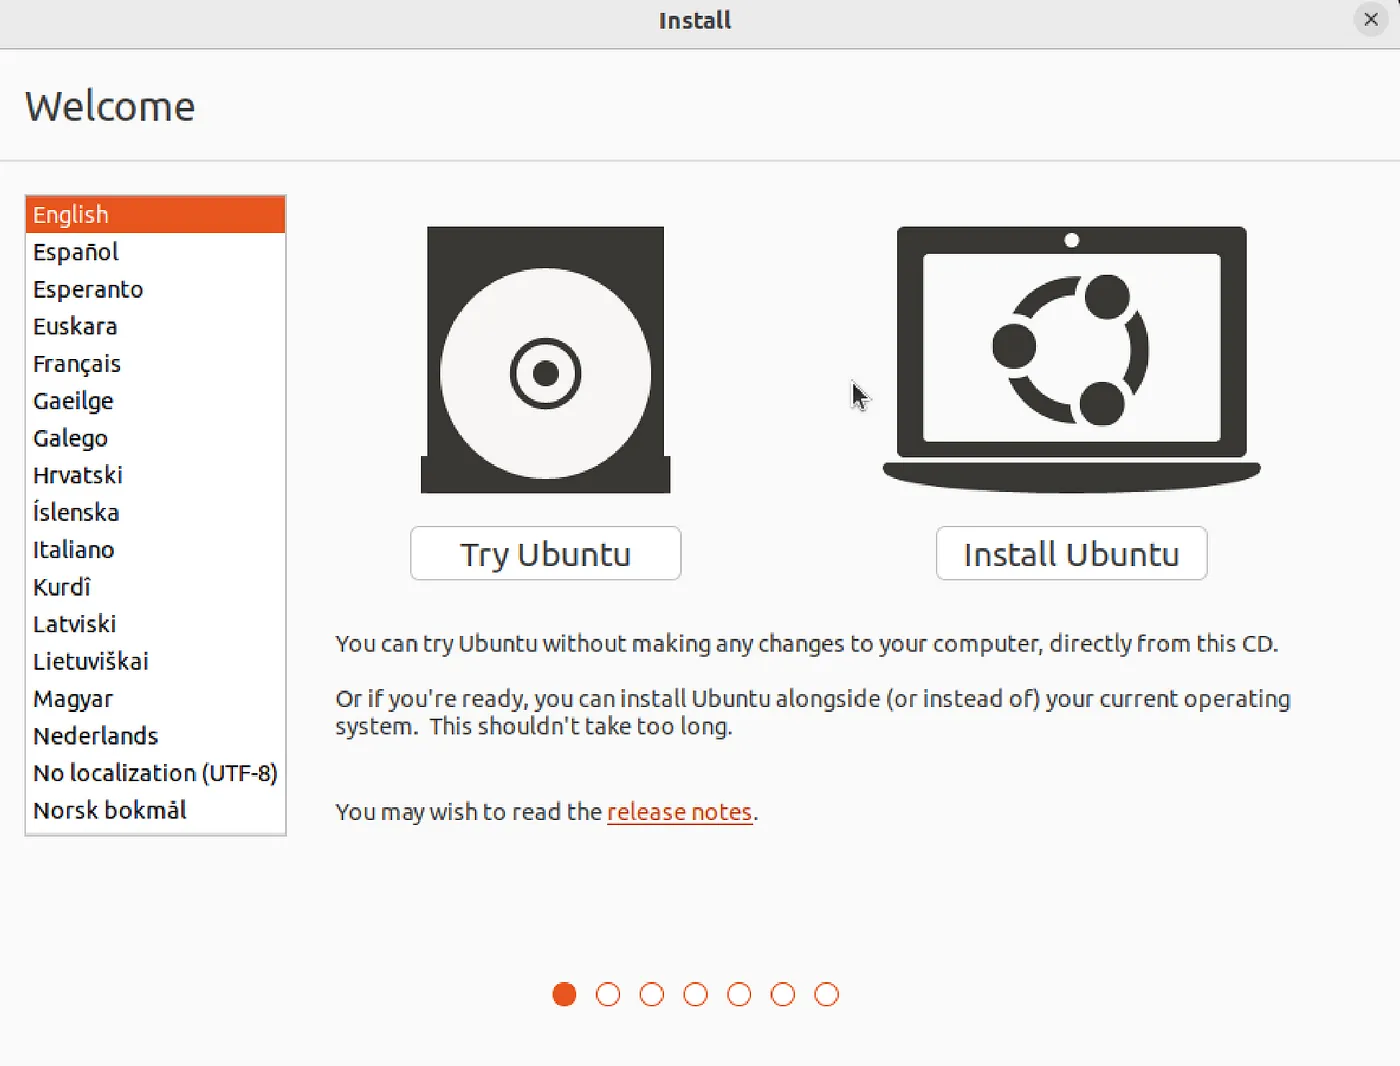
**Step 8:** Press the “Run” button to start the VM. Confirm “Try or Install Ubuntu” with Enter.

<figure class="">
  <img src="/assets/img/blog/2023-01-04-utm-virtual-machines-for-mac-open-source/Choose_Try_or_Install_Ubuntu.webp"
       alt="Choose Try or Install Ubuntu"><figcaption>
      Choose Try or Install Ubuntu (Screenshot by authors)

    </figcaption></figure>


Choose your language and click “Install Ubuntu”.

<figure class="">
  <img src="/assets/img/blog/2023-01-04-utm-virtual-machines-for-mac-open-source/Choose_language_and_Install_Ubuntu.webp"
       alt="Choose language and Install Ubuntu"><figcaption>
      Choose language and Install Ubuntu (Screenshot by authors)

    </figcaption></figure>


Then go through the Ubuntu installer.

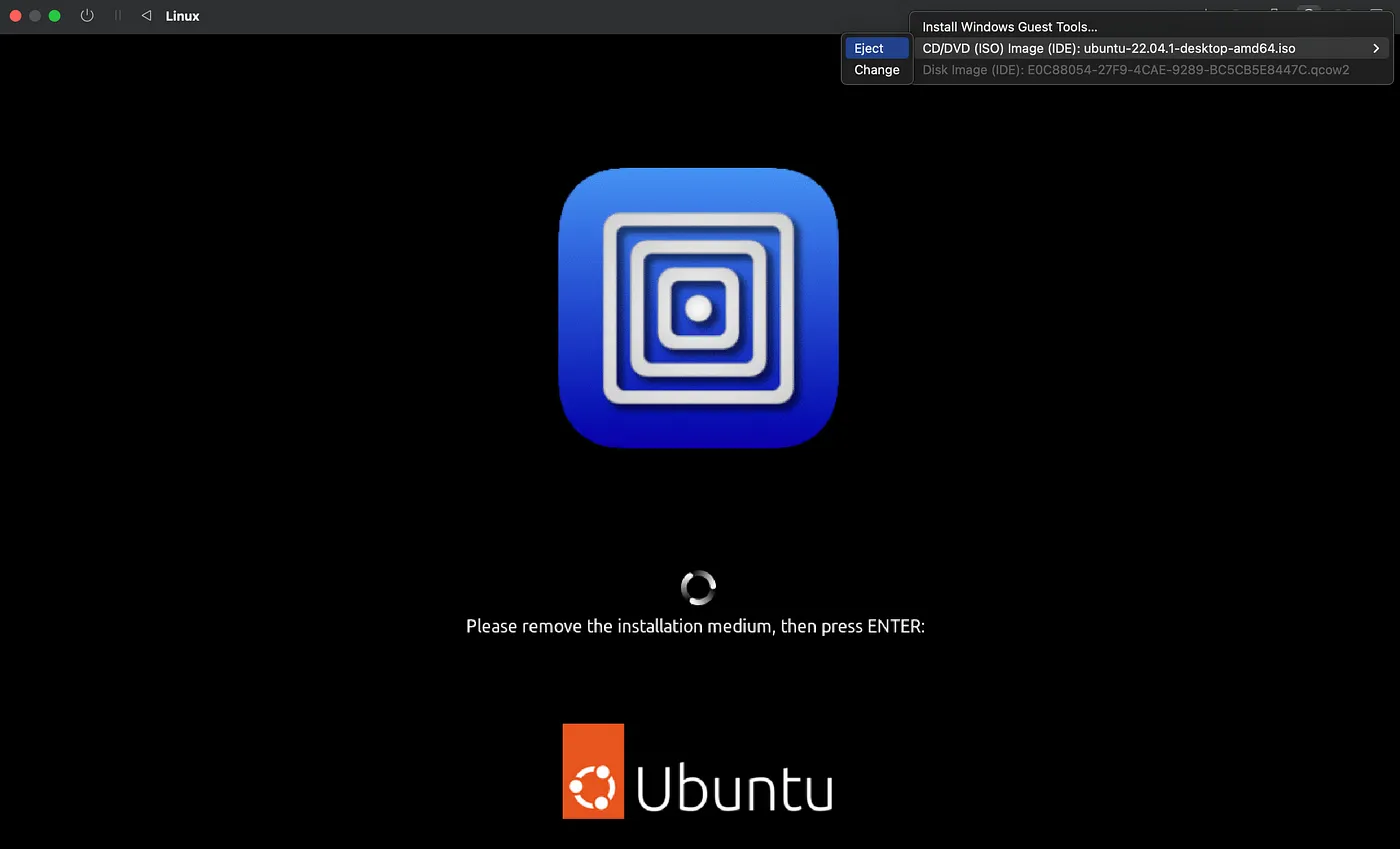
**Step 9:** After the installation, you must eject the installer ISO and press enter.

<figure class="">
  <img src="/assets/img/blog/2023-01-04-utm-virtual-machines-for-mac-open-source/Eject_ISO_Image.webp"
       alt="Eject ISO Image"><figcaption>
      Eject ISO Image (Screenshot by authors)

    </figcaption></figure>


That’s all. Enjoy Ubuntu 22.04 on your Mac.

## Conclusion
In this article, we have introduced UTM. UTM enables the virtualization and emulation of operating systems as a guest system. The emulation of other processor architectures is very impressive. We also showed how to install Ubuntu 22.04 in UTM.

<div class="ad-banner">
  <hr>
  💡 Do you enjoy our content and want to read super-detailed guides about AI Engineering? If so, be sure to check out our premium offer!

  <div style="text-align: center; margin-top: 0.7rem;">
    <a href="https://steady.page/en/tinztwins-hub/about" class="btn btn--primary">Unlock Premium</a>      
  </div>
</div>

<div class="ad-banner">
    <hr class="hr-text" data-content="Our Merch Shop">
    <a href="https://shop.tinztwinshub.com/merch/"><img src="../../assets/img/ads/ai_and_coding_merch.webp" alt="AI and Coding Merch" nopin="nopin"></a>
    <small style="display: block; margin-bottom: 0.5rem; margin-top: 0.5rem;"><strong>✨ Read without banner ads? </strong><a href="https://steady.page/en/tinztwins-hub/about" target="_blank" rel="noopener">Become a member</a> or <a href="https://steady.page/en/log_in?publication=tinztwins-hub" target="_blank" rel="noopener">log in</a></small>
</div>